


© Copyright, Alliance Laundry Systems LLC – DO NOT COPY or TRANSMIT
17
801562
Maintenance
Lubrication
All moving parts are sealed in a permanent supply of
lubricant or are equipped with oilless bearings.
Additional lubrication will not be necessary.
Cold Weather Care
If the washer is delivered on a cold day (below
freezing), or is stored in an unheated room or area
during the cold months, do not attempt to operate it
until the washer has had a chance to warm up.
Vacations and Extended Non-Use
IMPORTANT: To avoid possible property damage
due to flooding, turn off the water supply to the
washer whenever there will be an extended period
of non-use.
Care of Your Washer
Use only a damp or sudsy cloth for cleaning the
control panel. Some cleaning product sprays may
harm the finish on the control panel or damage the
interior of the hood.
Wipe the washer cabinet as needed. If detergent,
bleach or other washing products are spilled on the
cabinet, wipe immediately. Some products will cause
permanent damage if spilled on the cabinet.
Do not use scouring pads or abrasive cleansers.
The wash drum and window will need no particular
care although they may need rinsing or wiping after an
unusual load has been washed. Outside of window can
be cleaned with household window cleaner.
Replacing Hoses
Hoses and other natural rubber parts deteriorate after
extended use. Hoses may develop cracks, blisters or
material wear from the temperature and constant high
pressure they are subjected to.
All hoses should be checked on a yearly basis for any
visible signs of deterioration. Any hose showing the
signs of deterioration listed above should be replaced
immediately. All hoses should be replaced every five
years.
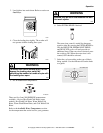
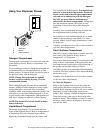
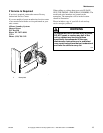
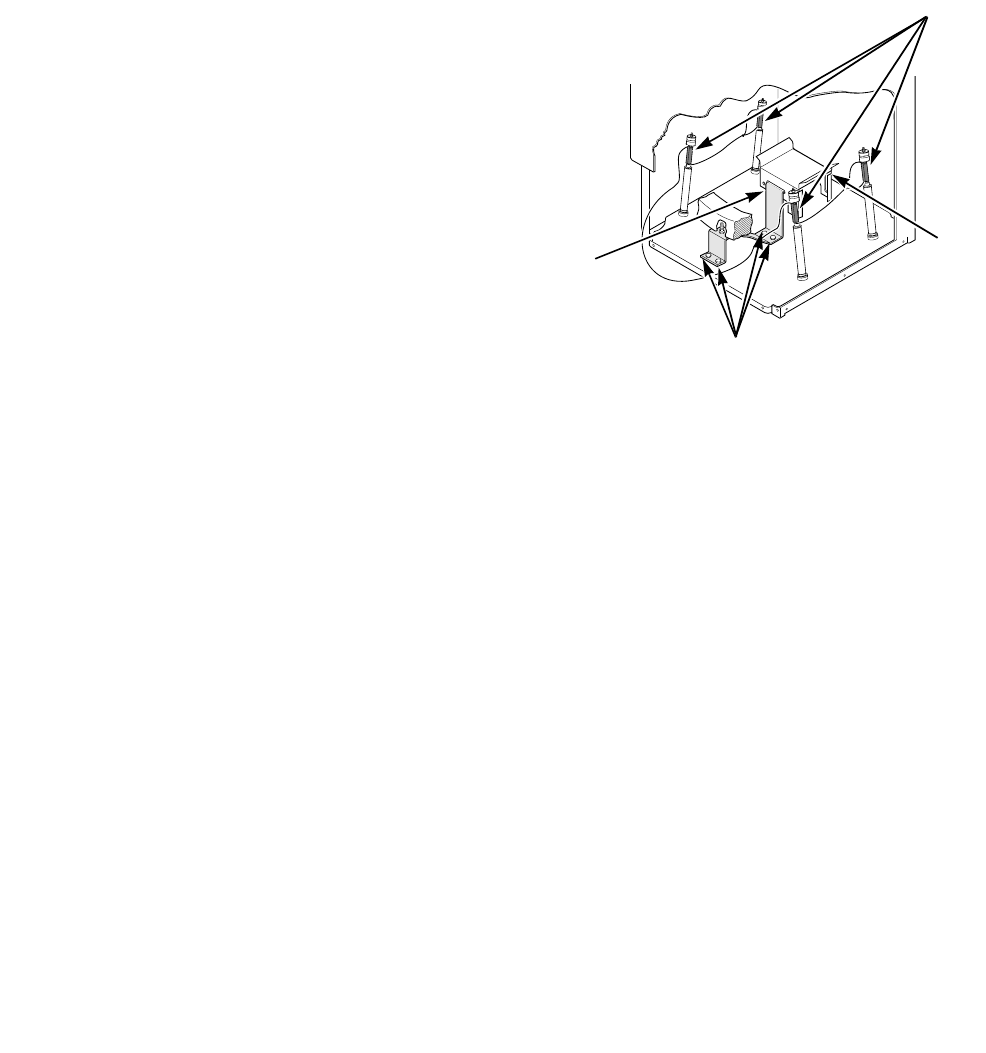
Reinstallation of Shipping Materials
Remove front access panel by removing two screws.
Place the shock sleeves on all four shock absorbers.
Refer to illustration below.
Insert hooked end of shipping brace into the open slot
of the motor mount. Attach with bolts and washers.
Refer to illustration below.
Reinstall front access panel.
Refer to the INSTALLATION INSTRUCTIONS for
proper procedures whenever the washer is moved.
H336I
1 Shock Sleeves
2 Motor Mount
3 Bolts and Lockwashers
4 Hooked End of Shipping Brace
2
1
4
3