


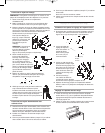

2. Attach hose to bottom inlet valve opening first.
3. Attach second hose to top inlet. Tighten couplings
b
y hand; then use pliers to make an additional
two-thirds turn.
NOTE: Inlet valve threads are plastic. Do not strip
or cross-thread.
Connect the drain hose
NOTE: Slide washer onto cardboard or hardboard before
moving across floor.
1. Move washer close to final position.
2. Put “hook” end of drain hose into laundry tub or standpipe.
3. Estimate the length of drain hose needed when washer is in
final position. Hose must be cut exactly to length so “hook”
end is held tightly over edge of standpipe.
If drain hose is too long,
cut straight end of hose.
(Do not cut the “hook”
shaped end of the drain
hose.)
NOTE: Do not force
excess length of drain
hose down the
standpipe. This could
cause siphoning.
4. Place the hose clamp
over the washer drain
connector. Push the
drain hose onto the
washer connector. Use
pliers to open clamp and
slide clamp over drain
hose. Check for good fit.
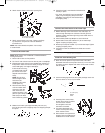
5. Measure and mark a point approximately 406 mm (16")
from the plug end of the shipping strap. Cut shipping strap at
this point.
7
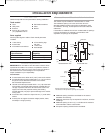
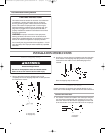
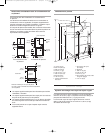
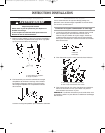
A
B
A. Cold water inlet valve
B. Hot water inlet valve
406 mm (16")
6. Check that hose is not twisted or kinked and is
securely in place.
Put “hook” end of drain hose into standpipe.
Tightly wrap the shipping strap around the
s
tandpipe. Push plug into the nearest hole in
the shipping strap.
Connect the inlet hoses to the water taps
1. Before attaching water inlet hoses to the water taps, run
water through both taps into a bucket. This will get rid of
p
articles in water lines that might clog hoses. Mark which is
the hot water tap.
2. Install a black plastic tap adapter on each inlet hose.
3. Attach bottom hose (inlet marked “H”) to hot water taps.
Tighten coupling to taps by hand.
4. Attach top hose (inlet marked “C”) to cold water taps. Tighten
coupling to taps by hand.
5. Use pliers to make an additional two-thirds turn to each
coupling.
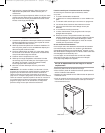
Level the Washer
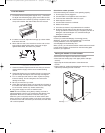
Install the front leveling feet
1. Stack two corner posts on top of each other. Tilt washer
backward and insert corner posts 76 mm (3") in from one side
of washer as shown. Repeat with other corner posts on other
side of washer.
2. Use the leveling legs and nuts from parts package. Screw nut
down to within 13 mm (1/2") from base.
3. Insert legs into correct holes
at each front corner of washer
until nuts touch washer.
Do not tighten nuts until
the washer is leveled.
4. Tilt washer backward and
remove corner posts. Gently
lower washer to floor.
5. Move washer to its permanent
location. Remove cardboard or
hardboard from under washer.
A
B
C
A. 13 mm (1/2")
B. Base
C. Nut
W10135309B v07.qxd:YC70811_W10135283A-En Fr 4/28/10 4:02 PM Page 7