


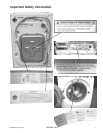

Troubleshooting Procedures
!
WARNING
To avoid risk of electrical shock, personal injury or death, disconnect power to unit before servicing, unless testing
requires power.
10 16025909 Rev. 0 ©2005 Maytag Services
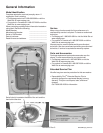
Place washer into Service Mode and check for diagnostic codes. See Technical Data Sheet taped to rear
panel.
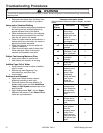
Will Not Start
•
Plug cord into live electrical outlet. Check for
proper voltage.
• Check fuse or reset circuit breaker.
•
Push any key to turn on the clothes washer.
Push the rotary selector knob to start the
washer.
• Close door and push the rotary selector knob
to start the clothes washer.
• Check to see if the washer is in a pause or
soak period in the cycle. Wait briefly for
machine to start. (If washer is in suds period,
“SUDs” will display instead of remaining time.
•
Check for restricted drain system. During an
electrical drain problem, “nd” error will occur
after 15 minutes.
•
Check water supply is working.
• Check water valve connections are good.
• Check the line filter and water valve filter.
•
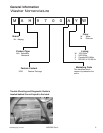
Check the machine control board terminal
connections CN5, CN6 for good connections.
• Replace console control board
.
Leaking
• Check dispenser hose to outer tub for
obstructions or restrictions.
• Make sure inlet hose connections are not
leaking. Check for rubber gasket damage due
to over-tightening of faucet couplers.
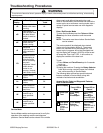
• Check standpipe for leak. Wrap a dry rag
around the standpipe opening. If rag becomes
wet, leak is fault of home plumbing. Be sure
the standpipe is capable of accepting the
incoming flow of water from the washer.
• Make sure end of drain hose is correctly
inserted and secured to drain standpipe.
• Check internal hose connections (fill, drain
systems, dispenser hoses & clamps).
• Check rubber boot. Remove, reposition and
reinstall, if necessary.
• Check for possible kinked dispenser to outer
tub hose. Hot water pressurization may force
door open.
No Tumble
•
Start normal cycle with an empty machine and
allow a fill to check tumble.
• Perform
Board Output Test
, or Quick Spin
Test (Before test, make sure that the tumbler
is empty.)
• Check for loose connections at Machine
Control Board, Pressure Switch, Motor, Tach
Harness and Motor Control. (Refer to the
component testing procedure)
• Check motor windings resistance.
CN9 pins 1 & 3 = 11.6ohms ±7%,
Pins 1 & 2 = 11.6ohms ±7%,
Pins 2 & 3 = 11.6 ohms ±7%
• Faulty Main Control Board.
• Faulty motor.
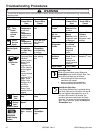
Will Not Spin
• Check to make sure the door is fully closed.
• Check for water left inside the washer. If
present, see Will Not Drain.
• Perform
Board Output Test
or
Quick Spin
Test
. (Before test, make sure that the tumbler
is empty.) If it doesn’t tumble after the test
above, check unbalanced load scenario, Main
Control Board, and motor.
• Check for loose connections at Machine
Control Board, Pressure Switch, Motor, Tach
Harness and Motor Control. (CN8, CN9, CN3)
Refer to the component testing procedure.
• Check motor winding resistance
CN9 pins 1 & 3=11.6ohms ±7%,
Pins 1 & 2=11.6ohms ±7%,
Pins 2 & 3=11.6ohms. ±7%.
No Water Fill
• Test water fill. Perform
Board Output Test
.
• Check to make sure water supply is turned on
fully.
• Check electrical circuit and connections at the
Water Valve, and Pressure Switch.
• Check for kinks in inlet hoses.
• Check for clogged inlet screens.
• Visually check hot, cold, bleach and softener
water valves separately for fill.
•
Check for low water pressure. May be
dependent on pressure entering home.
Variations may occur due to usage in the
home at the time machine is used.
•
Check for frozen pipes and hoses.
• Check resistance of Water Valve coils.
(Normal 1.18Kohms; Check resistance of
water valve coils. Check Pin #1 of CN5 and
Pin # 1,2,3,4 of CN10.
• Check for loose connections at the Pressure
Switch or on the Machine Control Board,
CN3. (Refer to the component Testing
procedure).
Tub Full of Suds
• Check for restricted drain system. See Will
Not Drain and Will Not Spin.
•
Check for loose wire connections at Control