8
Safety Instructions
Installation Instructions
Operating Instruction
Troubleshooting Tips
Customer Service
2
3
4
5
1
INSTALLING THE DRYER
Step 3 : Connect Gas Supply Pipe
(Gas Dryer ONLY)
For further assistance, refer to section on Gas
Requirements.
1. Make certain your dryer is equipped for use with the
type of gas in your laundry room. Dryer is equipped at
the factory for Natural Gas with a 3/8” N.P.T. gas
connection.
2. Remove the shipping cap from the gas connection at
the rear of the dryer. Make sure you do not damage the
pipe thread when removing the cap.
3. Connect to gas supply pipe using a new flexible
stainless steel connector.
4. Tighten all connections securely. Turn on gas and
check all pipe connections (internal & external) for
gas leaks with a non-corrosive leak detection fluid.
5. For L.P. (Liquefied Petroleum) gas connection, refer
to section on Gas Requirements.
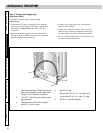
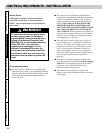
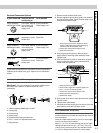
1 New Stainless Steel Flexible Connector -
Use only if allowed by local codes (Use
Design A.G.A. Certified Connector)
2 1/8” N.P.T. Pipe Plug (for checking inlet
gas pressure)
3 Equipment Shut-Off Valve-Installed
within 6’ (1.8 m) of dryer
4 Black Iron Pipe
Shorter than 20’ (6.1 m) - Use 3/8” pipe
Longer than 20’ (6.1 m) - Use 1/2” pipe
5 3/8” N.P.T. Gas Connection


