


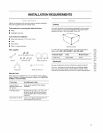

iNSTALLATiON iNSTRUCTiONS
Before Connect the inlet hoses to water faucets, Check to
ensure a washer is inside coupling.
IMPORTANT: Position the washer so that the rear of the unit is
within approximately 3 ft (90 cm) of its final location.
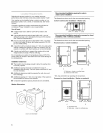
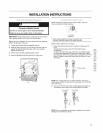
Before using your Washer, you must remove the four shipping
bolts from the back of the unit.
1. Loosen all the bolts with the supplied wrench.
2. Slide the bolt and spacer up and remove the bolt with the
spacer through the hole in the rear wall of your washer.
Repeat for each bolt.
.3. Fill the holes with the supplied plastic covers.
4. Keep the shipping bolts and spacers for future use.
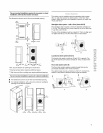
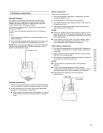
A B
A. Coupling
B. Washer
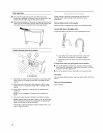
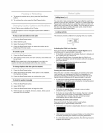
Connect the inlet hoses to the water faucets
Make sure the washer drum is empty.
1. Check the inlet hose to ensure a washer is inside each fill
hose.
Thread the inlet hoses to the HOT and COLD faucet
connections.
On the other end of the hose, check for one rubber washer
per hose and install each fill hose to the water valve. Make
sure the hose with the Hot printed line is attached to the HOT
faucet. Tighten by hand until snug, then two-thirds of a turn
with pliers.
Cold Hot
_ Rubber washer
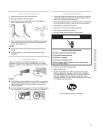
NOTE: For correct water use, connect both HOT and COLD
water valves. If either or both are not connected, an "nF" (no fill)
error can occur.
2. Turn on the "HOT" and "COLD "water supply and check all
connections at the water valve and the faucet for leaks.
Cold printed Hot printed
NOTE: Do not overtighten or use tape or sealants on the valve.
Damage to the valves can result.
9