


g=
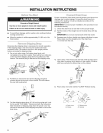
After the washer is in the final location and level, use a
%6" (14 mm) open-end wrench to turn the nuts on the feet
tightly against the washer cabinet.
IMPORTANT: If the nuts are not tight against the washer
cabinet, the washer may vibrate.
f. Check the electrical requirements. Be sure that you have the
correct electrical supply and the recommended grounding
method. See "Electrical Requirements."
2. Check that all parts are now installed. If there is an extra part,
go back through the steps to see which step was skipped.
3. Check that you have all of your tools.
4. Check that the yellow shipping strap was removed from the
back of the washer and used to secure the drain hose.
5. Dispose of/recycle all packaging materials.
6. Check that the water faucets are on.
7. Check for leaks around faucets and inlet hoses.
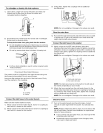
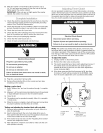
Electrical Shock Hazard
Plug into a grounded 3 prong outlet.
Do not remove ground prong.
Do not use an adapter.
Do not use an extension cord,
Failure to foimow these instructions can result in death,
fire, or electrical shock.
8. Plug into a grounded 3 prong outlet.
9. Remove the protective film on the console and any tape
remaining on the washer.
Making a cycle check
1. Read "Washer Use" and run the washer through 1 complete
cycle.
2. Measure 1/2of the normal recommended amount of powdered
or liquid detergent and pour it into the washer basket.
3. CIosethe lid.
4. The washer may be operated manually. Allow it to complete
1 whole cycle.
5. When the cycle is complete, check all hoses and connections
for proper operation and that they do not leak.
Testing and adjusting for standard start with coin slide
1. Advance timer manually to spin portion of cycle. Allow it to
shut off electrically.
2. Insert coin(s) and push the coin chute slide all the way in.
(Now pull the slide all the way out.) The appliance should start
on the return stroke of the coin chute slide.
3. If the washer does not start, see the "Adjusting Timer Clutch"
section and readjust the clutch.
4. After adjustment, retest the coin slide to make sure the coin
slide operates correctly.
All coin operated models have a timer that provides a 9-minute
wash in the Normal Cycle. To check the cycle, push the coin slide
all the way in and pull all the way out. Note the wash cycle time. If
the washer does not start or does not provide the proper wash
time, the clutch assembly may need adjustment.
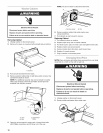
Electrical Shock Hazard
Disconnect power before servicing.
Replace all parts and panels before operating.
Failure to do so can result in death or electrical shock.
NOTE: The washer was tested at the factory. Some time may
have been left so that the washer will start to operate before the
coin slide is operated. If this happens, take off the access panel
from the top of the meter case and set the clutch to OFF position
by hand. Then proceed with timer clutch check.
To adjust the clutch:
1. Unplug washer or disconnect power.
2. Remove the meter case access panel.
3. The clutch assembly has a timer clutch adjustment screw. If
the washer does not start after the coin slide has been
pushed all the way in and out, turn the clutch adjustment
screw clockwise (right).
4. If the timer goes past the third increment of fill, less than
9 minutes of wash will be provided in the NORMAL Cycle.
Turn the clutch adjustment screw counterclockwise (left).
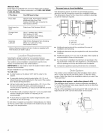
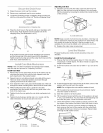
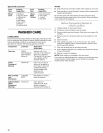
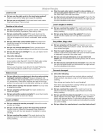
B C
\
\
A. Timer front D. Rotate
B. Start counterclockwise
C. Off E. Timer clutch
adjustment screw