


6. Tightentheboltusingaratchetanda5/16-in.socketuntilthe Tiltthewasherbackandremovethewoodblock.Gently
slidemechanismissecureanddoesnotmove. lowerthewashertothefloor.
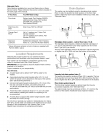
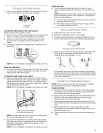
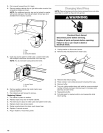
1 Coin Box 3 Access
2 Coin Slide 4 Meter Case
Adjusting Coin Box
1. Insert the coin box into the meter case from the front. The
tight fit of the coin box is set at the factory. You can loosen
the fit as desired by loosening the slotted rods inside the front
of the coin box.
2
! & 2 Slotted Rods
NOTE: Keep a record of all coin box key numbers. A lost key can
only be replaced if ordered by key number from Sears Parts. The
key number is located on the key. If the key number is not
available, the lock must be drilled out to remove the coin box.
2. Replace the meter case access panel.
Properly leveling your washer prevents excessive noise and
vibration.
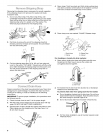
Install the front leveling feet
1. Prop up the front of the washer about 4 in. (10.2 cm) with a
wood block or similar object. The block needs to support the
weight of the washer.
2. Screw the lock nut onto each foot to within 1 in. (2.5 cm) of
the base.
(2.5 cm)
3. Screw the feet into the correct holes at the front corner of the
washer until the nuts touch the washer.
NOTE: Do not tighten the nuts until the washer is level.
4.
5.
6.
7.
8.
Slide to final location.
Tilt the washer forward until the rear of the washer is at least
4 in. (10.2 cm) off the floor. You may hear the self-adjusting
rear feet click into place. Lower the washer to the floor.
Check the levelness of the washer by placing a level on the
top edges of the washer, first side-to-side, then front-to-
back.
If the washer is not level, move the washer out slightly, tip
back, prop up the front of the washer with the wood block
and adjust the feet up or down as necessary. Repeat steps
5 through 8 until washer is level.
9. After the washer is in the final location and level, use a %e in.
(14 mm) open-end wrench to turn the nuts on the feet tightly
against the washer cabinet.
If the nuts are not tight against the washer cabinet, the
washer may vibrate.
t.
2.
3.
4.
5.
6.
7.
Check the electrical requirements. Be sure that you have the
correct electrical supply and the recommended grounding
method. (See "Electrical Requirements.")
Check to be sure all parts are now installed. If there is an
extra part, go back through the steps to see which step was
skipped.
Check to be sure you have all of your tools.
Check to be sure that the yellow shipping strap was removed
from the back of the washer and used to secure the drain
hose.
Dispose/recycle all packaging materials.
Check to be sure the water faucets are on.
Check for leaks around faucets and inlet hoses.
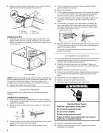
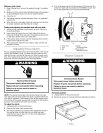
Electrical Shock Hazard
Plug into a grounded 3 prong outlet.
Do not remove ground prong.
Do not use an adapter.
Do not use an extension cord.
Failure to follow these instructions can result in
death, fire, or electrical shock.
8. Plug into a grounded 3 prong outlet.
9. Remove the protective film on the console and any tape
remaining on the washer.
8