


Installation
2
GB
! Keep this instruction booklet on hand in order to refer to
it when necessary. Take it with you when you move, and
should you sell this appliance or pass it on to another
party, make sure that this booklet is supplied along
with the dryer so that the new owner may be informed
about warnings and suggestions on how the dryer
works.
! Read these instructions carefully; the following
pages contain important information on installation
and suggestions on how the appliance works.
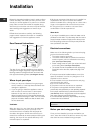
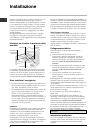
Door Reversal Instructions
The door of your dryer is reversible and can easily be
changed. Exchange diagonally hinge brackets and
blanking screws. Exchange door latch and catch with
their opposite blanking plates (see diagram above).
Where to put your dryer
●
Place your dryer at a distance from gas ranges,
stoves, heaters, or cook tops because flames can
damage the appliance.
●
If you are going to install the appliance under a
work counter, be sure to leave a 10mm space
between the top and any other objects on or
above the machine and a 15mm space between the
sides and lateral furnishings or walls. This is to ensure
proper air circulation. Make sure that the back vents
are not obstructed.
Ventilation
When the dryer is in use, there has to be adequate
ventilation. Make sure you put your dryer in an
environment that is not damp and has proper air
circulation throughout. Airflow around the dryer is
essential to condense the water produced during the
washing, the dryer will not operate efficiently in an
enclosed space or cupboard.
Door catch
Door latch
Hinge
Hinge
! We do not recommend that the dryer is installed in a
cupboard but the dryer must never be installed
behind a lockable door, a sliding door or a door with a
hinge on the opposite side to that of the dryer door.
! If using the dryer in a small or cold room some
condensation could be experienced.
Water drain
If your dryer is installed next to a drain the water can be
plumbed into this drain. This does away with the need to
empty the water container. Simply remove the top hose
from its top fitting at the rear of the dryer and plumb the
hose provided to the drain.
Electrical connections
Make sure of the following before you insert the plug
into the the electrical socket:
●
The socket must be grounded.
●
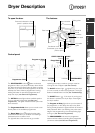
The socket must be able to sustain the machines
maximum power, which is indicated on the rating
label (see Dryer Description).
●
Power voltage must be within the values indicated
on the rating label (see Dryer Description).
●
The socket must be compatible with the dryers plug.
Should this not be the case, replace the plug or the
socket.
! The dryer must not be installed outdoors, even if the
space is sheltered. It can be very dangerous if it is
exposed to rain or storms.
! Once installed, the dryers electrical wire and plug
must be within easy reach.
! Do not use extension cords.
! The power cord must not be bent or squashed.
! The power cord supplied should be checked
periodically and replaced by a cord specially prepared
for this dryer and fitted only by authorised technicians
(see Service). New or longer power cords are supplied
at an extra charge by authorised dealers.
! The manufacturer denies any responsibility should any
of these rules not be followed.
! If in doubt about any of the above consult a qualified
electrician.
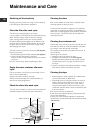
Before you start using your dryer
Once you have installed your dryer and before you
use it, clean the inside of the drum to remove any dust
that could have accumulated during transport.