


8 9
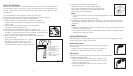
Using the Steamer
Always check fabric labels for recommendations before steaming. Test color fastness in
an inconspicuous spot. Some fabrics can be steamed better from the underside of the
material. Heavy fabrics may require repeated steaming. Never steam a garment while it
is being worn.
1. Do not operate the steamer without water in the water tank.
2. Be sure the steamer nozzle is placed on the hanger attachment (Figure 4).
3. Plug the steamer cord into a 120V AC electrical outlet.
4. Hang the garment to be steamed on the steamer’s collapsible
hanger. Attach the bottom of the garment to the low hanger clips
to keep it taut.
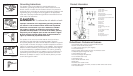
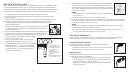
5. Press the foot press ON/OFF switch to the ON position.
The switch will illuminate (Figure 11).
6. A beep will sound indicating the steamer is ready for use.
7. After the beep sounds push the Steam on Demand button to turn on
the steam. The light glows green. Press the Steam on Demand button
to turn off the steam. The light turns off (Figure 12).
8. Once continuous steam emits from the steam nozzle, adjust the
pressurized steam
settings to the desired intensity. The + button
increases the steam intensity. The – button
decreases the steam intensity (Figure 12).
The default steam intensity is medium setting 4.
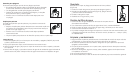
9. Lightly press the steam nozzle against the
garment and steam in a vertical motion starting
from the top of the garment to the bottom (Figure 13).
Always keep the hose and nozzle elevated above the
steamer and in a vertical position.
NOTE:
• The steamer will make a pumping sound during operation. This is
normal.
• A beep will sound when the tank is empty.
10. The Steam on Demand button pauses the steam. This button can be used when
repositioning, changing a garment, or during interruptions to prolong steam output
(Figure 12).
NOTE:
• Allow a few seconds for the boiler to cool down and the steam to stop after pressing
the steam on demand button.
• If the steam on demand button is activated for several minutes, it will take up to 25
seconds for the steam to resume.
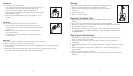
Using Attachments
When attaching or changing attachments, be sure the unit is off, unplugged, and com-
pletely cool to avoid contact with hot water.
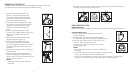
Cloth Nozzle Covers
The cloth nozzle cover can be used to soften the pressurized
steam intensity.
• Place the cloth cover over the steam nozzle (Figure 14).
• Steam in a downward motion from top to bottom.
Fabric Brush
The fabric brush opens the fabric weave for better steam penetration
on heavily wrinkled garments.
• Attach the fabric brush by lining up the notches on the
fabric brush with the holes on the steam nozzle. Gently
push into place (Figure 15).
• Steam in a downward motion from top to bottom gently
brushing the fabric.
Figure 11
Figure 14
Figure 15
STEAM
STEAM
STEAM
STEAM
STEAM
STEAM
STEAM
STEAM
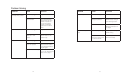
Figure 12
1. Plus button increases
steam intensity
2. LCD display shows steam
intensity setting
3. Minus button decreases
steam intensity
4. Light
5. Steam on Demand button
pauses the steam
1
2
3
4
5
Figure 13