


BEFORE EACH USE
• Check water inlet screen for damage.
• Check high pressure hose for leaks.
• Check chemical tanks and filters for damage.
• Check gun and wand assembly for leaks.
Purge pump of air and contaminants.
• Check engine oil level.
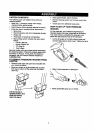
PRESSURE WASHER MAINTENANCE
Check and Clean Inlet Screen
Examine garden hose inlet screen. Clean if it is,
clogged or replace if it is tom.
Check High Pressure Hose
High pressure hose can develop leaks from wear,
kinking, or abuse. Inspect hose each time before tJsing
it. Check for cuts, leaks, abrasions, bulging of cover,
or damage or movement of coupl!ngs. If any of these
conditions exist, replace hose immediately.
,_ DANGER: Never repair a high pressure hose.
Replace with hose with one that meets the
minimum pressure rating of the system.
Check Chemical Reservoirs
Tank covers should snap cleanly onto tank. Ensure
chemical labels correctly identify tank contents.
Ensure that the System Rinse tank isfilled with clean
water. Ensure that Dial-A-Cleaner TM selector knob
rotates freely between each position. Examine the
tanks and replace ifthe filter is clogged
Check Gun and Wand
Examine hose connection to gun and make sure it is
secure. Test trigger by pressing it and making sure it
springs back intoplace when you release it. Put safety
latch in UP positionand test trigger. You should not be
able to press trigger. Replace gun immediately if it
fails any ofthese tests.
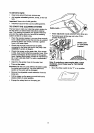
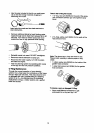
Check In-Une Filter
Refer to the illustrationand service the in-linefilter if it
becomes clogged, as follows:
In-Line Filter
1. Detach gun and lance from high pressure hose.
Detach lance from gun and remove o-dng and
screen from lance. Flush the screen, gun, and
lance with clean water to clear debris,
2.
3.
Ifthe screen isdamaged, the o-ring kit contains a
replacement in-linefilterscreen and an o-ring. If
undamaged, reuse screen.
Place the in-linefilterscreen into the threaded end
of the lance. Directiondoes not matter. Push the
screen in with the eraser end of a pencil untilit
rests flat at the bottom ofthe opening. Take care to
not bend the screen.
4. Place the o-ring intothe recess. Push the o-ring
snugly against the in-linefilterscreen.
5. Assemble the lance tothe spray gun, as described
eadier in this manual.
Purge Pump of Air and Contaminants
To remove the air from the pump, follow these steps:
• Set up the cleaning system as described in the
ASSEMBLY section and connect the water supply.
• Remove the wand extensionfrom the gun.
• Pull the trigger on the gun and hold untila steady
stream of water appears.
To remove the contaminantsfrom the pump, follow
these steps:
• Set up the cleaning system as described in the
ASSEMBLY section, and connect the water supply.
• Remove the nozzle attachment from the gun.
• Start the engine according to instructionsin
OPERATION section.
Pull the trigger on the gun and hold.
When the water supply is steady and constant,
engage the safety latch and refasten the nozzle
attachment.
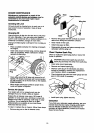
Nozzle Maintenance
If the nozzle becomes restrictedor clogged with
foreign materials, such as dirt, excessive pump
pressure may develop. A partiallyclogged nozzle can
cause a pulsingconditionduring use. This generally is
not a pump related problem, but rather a clogged or
partially restricted nozzle.
If the nozzle becomes clogged or partially restricted,
immediately clean the nozzle withthe kitincluded with
your cleaning system by followingthese instructions:
Shut off the engine and tum offthe water supply.
• Separate the wand from the gun.
• Rotate to stream setting.
• Remove nozzle from the end of the wand using a
2mm or 5/64 allen wrench.
\
11