


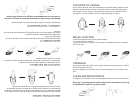

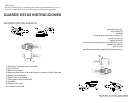
Selecting the temperature.
- Put the iron in a vertical position.
- Put the plug in the socket.
- Adjust the thermostat knob (1) according to the international symbol on the garment
label -The plate temperature control light (2) indicates that the iron is heating up. Wait
until the plate temperature control light goes off before ironing.
Warning: during ironing, the plate temperature control light (2) comes on at intervals,
indicating that the selected temperature is maintained. If you lower the thermostat tem-
perature after ironing at a high temperature, do not start ironing until the plate tempera-
ture control light comes on again.
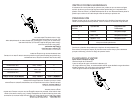
SURGE STEAM IRONING
The surge-of-steam feature provides powerful steam for removing stubborn wrinkles.
-Fill the iron with water as described in “Filling the reservoir”
-Plug iron into electrical outlet.
-As indicated on the temperature control knob (1), steam ironing is only possible at
higher temperature setting indicated with ‘MAX’ mark, otherwise the water may leak
from the soleplate.
-Turn the temperature control knob (1) to the position according to the fabric being
ironed as described in point 6 of ‘Setting the temperature’
-The indicator light will turn ‘OFF’ when the indicated setting reaches the correct tem-
perature.
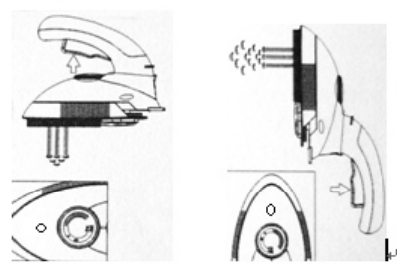
-Press the Steam jet button (3) to release the surge-of-steam. Pressing the button
several times may be necessary to prime the surge system.
-Wait a few seconds for the steam to penetrate the fabric before pressing the button
again for more steam.
-NOTE: For optimum steam quality, do not apply more than four successive ‘SHOT’
after the indicator light goes off.
To iron without SURGE STEAM IRONING, follow the instructions in section “SURGE
STEAM IRONING”
Cómo seleccionar la temperatura
-Coloque la plancha en posición vertical.
-Coloque el tapón en la abertura.
-Regule el termostato (1) de acuerdo al símbolo internacional en la etiqueta de la
prenda.
-La luz indicadora de temperatura (2) indica que la plancha se está calentando. Es-
pere hasta que luz indicadora se apague para comenzar a planchar.
Advertencia: Durante el planchado, la luz indicadora de temperatura (2) se enciende
en intervalos, indicando que la temperatura seleccionada se encuentra mantenién-
dose. Si se baja la temperatura después de planchar a temperatura alta, no planche
hasta que la luz indicadora de temperatura se encienda de nuevo.
PLANCHADO CON CHORRO DE VAPOR
Esta característica ofrece la opción de vapor fuerte para eliminar arrugas profundas.
-Llene la plancha con agua tal como se describe en la sección “Cómo llenar el
tanque”.
-Enchufe la plancha.
-Tal como se indica en la perilla reguladora de temperatura (1), el planchado a vapor
solo es posible a un nivel de temperatura alto indicado con la marca “MAX”, ya que
de lo contrario el agua empezará a gotear a través de la base de la plancha.
-Gire la perilla reguladora de temperatura (1) a la posición necesaria de acuerdo a la
tela que se vaya a planchar tal como se describe en el punto 6 de “Cómo seleccionar
la temperatura”.
-La luz indicadora se apagará cuando el nivel indicado alcance la temperatura cor-
recta.
-Presione el botón lanza vapor (3) para permitir la emisión del chorro de vapor. Puede
ser necesario presionar el botón varias veces para optimizar la función del chorro de
vapor.
-Espere unos segundos para que el vapor penetre en la tela antes de presionar el
botón de nuevo.
-NOTA: Para una calidad de vapor óptima, no aplique más de cuatro chorros sucesi-
vos después de que se haya apagado la luz indicadora.
PLANCHADO AL SECO
Para planchar sin el chorro de vapor, siga las instrucciones en al sección “Planchado
con chorro de vapor”.