6
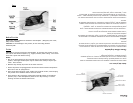
4. Slide the Temperature Setting Lever to the desired setting (reference the
Temperature Setting Guide on the product) for the fabric to be ironed and verify
the red Power Indicator is illuminated.
CAUTION: Check the garment/fabric label for the fiber content. If the
garment/fabric is made of blended fibers, turn the Temperature Dial to the fabric
with the lowest temperature setting before ironing.
5. Allow the product to heat (1-2 minutes) to the selected temperature setting
before ironing.
6. When finished, turn the Temperature Dial to the “0” (Off) position, and then
unplug the product from the electrical outlet.
WARNING: Always unplug the product from the electrical outlet when it is not in
use or will be left unattended.
7. Allow the product to cool completely before storing.
Dry Pressing:
To dry press, push the Steam/Dry Button down until it locks in the “Dry” (down)
position.
NOTE: It is not necessary to have water in the water reservoir when dry pressing.
Steam Pressing:
WARNING: Ensure the product is unplugged before adding water to the reservoir, and
if the product was in use, also allow it to cool before adding water.
CAUTION: Check the garment label of the item to be ironed for care instructions.
Some fabrics may be damaged when exposed to steam or water.
1. With the product unplugged from the electrical outlet and cooled (if it was in use),
slightly tip the product.
2. Push the Steam/Dry Button down until it locks in the “Dry” (down) position.
3. Pour water into the Water Fill Opening until the water level reaches the top of the
Water Reservoir Level Window.
CAUTION: Fill the Water Reservoir with water only; distilled water may be used if
the water in your area is hard, but do not use water from a home water softening
system and do not fill with other liquids.
CAUTION: Do not fill above the top of the Water Reservoir Level Window.
4. Push Steam/Dry Button down again to release the lock to the “Steam” (up)
position.
5. Set the product upright and wait 1-2 minutes until the product heats to the
selected temperature setting.
6. When finished ironing, slide the Temperature Dial to the “0” (Off) position and
unplug the product from the electrical outlet. Allow the product to cool
completely before moving or storing it.
Important: If no steam appears when the Variable Steam / Dry Dial is set for steam
and the product is hot and in the horizontal ironing position, gently tap the Soleplate
on the ironing board once or twice. If water drips from the steam vents, ensure the
Temperature Dial is set within the steam range (Wool – Linen) and the product has
4. Deslice el botón de temperatura a la opción deseada (utilice la guía de referencia
de temperatura ubicada en el producto mismo) de acuerdo a la tela que se vaya
planchar y verifique que la luz indicadora de energía de color rojo se encuentre ilumi-
nada.
PRECAUCIÓN: Verifique la etiqueta de la prenda o de la tela para ver los contenidos
de las fibras. Se la prenda o la tela está fabricada de una mezcla de fibras, coloque
la perilla de temperatura en el nivel de la tela con la temperatura más baja antes de
comenzar a planchar.
5. Deje calentar la plancha (de 1 a 2 minutos) según la temperatura seleccionada
antes de comenzar a planchar.
6. Una vez que se termine, gire la perilla de temperatura a la posición “0” (OFF
– apagado) y luego proceda a desenchufar el producto.
ADVERTENCIA: Siempre desenchufe el electrodoméstico si no lo va a utilizar o si se
lo tiene que dejar funcionando sólo.
7. Deje que el electrodoméstico se enfríe completamente antes de guardarlo.
Planchado al seco:
Para planchar al seco, presione el botón “Steam/Dry” hasta que quede asegurado
hacia abajo en la posición “Dry” (al seco)
NOTA: No es necesario llenar el tanque de agua para planchar al seco.
Planchado a vapor:
ADVERTENCIA: Asegúrese de que el electrodoméstico se encuentre desenchufado
antes de llenar el tanque de agua, y si el electrodoméstico se encuentra en uso, tam-
bién déjelo enfriar antes de añadir más agua.
PRECAUCIÓN: Verifique la etiqueta de la prenda que se desea planchar para ver las
instrucciones de lavado y planchado.
Algunas telas podrían dañarse si se las expone al vapor o al agua.
1. Con el electrodoméstico desenchufado y frío (si hubiera estado en uso), proceda a
inclinarlo ligeramente.
2. Presione el botón “Steam/Dry” hacia abajo hasta que quede asegurado en la
posición “Dry”.
3. Vierta agua dentro del tanque a través de la abertura hasta que el nivel alcance la
parte superior de la ventana de nivel del tanque.
PRECAUCIÓN: Llene el tanque solamente con agua. Se puede utilizar agua destilada
si el agua en su localidad fuera muy dura, pero no utilice agua que provenga de
un sistema de ablandamiento de agua casero ni tampoco llene el tanque con otros
líquidos.
PRECAUCIÓN: No llene el tanque por encima del nivel superior de la ventana del
tanque.
4. Presione el botón “Steam/Dry” hacia debajo de nuevo para soltarlo y que suba
quedando la posición “Steam” (a vapor).
5.Coloque el electrodoméstico de manera vertical y espere de 1 a 2 minutos hasta
que se caliente según la temperatura seleccionada.
6. Una vez terminado el planchado, coloque la perilla de temperatura en la posición
“0” (OFF – apagado) y proceda a desenchufarlo. Deje que el electrodoméstico se


