


5
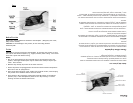
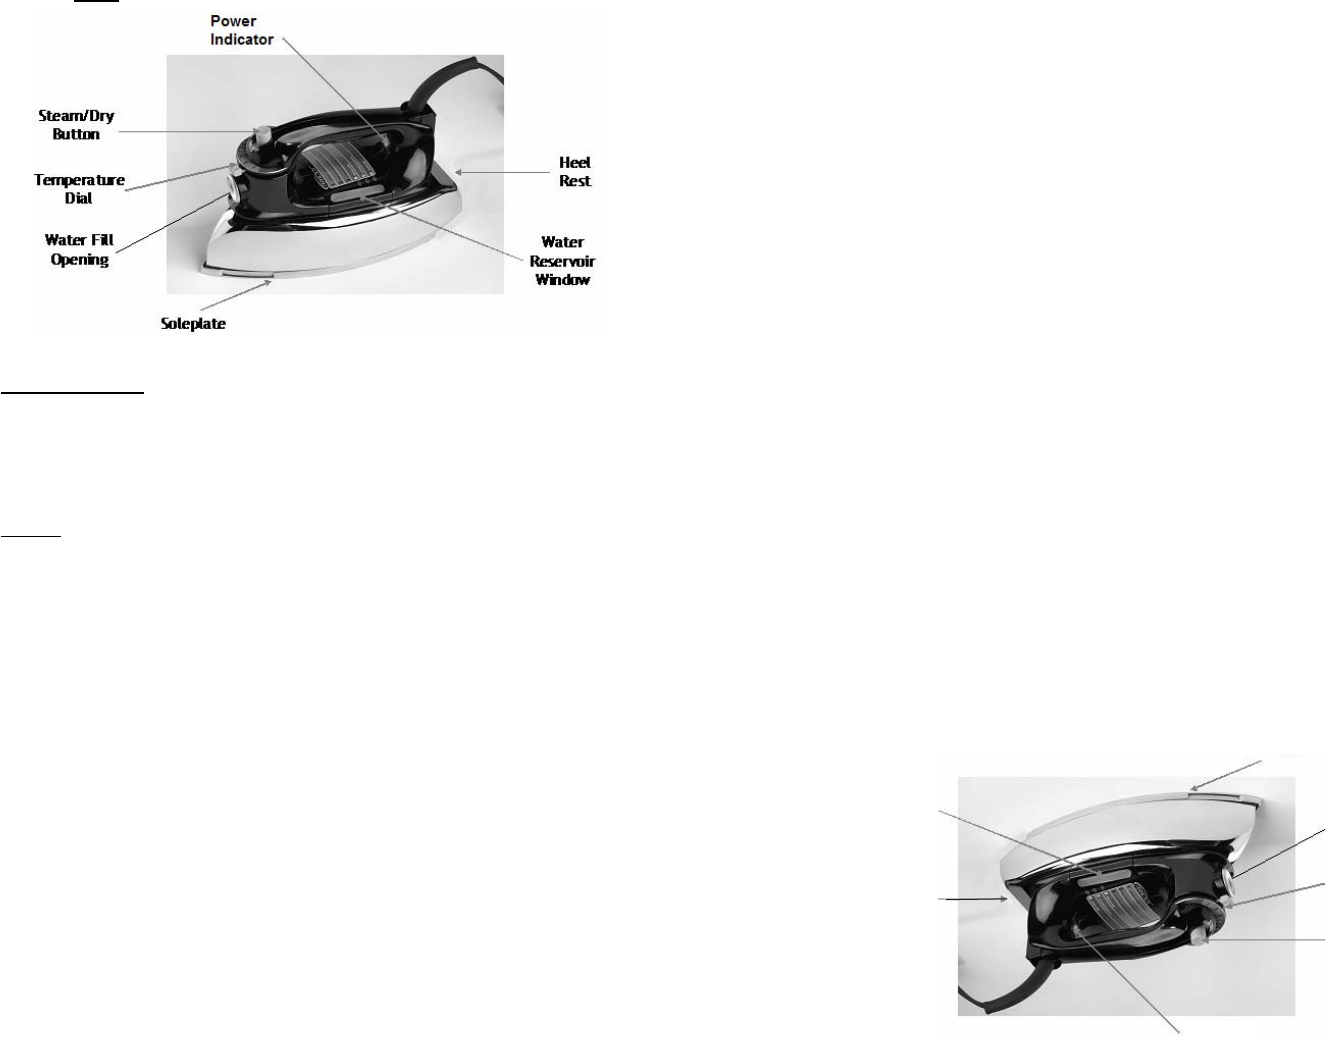
Parts
Before First Use
Remove any stickers/adhesives attached to the Soleplate. (Rub gently with a soft,
damp cloth if needed).
CAUTION: To avoid damage to the product, do not clean using abrasive
chemicals/pads.
To Use
CAUTION: To prevent scratching of the Soleplate, do not allow the product to come
into contact with abrasive objects (e.g., zippers, buttons) while ironing. Cover these
items with a press cloth before ironing.
NOTES:
• Due to the initial heating of the materials used in the manufacturing of the
product, some light smoke/vapors may be release when used for the first few
times. This is normal.
• Moisture may initially be present in the water reservoir.
1. Ensure the product is unplugged from the electrical outlet and the Temperature
Dial is set to the “0” (Off) position.
2. Place the product upright on a flat, stable, heat-resistant surface, and then plug
the product into a standard 120V AC electrical outlet.
3. Select Steam or Dry Pressing by pressing the Steam/Dry Button to the desired
position (“Dry” is the down position). Refer to the “Dry Pressing” or “Steam
Pressing” sections for detailed instructions.
5
Parts
Before First Use
Remove any stickers/adhesives attached to the Soleplate. (Rub gently with a soft,
damp cloth if needed).
CAUTION: To avoid damage to the product, do not clean using abrasive
chemicals/pads.
To Use
CAUTION: To prevent scratching of the Soleplate, do not allow the product to come
into contact with abrasive objects (e.g., zippers, buttons) while ironing. Cover these
items with a press cloth before ironing.
NOTES:
• Due to the initial heating of the materials used in the manufacturing of the
product, some light smoke/vapors may be release when used for the first few
times. This is normal.
• Moisture may initially be present in the water reservoir.
1. Ensure the product is unplugged from the electrical outlet and the Temperature
Dial is set to the “0” (Off) position.
2. Place the product upright on a flat, stable, heat-resistant surface, and then plug
the product into a standard 120V AC electrical outlet.
3. Select Steam or Dry Pressing by pressing the Steam/Dry Button to the desired
position (“Dry” is the down position). Refer to the “Dry Pressing” or “Steam
Pressing” sections for detailed instructions.
Partes
Antes del primer uso
Retire todas las etiquetas o pegatinas que se encuentren adheridas a la base
(Frote con cuidado utilizando un paño húmedo si fuera necesario).
PRECAUCIÓN: Con el fin de evitar daños al producto, no lo limpie utilizando
químicos abrasivos o esponjas para fregar.
Cómo utilizar la plancha
PRECAUCIÓN: Con el fin de prevenir que la base se arañe, no permita que el
producto entre en contacto con objetos abrasivos (por ejemplo cierres, botones)
al momento de planchar. Cubra estos artículos con un paño o una tela antes de
planchar.
NOTAS:
• Debido al calentamiento inicial de los materiales utilizados en la fabricación de
este producto, se podía producir cierto humo o vapor al momento de utilizarlo las
primeras veces. Esto es normal.
• Podría haber humedad dentro del tanque de agua en un inicio.
1. Asegúrese de que el electrodoméstico se encuentre desenchufado y que la
perilla de temperatura se encuentre en la posición “0” (OFF – apagado)
2. Coloque el producto de manera vertical sobre una superficie plana, estable y
resistente al calor y luego proceda a enchufarlo a un tomacorriente estándar de
120V AC.
3. Seleccione la opción de planchado a vapor o al seco presionando el botón cor-
respondiente (“Steam/Dry”) y colocándolo en la posición deseada (“DRY” – al seco
– es la opción con el botón presionado). Véase las secciones de “Planchado al
seco” y “Planchado a vapor” para mayores instrucciones.
Indicador de energía
Botón de planchado a
vapor / al seco
Perilla de temperatura
Abertura para
llenar agua
Base
Soporte
Ventana del tanque
de agua