4/EN
Washing Machine / User’s Manual
A WARNING
Ensurethatthecoldandhotwaterconnectionsaremadecorrectly
wheninstallingtheproduct.Otherwise,yourlaundrywillcomeout
hot at the end of the washing process and wear out.
Tightenallhosenutsbyhand.Neveruseawrenchwhen
tightening the nuts. Open the taps completely after making the
hose connection to check for water leaks at the connection
points.Ifanyleaksoccur,turnoffthetapandremovethenut.
Retightenthenutcarefullyaftercheckingtheseal.Toprevent
waterleakagesanddamagescausedbythem,keepthetaps
closed when the machine is not in use.
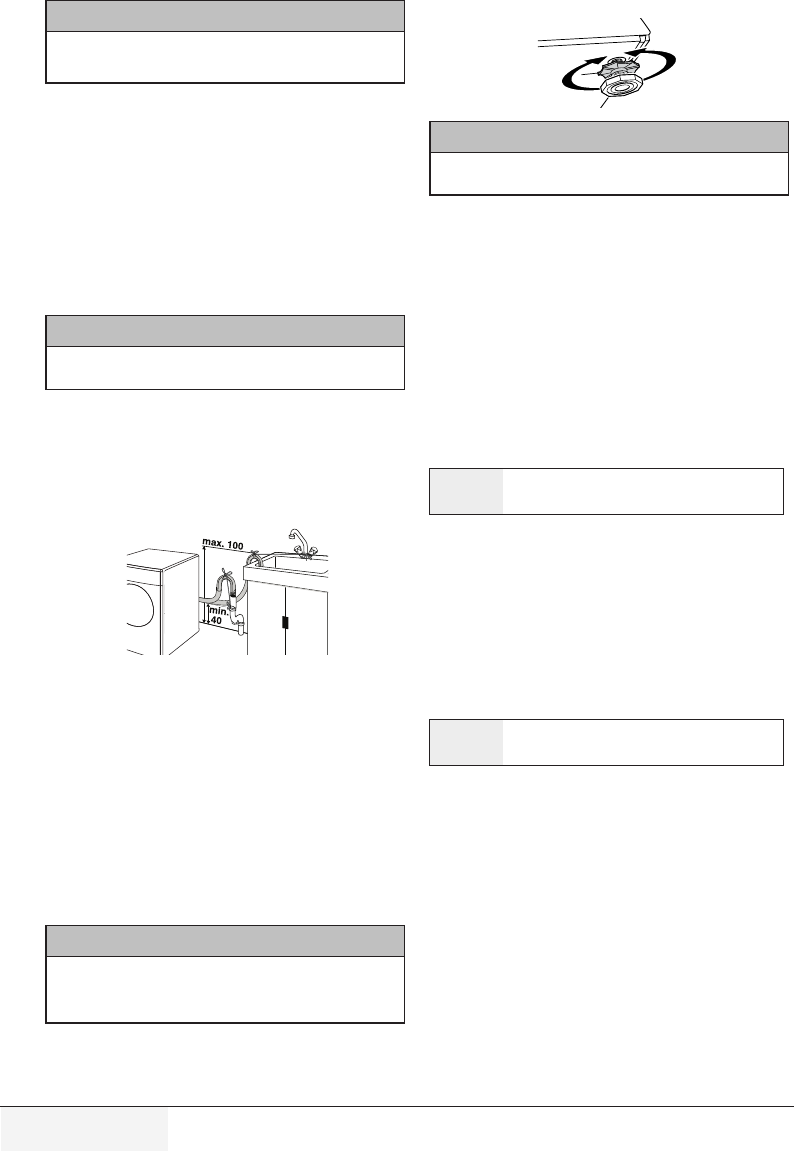
2.5 Connecting to the drain
• Theendofthedrainhosemustbedirectlyconnectedto
thewastewaterdrainortothewashbasin.
A WARNING
Donotremovethetransportationlocksbeforetakingoutthe
packaging reinforcement.
• Thehoseshouldbeattachedtoaheightofatleast40cm,
and 100 cm at most.
• Incasethehoseiselevatedafterlayingitonthefloorlevel
orclosetotheground(lessthan40cmabovetheground),
waterdischargebecomesmoredifficultandthelaundry
maycomeoutexcessivelywet.Therefore,followthe
heightsdescribedinthefigure.
• Topreventflowingofdirtywaterbackintothemachineand
toallowforeasydischarge,donotimmersethehoseend
into the dirty water or do not drive it in the drain more than
15cm.Ifitistoolong,cutitshort.
• Theendofthehoseshouldnotbebent,itshouldnotbe
steppedonandthehosemustnotbepinchedbetweenthe
drain and the machine.
• Ifthelengthofthehoseistooshort,useitbyadding
an original extension hose. Length of the hose may not
belongerthan3.2m.Toavoidwaterleakfailures,the
connectionbetweentheextensionhoseandthedrain
hoseoftheproductmustbefittedwellwithanappropriate
clamp as not to come off and leak.
2.6 Adjusting the feet
A WARNING
Inordertoensurethattheproductoperatesmoresilentlyand
vibration-free,itmuststandlevelandbalancedonitsfeet.Balance
themachinebyadjustingthefeet.Otherwise,theproductmay
movefromitsplaceandcausecrushingandvibrationproblems.
Loosenthelocknutsonthefeetbyhand.Adjustthefeetuntil
theproductstandslevelandbalanced.Tightenalllocknuts
againbyhand.
A WARNING
Donotuseanytoolstoloosenthelocknuts.Otherwise,theywill
get damaged.
2.7 Electrical connection
Connecttheproducttoagroundedoutletprotectedbya13
Afuse.Ourcompanyshallnotbeliableforanydamages
that will arise when the product is used without grounding in
accordance with the local regulations.
• Connectionmustcomplywithnationalregulations.
• Powercableplugmustbewithineasyreachafter
installation.
• Ifthecurrentvalueofthefuseorbreakerinthehouseis
lessthan13Amps,haveaqualifiedelectricianinstalla13
Ampfuse.
• Thevoltagespecifiedinthe“Technicalspecifications”
sectionmustbeequaltoyourmainsvoltage.
• Donotmakeconnectionsviaextensioncablesormulti-
plugs.
B
WARNING: Damagedpowercablesmustbe
replacedbytheAuthorizedServiceAgents.
Electrical requirements
Beforeyouinserttheplugintothewallsocketmakesure
thatthevoltageandthefrequencyshownintheratinglabel
corresponds to your electricity supply.
Werecommendthatthisappliancebeconnectedtothemains
supplyviaasuitableswitchedandfusedsocketinareadily
accessibleposition.
Shouldthemainsleadoftheappliancebecomedamagedor
needreplacingatanytime,itmustbereplacedbyaspecial
purposemademainsleadwhichcanonlybeobtainedfroma
AuthorisedServiceAgent.
B
WARNING: Thisappliancemustbeearthed
Ifthefittedmouldedplugisnotsuitableforyoursocket,then
theplugshouldbecutoffandanappropriateplugfitted.
Destroytheoldplug,whichiscutoffasaplugwithabared
cordcouldcauseashockhazardifinsertedintoasocket
elsewhere in the house.
Themouldedplugonthisapplianceincorporatesa13A
fuse.ShouldthefuseneedtobereplacedanASTAapproved
BS1362fuseofthesameratingmustbeused.Donotforget
torefitthefusecover.Intheeventoflosingthefusecover,
theplugmustnotbeuseduntilareplacementfusecoverhas
beenfitted.Colourofthereplacementfusecovermustbethe
samecolourasthatvisibleonthepinfaceoftheplug.Fuse
coversareavailablefromanygoodelectricalstore.


