


3 / 76 EN
Washing Machine / User’s Manual
2 Installation
RefertothenearestAuthorisedServiceAgentforinstallation
oftheproduct.Tomaketheproductreadyforuse,review
the information in the user manual and make sure that the
electricity,tapwatersupplyandwaterdrainagesystemsare
appropriatebeforecallingtheAuthorizedServiceAgent.If
theyarenot,callaqualifiedtechnicianandplumbertohave
any necessary arrangements carried out.
C
Preparationofthelocationandelectrical,tapwaterand
waste water installations at the place of installation is
undercustomer'sresponsibility.
B
warning: Installationandelectricalconnectionsof
theproductmustbecarriedoutbytheAuthorized
ServiceAgent.Manufacturershallnotbeheldliablefor
damagesthatmayarisefromprocedurescarriedoutby
unauthorizedpersons.
A
warning: Priortoinstallation,visuallycheckiftheproduct
hasanydefectsonit.Ifso,donothaveitinstalled.
Damagedproductscauserisksforyoursafety.
C
Make sure that the water inlet and discharge hoses
aswellasthepowercablearenotfolded,pinchedor
crushed while pushing the product into its place after
installation or cleaning procedures.
2.1 Appropriate installation location
• Placethemachineonarigidfloor.Donotplaceitona
long pile rug or similar surfaces.
• Totalweightofthewashingmachineandthedryer-with
full load- when they are placed on top of each other
reachestoapprox.180kilograms.Placetheproduct
on a solid and flat floor that has sufficient load carrying
capacity!
• Donotplacetheproductonthepowercable.
• Donotinstalltheproductatplaceswheretemperature
mayfallbelow0ºC.
• Placetheproductatleast1cmawayfromtheedgesof
other furniture.
2.2 Removing packaging reinforcement
Tiltthemachinebackwardstoremovethepackaging
reinforcement.Removethepackagingreinforcementby
pullingtheribbon.
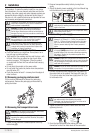
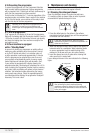
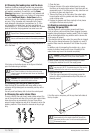
2.3 Removing the transportation locks
A
warning: Donotremovethetransportationlocksbefore
taking out the packaging reinforcement.
A
warning: Removethetransportationsafetyboltsbefore
operatingthewashingmachine!Otherwise,theproduct
willbedamaged.
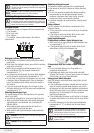
1.Loosenalltheboltswithasuitablespanneruntilthey
rotate freely (C).
2.Removetransportationsafetyboltsbyturningthem
gently.
3.AttachtheplasticcoverssuppliedintheUserManualbag
into the holes on the rear panel. (P)
C
Keepthetransportationsafetyboltsinasafeplaceto
reusewhenthewashingmachineneedstobemoved
again in the future.
C
Never move the product without the transportation safety
boltsproperlyfixedinplace!
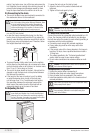
2.4 Connecting water supply
C
Thewatersupplypressurerequiredtoruntheproductis
between1to10bars(0.1–1MPa).Itisnecessaryto
have10–80litersofwaterflowingfromthefullyopen
tap in one minute to have your machine run smoothly.
Attachapressurereducingvalveifwaterpressureis
higher.
C
Ifyouaregoingtousethedoublewater-inletproduct
as a single (cold)water-inletunit,youmustinstallthe
suppliedstoppertothehotwatervalvebeforeoperating
theproduct.(Appliesfortheproductssuppliedwitha
blindstoppergroup.)
A
warning: Modelswithasinglewaterinletshouldnotbe
connectedtothehotwatertap.Insuchacasethelaundry
will get damaged or the product will switch to protection
mode and will not operate.
A
warning: Donotuseoldorusedwaterinlethosesonthe
newproduct.Itmaycausestainsonyourlaundry.
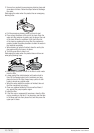
1.Connectthespecialhosessuppliedwiththeproductto
the water inlets on the product. Red hose (left) (max. 90
ºC)isforhotwaterinlet,bluehose(right)(max.25ºC)is
for cold water inlet.
A
warning: Ensure that the cold and hot water connections
are made correctly when installing the product.
Otherwise,yourlaundrywillcomeouthotattheendof
the washing process and wear out.
2.Tightenallhosenutsbyhand.Neveruseatoolwhen
tightening the nuts.
3. Open the taps completely after making the hose
connection to check for water leaks at the connection