28 / EN
Washing Machine / User’s Manual
3.Openthetapscompletelyaftermakingthehose
connection to check for water leaks at the connection
points.Ifanyleaksoccur,turnoffthetapandremovethe
nut.Retightenthenutcarefullyaftercheckingtheseal.To
preventwaterleakagesanddamagescausedbythem,
keep the taps closed when the machine is not in use.
2.5 Connecting to the drain
• Theendofthedrainhosemustbedirectlyconnectedto
the wastewater drain or to the washbasin.
A
Warning: Your house will be flooded if the hose comes
outofitshousingduringwaterdischarge.Moreover,there
is risk of scalding due to high washing temperatures!
Topreventsuchsituationsandtoensuresmoothwater
intakeanddischargeofthemachine,fixtheendofthe
dischargehosetightlysothatitcannotcomeout.
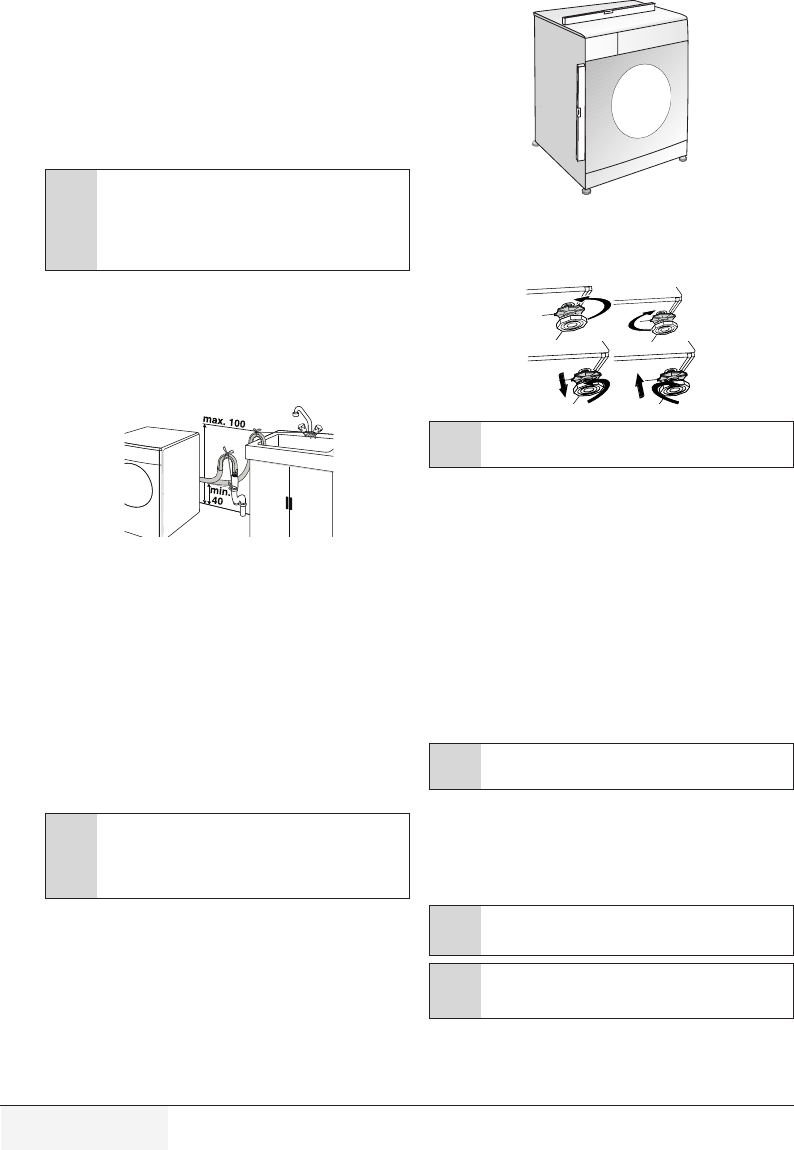
• Thehoseshouldbeattachedtoaheightofatleast40
cm, and 100 cm at most.
• Incasethehoseiselevatedafterlayingitonthefloor
levelorclosetotheground(lessthan40cmabovethe
ground), water discharge becomes more difficult and the
laundrymaycomeoutexcessivelywet.Therefore,follow
the heights described in the figure.
• Topreventflowingofdirtywaterbackintothemachine
andtoallowforeasydischarge,donotimmersethehose
endintothedirtywaterordonotdriveitinthedrainmore
than 15 cm. If it is too long, cut it short.
• Theendofthehoseshouldnotbebent,itshouldnotbe
stepped on and the hose must not be pinched between
the drain and the machine.
• Ifthelengthofthehoseistooshort,useitbyadding
anoriginalextensionhose.Lengthofthehosemay
notbelongerthan3.2m.Toavoidwaterleakfailures,
theconnectionbetweentheextensionhoseandthe
drain hose of the product must be fitted well with an
appropriate clamp as not to come off and leak.
2.6 Adjusting the feet
A
Warning: In order to ensure that the product operates
moresilentlyandvibration-free,itmuststandleveland
balancedonitsfeet.Balancethemachinebyadjusting
thefeet.Otherwise,theproductmaymovefromitsplace
andcausecrushingandvibrationproblems.
1.Loosenthelocknutsonthefeetbyhand.
2.Adjustthefeetuntiltheproductstandsleveland
balanced.
3.Tightenalllocknutsagainbyhand.
A
Warning: Donotuseanytoolstoloosenthelocknuts.
Otherwise,theywillgetdamaged.
2.7 Electrical connection
Connecttheproducttoagroundedoutletprotectedbya16
Afuse.Ourcompanyshallnotbeliableforanydamages
that will arise when the product is used without grounding in
accordance with the local regulations.
• Connectionmustcomplywithnationalregulations.
• Powercableplugmustbewithineasyreachafter
installation.
• Ifthecurrentvalueofthefuseorbreakerinthehouseis
lessthan16Amps,haveaqualifiedelectricianinstalla
16 Amp fuse.
• Thevoltagespecifiedinthe"Technicalspecifications"
sectionmustbeequaltoyourmainsvoltage.
• Donotmakeconnectionsviaextensioncablesormulti-
plugs.
B
Warning: Damagedpowercablesmustbereplacedby
theAuthorizedServiceAgents.
Transportation of the product
1.Unplugtheproductbeforetransportingit.
2.Removewaterdrainandwatersupplyconnections.
3. Drain all water that has remained in the product.
4.Installtransportationsafetyboltsinthereverseorderof
removalprocedure;
C
Nevermovetheproductwithoutthetransportationsafety
boltsproperlyfixedinplace!
A
Warning: Packaging materials are dangerous to children.
Keeppackagingmaterialsinasafeplaceawayfrom
reach of the children.


