


© Copyright, Alliance Laundry Systems LLC – DO NOT COPY or TRANSMIT
Installation
7
510977
Additional Security
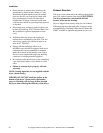
Torx security screws are available (as optional
equipment at extra cost) for securing lower access
panel to dryer base. Order part number 62853.
A Torx bit, part number 282P4, is available (as
optional equipment at extra cost) for installing the
Torx security screws.
A Torx bit holder, part number 24161, is available (as
optional equipment at extra cost) to be used with the
Torx bit.
Slide Extension
(Coin Slide Models Only)
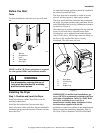
Remove slide extension, screws and lockwashers from
the accessories bag and install the extension on the top
of the coin slide.
IMPORTANT: Slide extension must be attached to
top side of the coin slide to make it long enough to
activate the accumulator.
NOTE: This dryer, as shipped from the factory,
does not include the coin slide, coin drawer, lock or
keys. This coin slide kit (or parts) must be ordered,
at extra cost, according to the purchaser’s
requirements direct from the coin kit manufacturer
of your choice.
Timer Cams
(Coin Slide Models Only)
The dryer timers are factory equipped with a 45
minute timing cam. If this drying time is not suitable
to your installation, the following cams can be found
in the accessories bag.
ELECTRIC DRYERS
1-53242 Cam (30 Minutes)
1-53240 Cam (60 Minutes)
GAS DRYERS
1-53242 Cam (30 Minutes)
A 60 minute timing cam, Part No. 53240, is available
for the gas dryer as optional equipment at extra cost.
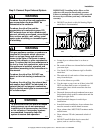
To change the timing cam:
1. Align notch in cam with a tooth on ratchet wheel.
2. Squeeze the ends of the two timing cam prongs
together.
3. Carefully lift timing cam off post.
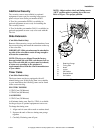
NOTE: Adjust ratchet wheel and timing cam to
“OFF” position prior to putting dryer into use.
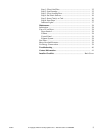
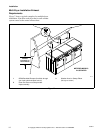
Refer to Figure 1 for proper position.
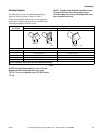
Figure 1
D775I
1 Retaining Prongs
2 Timing Cam
3 Notch
4 Levers
5 Off Position
6 Ratchet Wheel
7 On Position
D775I
2
3
4
5
6
1
7