


© Copyright, Alliance Laundry Systems LLC – DO NOT COPY or TRANSMIT 506126
16
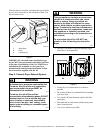
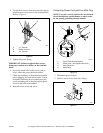
9. Reinstall four hinge attaching screws, removed in
Step 1.
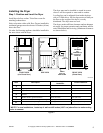
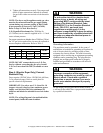
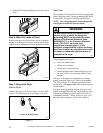
Step 6: Wipe Out Inside of Dryer
Before using dryer for the first time, use an all-purpose
cleaner, or a detergent and water solution, and a damp
cloth to remove shipping dust from inside dryer drum.
Figure 16
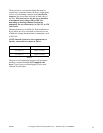
Step 7: Plug In the Dryer
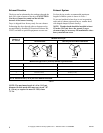
Electric Dryer
Connect the dryer to an electrical power source. Refer
to Step 4 for information on connecting power cord.
Figure 17
Gas Dryer
Dryer requires 120 Volt, 60 Hertz electrical supply and
comes equipped with a 3-prong grounding plug. Refer
to serial plate for specific electrical requirements.
NOTE: The wiring diagram is located behind the
control panel, inside the control cabinet.
When plugging in the dryer:
• Do not overload circuits.
• Do not use an adapter.
• Do not use an extension cord.
• Do not operate both a washer and gas dryer on
the same circuit. Use separetely fused 15 amp
circuits.
The dryer is designed to be operated on a separate
branch, polarized, three-wire, effectively grounded,
120 Volt, 60 Hertz, AC (alternating current) circuit
protected by a 15 Ampere fuse, equivalent fusetron or
circuit breaker.
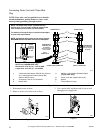
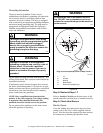
The three-prong grounding plug on the power cord
should be plugged directly into a polarized three-slot
effectively grounded receptacle rated 120 Volts AC
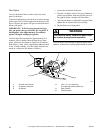
(alternating current) 15 Amps. Refer to Figure 18 to
determine correct polarity of the wall receptacle.
DRY689N
D275I
D623I
DRY689N
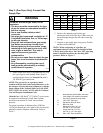
Connect to 30 Amp circuit.
To reduce the risk of fire, electric shock,
serious injury or death, all wiring and
grounding MUST conform with the latest
edition of the National Electrical Code,
ANSI/NFPA 70, or the Canadian Electrical
Code, CSA C22.1, and such local
regulations as might apply. It is the
customer’s responsibility to have the wiring
and fuses installed by a qualified electrician
to make sure adequate electrical power is
available to the dryer.
W521
WARNING