17
Installation
(continued)
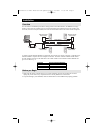
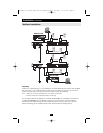
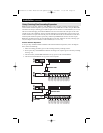
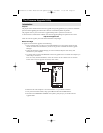
Topology Considerations
The use of RJ-45 CPU connectors, combined with our Auto Signal Compensation (ASC), allow signals to
travel up to 500 feet (150 meters) and still maintain reliability and high video resolution. This allows the
B060-032 installation to take advantage of the internal Cat5e and Cat6 wiring built in to most modern
commercial buildings.
Note: Although the B060-032 supports legacy CAT5 wiring, the performance and video quality may
degrade over longer distances.
Since the data signals are not transmitted in packets, the transmission cannot go through network hubs or
switches. Passive components such as patch panels, keystone jacks, patch cables, etc. can be used to chan-
nel the traffic.
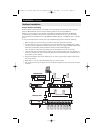
Basic Operations
Hot Plugging
The B060-032 supports hot plugging—components can be removed and added back into the installation by
unplugging their cables from the ports without the need to shut the unit down. In order for hot plugging to
work properly, however, the procedures described below must be followed:
Switching Station Positions: On daisy chained installations, you can switch station positions by simply
unplugging from the old parent and plugging into a new one.
Hot Plugging Console Ports: Keyboard, monitor, and mouse can all be hot plugged. If you experience a
problem after you plug in a new mouse, do a system reset by pressing the reset switch on the B060-
032’s front panel (see p. 4 for details). If this doesn't resolve the problem, restart the computers that have
the problem.
Powering Off and Restarting
Powering off the B060-032 does not affect the computers attached to it. When you restart the B060-032,
you will regain control immediately. To replace a B060-032, simply power it down; unplug the cables;
plug them into the new unit; and power the new unit on.
Note: If any of the computers behave strangely after powering off and restarting, or changing a switch,
simply restart the computer.
Port Selection
Port Selection is accomplished either by entering Hotkey combinations from the keyboard, or by means of
the B060-032’s OSD (On Screen Display). OSD Operation is discussed in detail in the next chapter;
Hotkey Port Selection is discussed on p. 27.
Although hotkeys are handy for a single stage installation, we strongly recommend you use the more
powerful and versatile OSD - especially for daisy chained, cascaded, and combined installations.
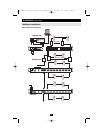
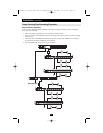
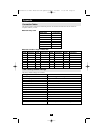
Port ID Numbering
Each CPU port on a B060-032 installation is assigned a unique Port ID. You can access and control any
computer on the installation by specifying the Port ID of the port that it is connected to. Depending on
where the computer is on the installation, its Port ID will either have two or three parts.
Single Stage and Daisy Chained Installations
For single stage and daisy-chained installations, the Port ID is made up of two parts: a Station Number and
a Port Number:
• The Station Number - is a two digit number which reflects the switch’s position in the daisy chain
sequence. This corresponds to the number displayed on the front panel Station ID LED.
• The Port Number - reflects the port on the B060-032 Station that the computer is connected to.
• The Station Number precedes the Port Number.
Note: Station numbers from 1 - 9 are padded with a preceding zero, so they become 01 - 09.
For example, a computer attached to Port 12 of Station 6 would have a Port ID of: 06-12.