16
Parts Listing
Getting the telescope ready for first observations requires only a few minutes. When
first opening the pac
king box, note carefully the following parts:
ܖ RCX400 Telescope with fork mount system and GPS Receiver
ܖ AutoStar II handbox and interface coil cord; handbox holder
ܖ 8 x 50mm viewfinder assembly
ܖ 2" diagonal mirror and
2” visual back barrel
ܖ Series 5000 UltraWide 24mm eyepiece
ܖ V
ariable height tripod
ܖ USB cable and software CD ROM
How to Assemble the Tripod
Remove the parts of the tripod from the shipping carton. Assembly of the tripod will
take just a few minutes.
To assemble the tripod:
1. Slide a tripod leg into a leg receptacle (Fig. 7). Rotate the leg until the trigger
release pin is next to the thruster bar latch (
Fig. 8).
2. Slide the thruster bar latch hook into the slot in the trigger release pin (
Fig. 9).
3. Rotate the leg attachment lock to tighten the leg in place (
Fig. 10).
4. To unlock the leg, press and hold down the trigger release lever (
Fig. 11). While
holding the lever down, slide the leg extension in or out to the desired length. Let
go of the lever to lock the leg extension into place. Unhook the trigger release pin
to lock the leg in place.
5. Repeat steps 1 through 4 for the other two tripod legs.
How to Assemble Your Telescope
The telescope’s fork mounting base attaches directly to the tripod. The telescope in
this way is mounted in an “altazimuth” (“altitude-azimuth,” or “vertical-horizontal”) for-
mat. It is recommended that two people attach the mount to the tripod.
Caution for 12” and 14” model users: Due to the weight and size of
these products, please use extreme caution whenever assembling,
disassembling, lifting, transporting or storing these products.Two or more
persons should always be used whenever performing any of these tasks.
Disregard for the above warning could result in serious injury or death.
Note: The field tr
ipod also can be used in conjunction with the optional
equatorial wedge (see your wedge’s instruction sheet for more
inf
or
mation) f
or long exposure astrophotography.
The tr
ipod base comes with a tangent ar
m attached f
or use with the superw
edge
.
To attach the mount:
1. Take note of the T-handle under the tripod base. The T-handle is spring-mounted
into position. Note also that there is a hole on the bottom side of the mount base.
2. Lift the mount and position the mount base over the tripod base. Line up the hole
on the mount base o
ver the T-handle rod. When they are lined up, place the
mount do
wn onto the rod and the rod will “pop up” into the hole (
Fig.
12
).
3. Rotate the T-handle until the rod is tightened to a firm feel (
Fig. 13).
To install the batteries:
Assembly of the RCX400 telescope requires eight C-cell (user-supplied) batteries or
the optional RCX A
C
Wall Adapter to a standard 115v home outlet . Plug the adapter
into the 12vDC In por
t of the computer control panel (
B,
Fig. 1d
).
1. Turn the Dec. lock (
17, Fig. 1a) counterclockwise to unlock the the optical tube
(
19, Fig. 1a). Move the optical tube to the position depicted in Fig. 1a and turn
the Dec. lock clockwise to a firm feel to relock the position of the optical tube.
2. Remove the battery compartment covers (
7, Fig. 1a) and carefully remove the
batter
y holders, being mindful of the connector wires (
Fig.
15
).
Insert four user-
supplied C-cell batter
ies into each batter
y holder
, or
iented as sho
wn on the dia
-
gram on the battery slots inside the battery holder. Return the battery holders to
their respectiv
e compar
tments and replace the co
v
ers.
GETTING STARTED
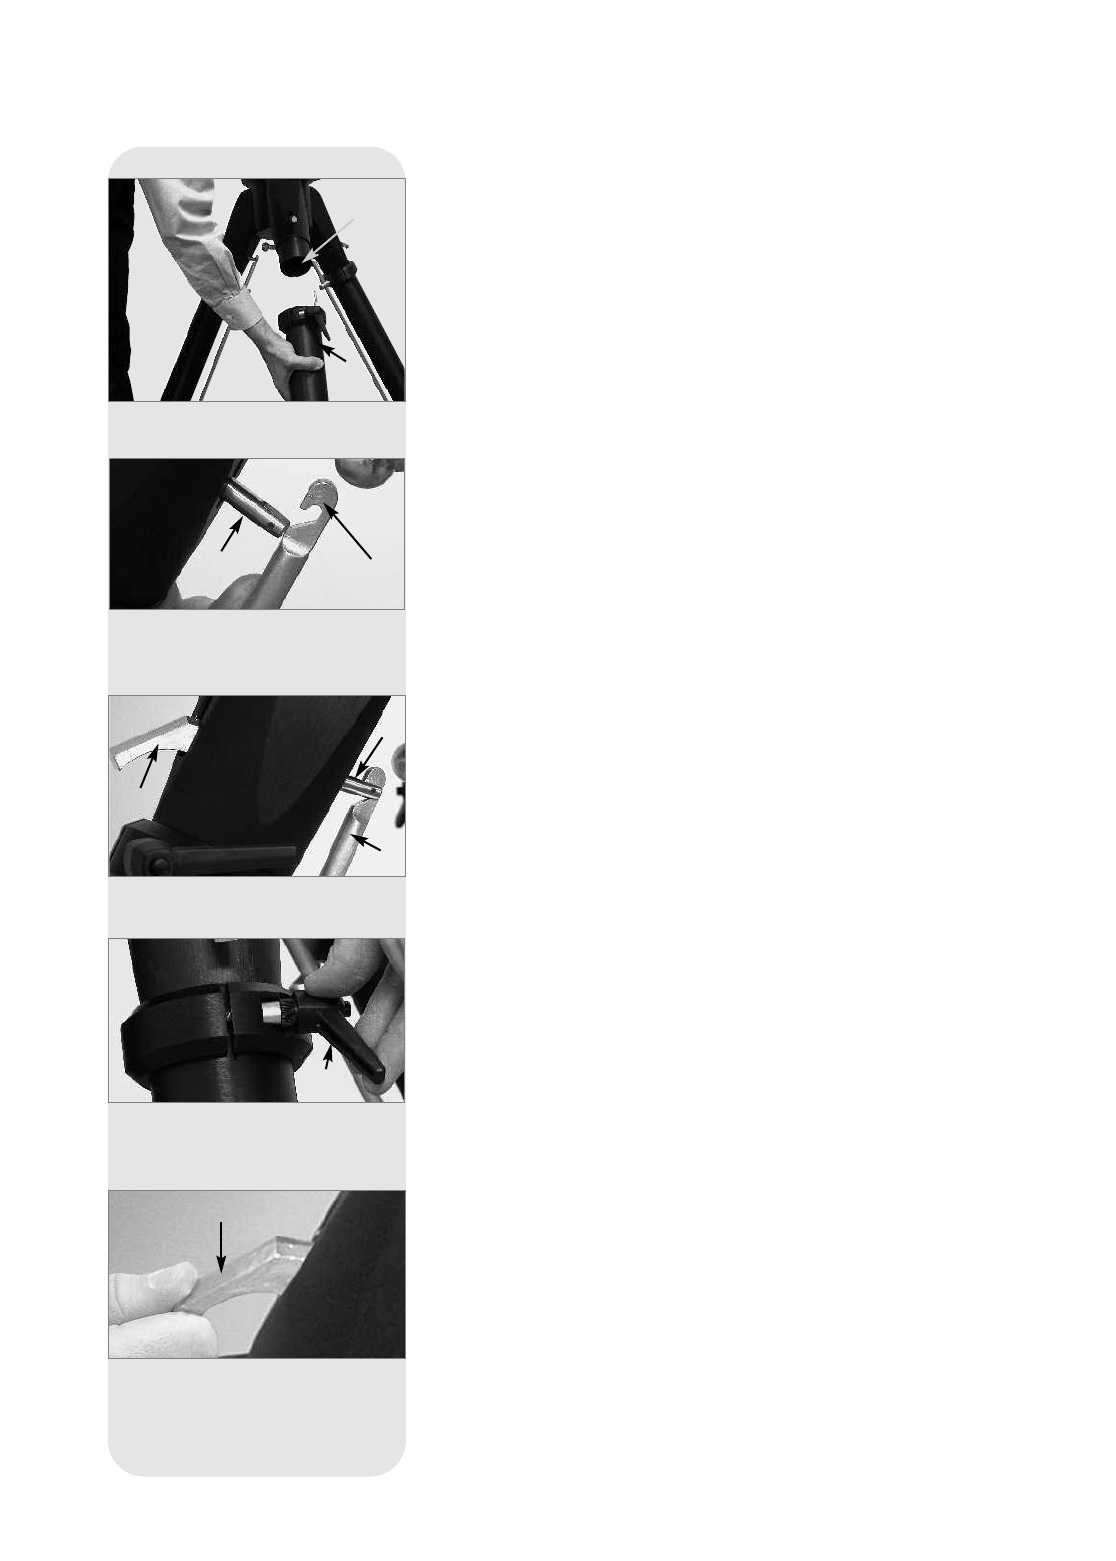
Fig. 11: Press down the trigger lever
(5) so that you can adjust the height
of the tripod.
Fig. 7: Attach leg (1) to leg
receptacle (2).
Fig. 8: Rotate the leg until the trigger
release pin (4) is next to the thruster
bar (3).
Fig. 9: Slide thruster hook (4) into
the slot of the trigger release pin (3).
Fig. 10: Tighten the leg adjustment
loc
k (6).
B
d
e
f
e
d
g
c
f


