www.addonics.com Technical Support (M-F 8:30am - 6:00pm PST) Phone: 408-453-6212 Email: www.addonics.com/support/query/
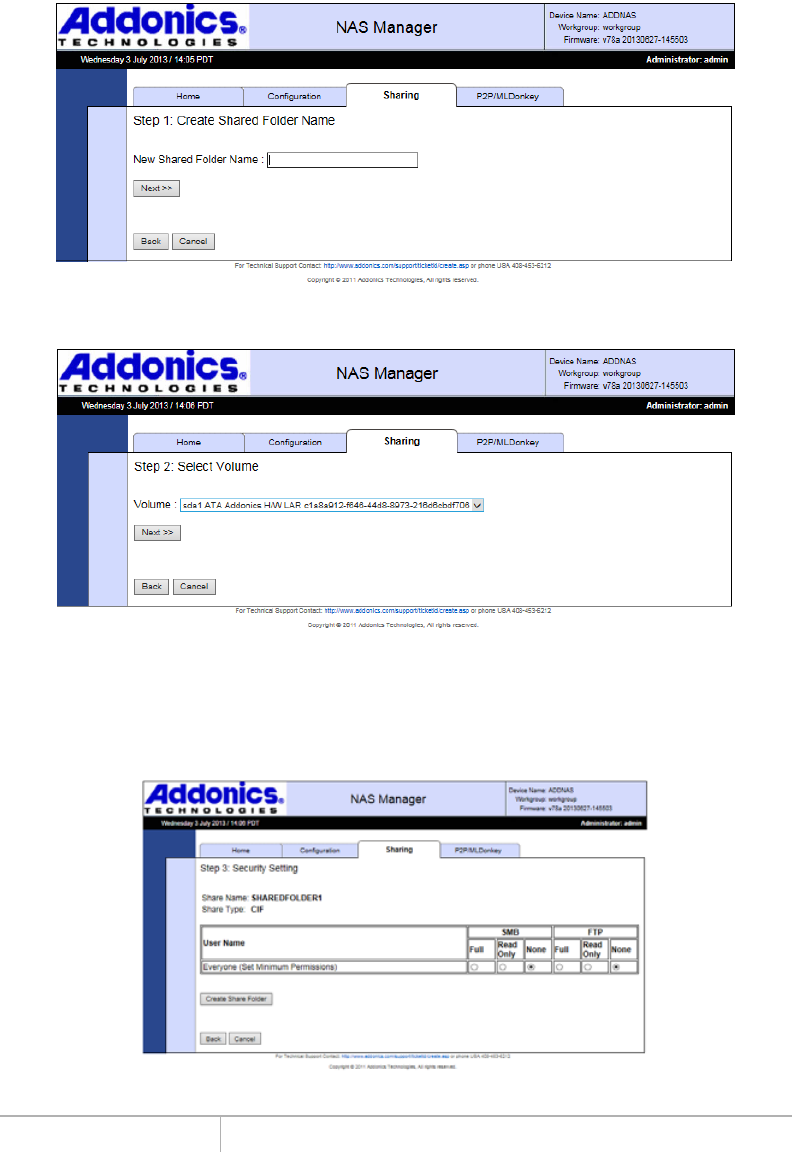
Step 1 is to define the name of the share. The share name will become the folder
name on the drive.
NOTE: The shared folder name will be written to disk using all capital letters. If an existing folder of the same
name appears and is not all capital letters, the NAS considers that not a match and writes the same folder
name in all capital letters anyway. This can cause unpredictable results if the drive is subsequently
connected to a computer. If a folder exists of the same name with all capital letters, it will be shared
without harming any data.
Step 2 is to select the drive the share is to be created on. The drive is identified by the
drive letter and partition number, the vendor and model, and the mount point.
Step 3 is to set the initial permissions for the new share. A permission setting for
“Everyone” as well as each individual user is listed, with the default permission set to
None for both SMB and FTP. Once you have reviewed the permissions for all users
and made any desired changes, clicking on “Create Share Folder” will complete the
Wizard.
Rename A Shared Folder
Changes the name of the directory as well as the share name for an existing shared
folder. Select the share to change and type in a new name, then click “Rename
Shared Folder.”
NOTE: The new shared folder name will be written to disk using all capital letters. If an existing folder of the
same name appears and is not all capital letters, the NAS unit considers that not a match and writes the
same folder name in all capital letters anyway. This can cause unpredictable results if the drive is
subsequently connected to a computer. If a folder exists of the same name with all capital letters, it will be
shared without harming any data.
Remove a Shared Folder
Deletes a share from the NAS unit. As a precaution this screen requires the word “yes”
is typed in as confirmation.
NOTE: Removing a shared folder also deletes the associated directory and all of its contents from the drive.
It is however possible to delete the share without destroying any data: simply disconnect the drive physically
from the NAS unit before proceeding. If the shared folder is on the NAS unit's RAID array, shutting down the
unit, then removing all of the RAID drives and powering up again before deleting the share will preserve the
data.
Update Security Settings
Changes SMB and FTP permissions for a share for each user and the general
permission for “Everyone.” Select the share to change, then click next and another
page will appear with current permissions. Make desired changes and click Update to
apply.


