


3
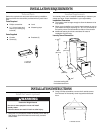
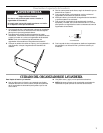
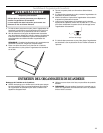
3. Attach the brackets to the back of the laundry tower using the
screws (provided). Align the brackets so that the latch is
pointing up.
4. Attach the console to the laundry tower. Align the locators
with the brackets and push down until the latches snap into
place and the magnets on the bottom of the console attach to
the top panel.
NOTE: Once installed, the console can be removed only by
removing the 2 console screws.
Install the Laundry Tower
1. Using two or more people, situate the laundry tower near its
final location. Open the drawers to remove any contents
stored inside.
2. To determine how far to extend the leveling feet, measure the
height of the washer and/or dryer you are installing the laundry
tower next to or between.
NOTE: Refer to the laundry tower dimensions in “Location
Requirements.”
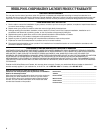
3. Place a piece of cardboard on the floor and, using two or more
people, lay the laundry tower on its side.
4. Turn all four feet out to the dimension determined in Step 2.
5. Using two or more people, return the laundry tower to the
upright position.
6. Check the laundry tower height and levelness and adjust the
feet as needed.
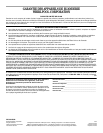
7. Once the laundry tower is at the appropriate height and is
level, use a ⁹⁄₁₆" (14 mm) open-end wrench to securely tighten
all four locknuts against the laundry tower.
8. Using two or more people, slide the laundry tower into its final
location and confirm height and levelness.
LAUNDRY TOWER CARE
To clean the interior and exterior:
■ Use a soft damp cloth or sponge to wipe up any spills.
Occasionally wipe the surfaces of your laundry tower to help
keep it looking new.
■ Use mild soap and water; do not use abrasive products.
■ NOTE: Do not lift the front of the console off the laundry tower
without first removing the console screws.
A.Locator
B.Latch
A
B
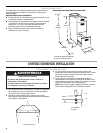
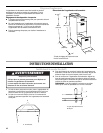
WARNING
Excessive Weight Hazard
Use two or more people to move and install
laundry tower.
Failure to do so can result in back or other injury.
A.Locknut
A