


8
Synthetics/Permanent Press cycle
The Synthetics/Permanent Press cycle starts with high-speed
agitation and then steps to low-speed agitation for cleaning
permanent press blends and synthetic fabrics. To minimize
wrinkling, this cycle features a cool-down rinse and a low-speed
final spin. Select 6 or 9 minutes of wash time to clean lightly to
moderately soiled loads.
Delicates cycle
The Delicates cycle features low-speed agitation for gentle soil
removal from delicate items and washable knits. Low spin
speeds minimize wrinkling. Use this cycle for cleaning lightly to
moderately soiled loads.
Hand Washables
The Hand Washables cycle features a series of brief, low-speed
agitations and short soaks to gently clean special-care items.
Low spin speeds minimize wrinkling. Use this cycle for cleaning
lightly soiled hand washables.
Garments are labeled "Hand Wash" because:
■ The fiber or construction may be sensitive to agitation.
■ The fabric contains sensitive dyes that may bleed.
NOTE:
Some "Hand Wash" items, particularly wool, naturally
shrink when washed. Keep this in mind when you purchase items
labeled "Hand Wash".
Properly sort and then use your Hand Washables cycle for gentle
washing. If items appear to be floating due to trapped air, stop
the washer by pushing in the Cycle Control knob. Push items
down into the water. Restart the washer by pulling out the Cycle
Control knob. Follow care label directions for drying. Items that
may shrink should be dried flat. When still wet, block these items
by gently stretching to original measurements.
Quick Wash cycle
The Quick Wash cycle features a reduced agitation speed for
gentle soil removal, while providing shortened wash/rinse, drain,
and spin times. Use this cycle with a
low water level and a
warm wash
to quickly clean a few lightly soiled items.
Rinse and Spin
When using extra detergent for heavily soiled clothes, or washing
special-care items, you may find an extra rinse and spin is
needed.
1.
Push in the Cycle Control knob and turn it clockwise to any of
the Rinse settings.
2.
Pull out the Cycle Control knob. The washer fills to the
selected load size, agitates, drains, and spins.
NOTE:
An EXTRA RINSE option is available (on some models).
See “Starting Your Washer.”
Drain and Spin
A drain and spin may help shorten drying times for some heavy
fabrics or special-care items by removing excess water.
1.
Push in the Cycle Control knob and turn it clockwise to any of
the Spin settings.
2.
Pull out the Cycle Control knob. The washer drains, then
spins.
Self-Cleaning Lint Filter
Your washer has a self-cleaning lint filter at the bottom of the
basket. Wash and rinse water flow over the filter during agitation,
separating the lint from the water. The lint spins out of the system
during the spin part of the cycle. If your washer drains into a tub,
remove any lint collected in the tub or strainer.
WASHER CARE
Cleaning Your Washer
Cleaning the exterior
Use a soft, damp cloth or sponge to wipe up any spills such as
detergent or bleach. Occasionally wipe the outside of your
washer to keep it looking new.
Cleaning the interior
Clean your washer interior by mixing 1 cup (250 mL) of chlorine
bleach and 2 cups (500 mL) of detergent. Pour this into your
washer and run it through a complete cycle using hot water.
Repeat this process if necessary.
NOTE:
Remove any hard water deposits using only cleaners
labeled as washer safe.
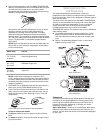
Cleaning the liquid fabric softener dispenser
Flush dispenser periodically with warm water, as shown. Remove
the dispenser by grasping the top of the dispenser with both
hands and squeezing and pushing upwards with thumbs. Clean
the dispenser by rinsing it under a water faucet. Replace it after
cleaning.
NOTE:
Do not wash clothes with this dispenser removed. Do not
add detergent or bleach to this dispenser; it is for liquid fabric
softener use only.
Water Inlet Hoses
Replace inlet hoses after five years of use to reduce the risk of
hose failure. Periodically inspect and replace inlet hoses if
bulges, kinks, cuts, wear or leaks are found.
When replacing your inlet hoses, mark the date of replacement
on the label with a permanent marker.