


9
Select this setting to dry items to a damp level, or to dry items
that do not require an entire drying cycle. Damp dry items such
as jeans (to prevent stiffness) or cotton clothing (to make
pressing easier). Choose a temperature setting based on the
fabrics in your load.
Select this setting to remove wrinkles from items such as clothing
packed in a suitcase or items wrinkled from being left in the dryer
too long. Set the temperature selector to Medium or Low Heat
depending on the fabrics in your load.
Use the Air Dry cycle for items that require drying without heat
such as rubber, plastic, and heat-sensitive fabrics. Set the Cycle
Control knob to Air Dry. This chart shows examples of items that
can be dried using the Air Dry cycle.
*(Minutes). Reset cycle to complete drying if needed.
When using Air Dry
■ Check to see that coverings are securely stitched.
■ Shake and fluff pillows by hand periodically during cycle.
■ Dry item completely. Foam rubber pillows are slow to dry.
End of Cycle Signal
■ The End of Cycle signal sounds when a cycle is complete, the
signal will sound only if set to On.
■ If the Iron Dry (Automatic) cycle is running, and the End of
Cycle signal is set to On, a signal sounds every few minutes.
The signal stops when you open the door or turn the Cycle
Control knob to Off.
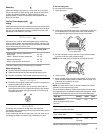
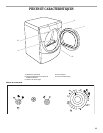
Drying Rack
The drying rack is useful for drying items you would not
necessarily want to tumble dry or that you would normally line dry
(for example, sweaters).
If your model does not have a drying rack, you can order one by
contacting the dealer from whom you purchased your dryer.
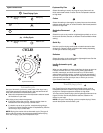
To use the drying rack
Do not remove the lint screen.
1. Open dryer door.
A. Front edge
2. Place drying rack inside dryer drum, positioning the back wire
on the ledge of the inner dryer back panel. Push down on
front edge of drying rack to secure over the lint screen.
A. Dryer back panel
3. Put the wet items on top of the rack. Leave space between
the items so air can reach all the surfaces.
NOTE: Do not allow items to hang over the edge of the rack.
4. Close the door.
5. Select a timed drying cycle and temperature, or an air cycle.
Items containing foam, rubber, or plastic must be dried on a
clothesline or by using an air cycle.
6. Push the Start button.
NOTE: You must remove rack for normal tumbling. Do not use
automatic cycles with the drying rack.
This chart shows examples of items that can be rack dried and
the suggested cycle, temperature setting and drying time. Actual
drying time will depend on the amount of moisture items hold.
*(Minutes) Reset time to complete drying, if needed.
Damp Dry
Iron Dry (Timed Drying cycle)
setting
Air Dry cycle
Type of Load Air Dry cycle*
Foam rubber—pillows, padded bras,
stuffed toys
Plastic—Shower curtains, tablecloths
Rubber-backed rugs
Olefin, polypropylene, sheer nylon
20 - 30
20 - 30
40 - 50
10 - 20
Rack Dry Setting Temp Time*
Wool Sweaters
Block to shape and lay flat on
the rack
Timed Low 60
Stuffed toys or pillows
Cotton or polyester fiber filled
Timed Low 60
Stuffed toys or pillows
Foam rubber filled
Air
(no heat)
None 90
Sneakers or canvas shoes Air
(no heat)
None 90
A
A