


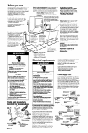

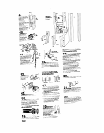

Move washer/dryer to its permanent
location. Remove cardboard/hardboard
from under washer/dryer.
access panel
in Step 19, remove the
two foam shipping pieces between the
washer and dryer and place with the
other shipping pieces. If the exhaust
duct cannot be connected from the
side of the washer/dryer, the exhaust
duct can be reached from the front
through the access panel. Remove the
two Phillips-head screws located at the
top of the access panel. Set access
panel and screws aside.
23
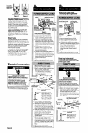
n
Carefullv move the
washer/dryer into final position.
l
Tilt the washer/dryer forward, raising
back legs 1 inch off the floor so that
the rear self-leveling legs will adjust.
Gently lower the washer/dryer to the
floor.
l
Check that the washer/dryer is level
by placing a carpenter’s level on top
of the washer, first side to side. then
front to back.
-
If it is not level, adjust the front legs
up or down.
- Tilt the washer/dryer forward, raising
back legs 1 inch off the floor so that
the rear self-leveling legs will adjust.
Gently lower the washer/dryer to the
floor.
- Check that the washer/dryer is level.
Repeat as needed.
30
w Check
that you
removed all the shipping pieces,
including the three shipping straps with
keys. Dispose of all materials in proper
manner,
If you do not remove all three shipping
straps, your washer/dryer may “walk”
away from its location.
26
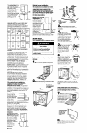
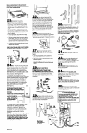
n
Determine the length of
exhaust duct that is needed to connect
the dryer to the exhaust hood. (See
“Exhaust requirements,” Panels C and D,)
CHECK THAT DRAIN HOSE IS NOT TWISTED
OR KINKED AND IS SECURELY IN PLACE.
27
n
Connect exhaust duct to
washer/dryer and then to the exhaust
hood.
l
Use the straightest path possible to
avoid 90” turns.
l
Use duct tape to seal all joints in the
exhaust system.
l
Use caulking compound to seal
exterior wall opening around exhaust
hood.
31
n
Check that you have all of
your tools.
32
WTurn on water faucets and
check for leaks. Tighten couplings if
there is leaking. Do Not overtighten; this
could cause damage to faucets.
strap
baded
A
A
nl,
,.ostic beaded strap
33
n
Replace access panel. Be
24
n
Put “hook” end of drain hose
28
w CHECK ELECTRICAL
sure to tighten screws at each end of
the access panel.
in laundry tub or standpipe. Wrap the
plastic beaded strap around the drain
hose and laundry tub or standpipe.
Thread beaded end of strap through
keyhole end. Pull until strap is tight. Slide
strap into narrow end of keyhole to lock
strap in place. See Figures A-B.
If the water inlet faucets and drain
standpipe are recessed, tightly wrap the
plastic beaded strap around the drain
hose and faucet body. (Do Not wrap
strap around the faucet handles or
stems,) Thread beaded end of strap
through keyhole end. Pull until strap is
tight. Slide strap into narrow end of
REQUIREMENTS. BE SURE YOU HAVE
CORRECT ELECTRICAL SUPPLY AND
RECOMMENDED GROUNDING METHOD.
Check the Installation Instructions to see
that you have completed each step.
Complete any missed steps before you
continue.
34
tread the Use and Care
Guide to fully understand your new
washer/dryer. Open dryer door. Check
to be sure lint screen is in its proper
position. Wipe out drum.
35
n
Plug power supply cord into
grounded outlet. Reconnect the power
supply. Now start the washer and allow
it to complete the regular cycle.
keyhole to lock strap in place.
See Figure C.
Secure the drain hose to the tub
or standpipe with the plastic
strap. Failure to properly secure
drain hose could result in water
damage.
If drain hose cannot be strapped
into place, hose must be cut
exactly to length so
“hook” end is held
tightly over edge of
tub or standpipe.
Figure D.
36
n Start dryer and allow it to
comblete a full heat cycle to make sure
D
PI
it is working properly. ’
Congratulations!
You have successfully installed your
new washer/dryer. To get the most
efficient use from your new
washer/dryer, read your Use and Care
Guide.
Keep Installation Instructions and
Guide.
29
n
Check that all parts are now
installed. See parts list, Panel D. If there is
an extra part, go back through steps to
see which step was skipped.
If a longer drain hose is needed, drain
hose (Part No. 388423) and hose
extension kit (Part No. 285442) are
available from your authorized parts
distributor. If drain hose must be
shortened, use hose kit (Part No.
285442).
Note: If washer/dryer is moved to adjust
drain hose, the washer/dryer must be
leveled again. Repeat Step 23. Place
cardboard under the washer/dryer and
carefully move washer/dryer to avoid
damaging floor covering.
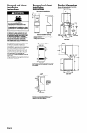
Numbers
correwond
I # \>
to steljs.
’ 18.
Panel F