


MODE D’EMPLOI (SUITE)
REPASSAGE À LA VAPEUR (SUITE)
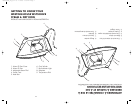
Pour repasser à la vapeur, il est important de s’assurer que le sélecteur de
température se trouve entre les réglages WOOL et LINEN, afin d’éviter les
taches d’eau sur les vêtements.
1. Avant la première utilisation, retirer tout autocollant de la semelle.
S’assurer d’enlever tout résidu en frottant la semelle avec un linge
humide.
2. Régler la commande de débit de vapeur à
la position OFF. Cela coupera la vapeur
s’il y a de l’eau dans le réservoir.
3. Régler la commande de température à la position MIN.
4. Avant de brancher le fer, soulever le couvercle du réservoir d’eau et
verser de l’eau dans le réservoir jusqu’au repère de niveau MAX.
MISE EN GARDE : Ne jamais remplir le réservoir d’apprêt pour
tissus, d’empois ni d’aucune autre solution car cela
endommagerait le mécanisme de production de vapeur. Ne pas
utiliser d’eau contaminée.
5. Brancher le cordon sur une prise électrique c.a. de 120 V.
6. Régler la commande de température à WOOL, COTTON ou LINEN. (Si
la température est réglée à un degré moindre, la vapeur ne pourra pas
se former adéquatement et de l’eau pourrait s’écouler de la semelle.)
Le voyant lumineux s’allume dès que le fer est branché et que le
réglage est supérieur à MIN.
NOTE : À la première utilisation, le fer peut dégager une odeur pendant
une dizaine de minutes. Cela résulte du chauffage initial des matériaux
constituant l’appareil. L’odeur ne présente aucun danger et devrait
disparaître après la première utilisation.
7. Régler la commande de débit de vapeur au débit désiré. Au débit
maximum, l’appareil utilise plus d’eau; il peut donc être nécessaire de
remplir le réservoir plus souvent.
8. Placer l’appareil sur son talon d’appui sur une surface stable et
protégée. Laisser l’appareil chauffer au réglage choisi. Lorsque le
voyant lumineux s’éteint, le fer est prêt.
9. Après le repassage, régler la commande de température à la position
MIN et la commande de débit de vapeur à OFF. Débrancher l’appareil
et le laisser refroidir complètement avant de le ranger.
MISE EN GARDE : Éviter tout contact avec la vapeur qui s’échappe du
fer.
MISE EN GARDE : Si le fer a servi pendant une longue période et qu’il est
très chaud, NE PAS remplir le réservoir d’eau. Laisser le fer refroidir, puis le
remplir et continuer à repasser.
8
8
OPERATING INSTRUCTIONS (Cont.)
STEAM IRONING (Cont.)
When using as a Steam Iron, be sure the temperature setting on the
Temperature Control Dial is within the WOOL to LINEN setting to avoid
water spotting on the garment.
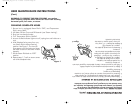
1. Before first use, remove any adhesive stickers from the Soleplate.
Make sure all adhesive is removed by rubbing Soleplate with a
damp cloth.
2. Turn Steam Dial to “OFF”.
This will stop the flow of
steam if water is in the Reservoir.
3. Turn Temperature Dial to “MIN”.
4. With the unit UNPLUGGED, lift Water Fill Port Cover and pour water
through Water Fill Port to the “MAX” water level.
CAUTION: Never fill Iron with fabric conditioner, starches, or
any other solution as these will damage the steam mecha-
nism. Do not use contaminated water.
5. Plug the cord into a 120V AC electrical outlet.
6. Turn Temperature Dial to “WOOL”, “COTTON” or “LINEN” setting.
(If the temperature is set below these temperatures, steam will not be
able to form properly and water may drip from the Soleplate.)
The Red Indicator Light will turn on as soon as the Iron receives
power and the Temperature Dial is turned to a heat setting above
“MIN”.
NOTE: When turned on for the first time, your new Iron may emit an
odor for up to 10 minutes. This is due to the initial heating of the mate-
rials used in making the Iron. The odor is safe and should not reoccur
after initial heating.
7. Turn Steam Dial to adjust steam rate. When using the maximum
steam rate, the iron uses more water and it may be necessary to fill
the Reservoir more often.
8. Place Iron on its Heel Rest and place on a stable, protected surface.
Allow Iron to heat to selected temperature setting. When Red
Indicator Light turns off, the Iron is ready for use.
9. When finished ironing, turn Temperature Dial to “MIN” and Steam
Dial to “OFF”. Unplug Iron from wall outlet. Allow Iron to cool com-
pletely before cleaning the exterior of the Iron or storing.
CAUTION: Avoid coming in contact with escaping steam.
CAUTION: If the Iron has not been used for a long period of time and
is hot, DO NOT fill it with water. Allow to cool, then refill and resume
ironing.
WST5000ZE_IB_13-1-05 1/13/05 3:09 PM Page 15