


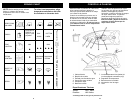

INSTRUCCIONES DE USO USER MAINTENANCE INSTRUCTIONS
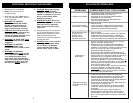
Fig. 2
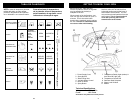
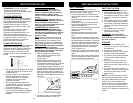
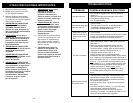
In order to remove calcium and built-up
particles, the self-cleaning system should be
run at least once a month. (Fig. 9)
• Fill the watering beaker provided to the
half-full mark and then pour into the water
reservoir.
• Set the variable steam control to the no
steam position.
• Insert the main plug into the wall socket.
• Set the temperature control dial to the
maximum temperature.
• Wait until the thermostat light goes off and
steam iron has reached preset
temperature.
• Remove the plug from the wall socket.
• Hold the steam iron horizontally over a
sink.
• Place the variable steam control to “Self-
Clean” position. Hot water and steam will
be emitted from the soleplate. Swing the
steam iron lightly back and forth gently to
allow lime and dust particles to come out.
• When the water reservoir is empty, shift
the variable steam control from “Self-
Clean” position to “0”.
• Stand the iron upright and insert the plug
into the wall socket to let the iron heat up
again.
• Move the iron over a clean cotton cloth to
clean the soleplate and let the remaining
water on the soleplate evaporate.
SELF CLEANING
Fig. 9
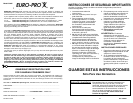
Este artefacto es SÓLO PARA USO
DOMÉSTICO y puede conectarse a
cualquier tomacorriente eléctrico
polarizado de 120V CA. No utilice ningún
otro tipo de tomacorriente.
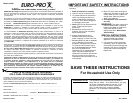
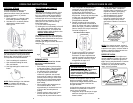
PLANCHADO EN SECO
Todos los ajustes marcados en el regulador
de temperatura pueden utilizarse para
planchado en seco. Deslice la palanca de
control de vapor variable hasta el tope
comosemuestraenlaFigura1.Esto
cortará el flujo de vapor si hay agua en el
tanque.
PLANCHADO AL VAPOR
¡ADVERTENCIA! NO apunte la
plancha hacia el rostro, hacia usted
mismo ni hacia ninguna otra persona
mientras utiliza o ajusta el vapor.
Pueden ocurrir quemaduras o lesiones
graves.
¡ADVERTENCIA! Antes de llenar la
plancha con agua, asegúrese de que no
esté conectada al tomacorriente
eléctrico. La plancha puede llenarse con
agua mientras está caliente.
¡ADVERTENCIA! PARA EVITAR
RIESGOS DE QUEMADURAS, tenga
cuidado al llenar la plancha con agua.
Pueden ocurrir quemaduras al contacto
con piezas metálicas calientes, agua
caliente o vapor.
NOTA
: Debido al diseño de la base, se
puede utilizar agua de la llave corriente
con esta plancha. Sin embargo, en las
áreas de agua muy dura, recomendamos
utilizar agua destilada o desmineralizada.
PRECAUCIÓN: Nunca llene la plancha
con acondicionador para telas,
almidones ni ningún otro líquido, ya que
éstos dañarán el mecanismo del vapor.
No use agua contaminada.
1. Gire el regulador de temperatura a
“Min” y deslice la controle de vapor
variable hacia abajo
hasta el tope.
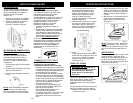
2. Sosteniendo la plancha con un leve
ángulo, vierta el agua lentamente en
la entrada de llenado de agua. Consulte
la figura 2. Llene el tanque hasta el
nivel deseado o hasta la marca de nivel
de agua “MAX” utilizando el frasco para
llenado de agua. (Cuando la plancha
está en posición vertical, el tanque de
agua azul transparente permite medir la
cantidad de agua). NO llene en exceso
el tanque.
3. Conecte el cable a un tomacorriente
eléctrico polarizado de 120V CA.
14
FUNCIÓN ANTIGOTEO
La función antigoteo incorporada ayuda a
reducir las manchas de agua cortando el
flujo de agua cuando la temperatura de la
plancha sea demasiado baja para
producir suficiente vapor. La función
antigoteo reduce el goteo de agua y las
manchas.
Si presiona con mucha frecuencia el
botón de escape de vapor o si la
temperatura es demasiado baja, no se
podrá evitar el goteo de agua y las
manchas. La cantidad de gotas de agua a
la larga disminuirá, una vez que la
plancha haya utilizado2ó3tanques
llenos para vapor y planchado.
Fig. 1
Para Planchado en Seco:
AUTOLIMPIEZA
1. Gire el regulador de temperatura a “MIN”
y deslice la palanca de control de vapor
variable hasta “0”.
2. Conecte el cable a un tomacorriente
eléctrico polarizado de 120V CA.
Se encenderá la luz de encendido,
indicando que la plancha está
recibiendo corriente.
3. Gire el regulador de temperatura al
ajuste deseado. (Para ver una guía de
selección de temperatura, consulte la
“Guía de Planchado”).
4. Coloque la plancha sobre su talón
(en una superficie estable y protegida)
mientras se alcanza la temperatura
deseada.
EMPTYING THE IRON
1. Always empty iron after each use.
2. When finished using the iron, turn
the variable steam control to “0” and
the temperature control dial to “MIN”.
3. Unplug the iron from the electrical
outlet.
4. Set variable steam control to “MAX”.
5. Turn the iron upside down over the
sink with the tip pointing downward
and allow the water to flow from the
opening.
6. Set variable steam control to “0”.
7. Allow iron to cool in an upright
position before storing.
WARNING! Use caution when
emptying the iron. Burns may occur
from touching hot metal surfaces,
hot water or steam.
STORAGE
1. Always turn the variable steam
control to "0" after you have emptied
the water tank.
2. Allow the iron to cool down.
3. Always store the iron in the upright
position to protect the soleplate.
4. From time to time, clean the exterior
of the iron with a damp cloth and
wipe dry.
5. If you use spray starch, wipe the
soleplate occasionally with a soft
damp cloth to prevent the build-up of
deposits.
6. If the iron has not been used for a
few weeks, hold the iron horizontally
and allow to steam for 2 minutes
before ironing.
NOTE: The anti drip function reduces
water dripping and water stains. It does
not prevent water dripping and water
stains if you press the steam burst
button too often or if the temperature is
too low. The amount of water droplets
will eventually decrease after the iron is
used for 2 to 3 tankfuls of steaming and
ironing.
7