


22
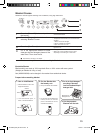
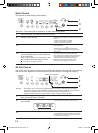
Screws
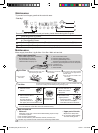
Figure 3
Bottom Cover
Base
Figure 2
3
3
4
1
2
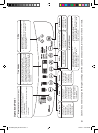
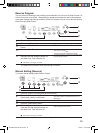
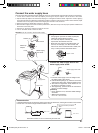
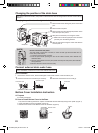
Changing the position of the drain hose
Depending on the drain location, the position of the drain hose can be changed to the left side of the washing
machine.
Changing the position from the right to the left side
1
Remove the screw affixing the part A connection
port.
2
Remove the rear panel.
3
Remove the cover and change the position of the
hose from part A to part B.
4
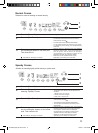
Affix part B connection port using the screw.
w
Make sure to hook the upper part of the connection
port firmly onto the washing machine.
5
Affix the rear panel using the screw and affix the
cover at part A.
Part A
Rear panel
Part A
Hose
Part B
Cover
3
3
4
1
2
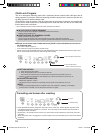
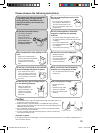
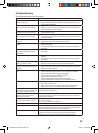
[NOTE]
How to remove the rear panel
The rear panel is fixed with 4 screws, 4 claws at both right and left sides and 4
hooks at top and bottom.
1. Loosen and remove the 4 screws.
2. Pull the panel while pushing the end of the claws inwards, then release the
fastened claws.
3. Hold the gap between the body and panel and warp the rear panel, then release
the upper hook.
4. Remove the lower hooks from the body.
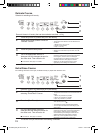
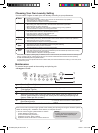
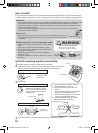
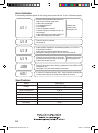
Connect external drain water hose
Prior to installation, make sure to mount the external drain hose.
How to connect
Connection port
•
If the hose is hard to insert, attach a detergent to the inside surface of the connection port.
1
Insert the hose into the connection port securely.
2
Slide the hose band as far as it will go.
Bottom Cover Installation Instruction
Hose band
A. Purpose
For safety precaution.
B. How to install Bottom Cover to the Base
1.
Lay down the washing machine on a piece of cardboard with the back body facing to the upside. (Figure 1)
2. Insert the Bottom Cover to the Base. (Figure 2)
3. Fasten the 2 screws of the Bottom Cover to the Base. (Figure 3)
Figure 1
Connection port
External drain water hose
NA-F90H2_EN_AR-PE-V2.indd 22 11/23/11 3:41:45 PM