


©2004 Maytag Appliances Company 16022904 Rev. 0 43
WARNING
!
To avoid risk of electrical shock, personal injury or death;
disconnect power to unit before servicing.
Disassembly Procedures
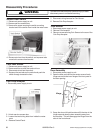
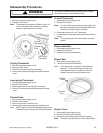
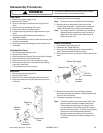
4. Grasp the idler pulley in left hand, pull idler upward
and to the left.
Note: There is a built-in stop to prevent overstressing
of the idler arm spring. Slip belt off the motor
pulley.
5. Slip the belt off the back of the tumbler.
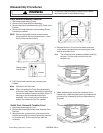
6. While lifting top cover, pull tumbler out of cabinet.
Pull to the Side
Work the Belt Off of the Pulley
Installing Drive Belt
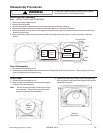
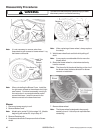
1. Disconnect power supply to unit.
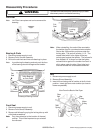
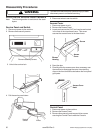
2. Place belt onto the outside of the tumbler and position
the belt 1 1/2" in front of rear baffle mounting screws
with ribbed side against tumbler.
3. Position tumbler into the rear felt seal, resting the
tumbler onto the rear rollers. Lower the front of the
tumbler onto the blower housing.
4. Insert left hand along side of tumbler at 8 o'clock.
Insert right arm under tumbler (as close to blower as
possible).
Rear
Bulkhead
Baffle Rear
Mounting Screw
Belt
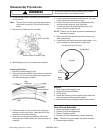
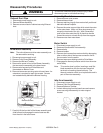
5. Locate the belt and create a small loop with your right
hand, ensuring the belt is free of twist.
6. Position the open end of the loop (ribbed side down)
onto the motor pulley with your right hand.
7. To clear the drive belt, grasp the idler pulley in left
hand, pull idler up and to the left.
NOTE: There is a built-in stop to prevent overstressing of
the idler arm spring.
8. Relax your left hand and allow the idler pulley to rest
down onto the belt.
9. Grasp baffles with both hands and rotate tumbler 1 or 2
turns clockwise to allow the belt to align itself.
As Viewed From The Front
Tumbler Belt
Idler
Pulley
Motor
Pulley
Cylinder
Baffles
1. Disconnect power supply to unit.
2. Remove Front Panel and Door.
3. Lift Top Cover.
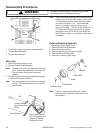
4. Rotate the tumbler until the screws of the baffle to be
removed appear at the top of the tumbler.
5. Remove two screws holding the baffle to the tumbler.
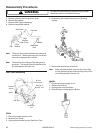
Rear Shroud Assembly
1. Disconnect power supply to unit.
2. Remove Front Shroud Assembly.
3. Remove Tumbler and Belt
4. Remove Gas Valve Assembly or Heater Assembly.
Note: Be careful on gas models, the igniter is fragile.
5. Remove heat enclosure.