


18
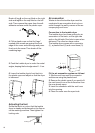
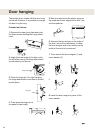
Break off tag A on the cup fitted on the right
side and tag B on the cup fitted on the left
side. Then remove the paper from the self-
adhesive surface under the plastic cups.
4. Fit the plastic cups so that the “tags”
marked with arrows are against the front
edge of the cover and side edge and press
firmly onto the cover. Then break off the
remaining tags.
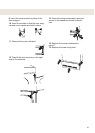
5. Push the tumble dryer in under the metal
angles, keeping the front edge raised 1 - 2 cm.
6. Lower the tumble dryer’s front feet into
the plastic cups and adjust so that the dryer
is balanced.
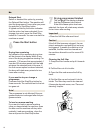
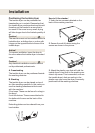
Adjusting the feet
Screw the feet in or out so that the tumble
dryer is steady and balanced on the floor or
on the washing machine. Then tighten the
locking nuts.
Locking nut
A
B
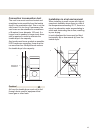
Air evacuation
Waste air from the tumble dryer must be
conducted to an evacuation duct or to an
outlet through the wall by means of the ac-
companying vent hose.
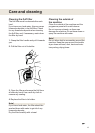
Connection to the tumble dryer
The tumble dryer has three options for air
evacuation: at the back, on the right side
and on the left side. One hole is open when
delivered. The other two have covers.
The tumble dryer comes with a connector
(1), a plastic band (2) and a vent hose (3).
Fit the air evacuation system as follows:
1. Slip the vent hose onto the connector
and secure using the plastic band.
2. Remove the plastic cover if you want to fit
the vent hose to one of the holes other than
the one already open.
3. Insert the connector with the vent hose
into the opening.
4. Place the cover over the open hole.
1
2
3