


25
Compactor Owner’s Manual
Lift Depths
Shut off the compactor and lift it into the air to a new position, or using
minimum boom down-force slide the compactor along the ground. Avoid
dragging the compactor's plate across the material surface ('ironing')
while the motor is running. Forces exerted on the compactor by 'ironing'
can cause premature failure.
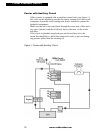
Another cause of premature mount failure occurs when working in very
wet soil and/or a very tight trench. Suction or drag when the compactor
is lifted can cause the mounts to tear. In these situations fasten a chain
between the compactor's upper and lower sections to relieve the lifting
strain on the rubber isolators.
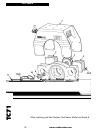
Never grade the trench or level backfill with the compactor. Extreme side
forces can damage the rubber isolators.
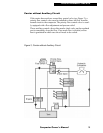
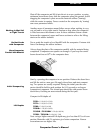
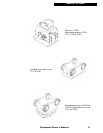
Always keep the plate of the compactor parallel with the material being
compacted. Compactors can operate on an angle if you keep the carrier
boom down-force at 90
o
to the compactor base.
Start by operating the compactor in one position. Release the down force
and lift the unit to a new spot. Re-apply down-force and start compact-
ing. Two passes are usually required. During the initial pass the com-
pactor should be held in each position for 8-10 seconds or as long as
compaction is apparent. The second-pass should be with greater boom
down-force, focusing on areas missed during the first pass.
Compact in lift depths of:
TC51: .5-1 ft (0.15-0.3 M)
TC71: .5-1 ft (0.15-0.3 M)
TC80: 1-2 ft (0.3-0.6 M)
TC91S: 1-2 ft (0.3-0.6 M)
TC151S / TC151SH: 2-3 ft (0.6-0.9 M)
TC301 / TC301H: 2-4 ft (0.6-1.2 M)
Note: using a higher material lift depth may give less than 95% soil com-
paction. Materials with 5% moisture give better compaction. Narrow
excavations can use higher lifts.
Working in Wet Soil
or Tight Trench
Do Not Grade
with Compactor
Keep Compactor
Parallel with Material
Initial Compacting
OPERATION