


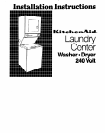
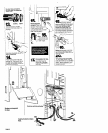


love washerldryer to its
ermanent location.
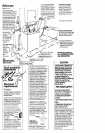
Check levelness of
n washer/dryer by
Ilacing a carpenter’s level on top of
dasher, first side to side then front
I back. If it is not level, screw the
‘ant legs up or down to adjust. Tilt
rasher forward raising back legs 1”
IH of floor to adjust rear self-
:veling legs. Gently lower washer
3 floor. Make final check with level.
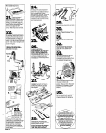
22
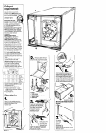
n
‘ut “hook” end of drain hose in tub
jr standpipe. Secure drain hose by
vrapping the plastic strap around
he hose as shown in Figures A-C.
f drain hose cannot be strapped in
,lace, it must be cut exactly to length
io the “hook” end is held tightly over
he edge of the tub or standpipe as
ihown m Figure D.
:HECK THAT HOSE IS NOT
MISTED OR KINKED AND IS
jECURELY IN PLACE.
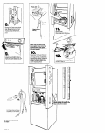
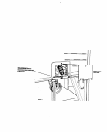
?xhausf ductwork can not be
:onnected from the side of the
vasher/dryer, the exhaust duct can
)e reached from the front, through
he access panel. Remove the
access panel by unscrewing 2
)hllllps heads screws located at
he top of the panel. Set panel and
icrews aside
NEL E
24.
To exhaust the dryer straight from
lack of the washer/dryer unit,
jetermine if any additional exhaust
duct is needed (see Exhaust
qequirements. Panel 6). To exhaust
.he dryer to either side or Inside
:heck If additional exhaust duct is
Teeded and see Alternate Exhaust
Wethods. Panel F Connect exhausl
jucl to exhaust hood.
Use duct tape to seal all joints.
26.
CHECK ELECTRICAL
REQUIREMENTS. BE SURE YOU
HAVE CORRECT ELECTRICAL
SUPPLY AND RECOMMENDED
GROUNDING METHOD. Check the
installation inslructlons to see that
you have completed each step.
Complete any missed steps before
you continue.
Check that all parts are now
installed. See parts list, Panel A.
If there is an extra part, go back
through steps to see which step
Check that you removed all the
shipping pieces including the three
shipping straps with keys.
If you do not remove the shipping
straps, your washer/dryer may
-
“walk” awav from its tocatlon.
DhilliDs screwdriver
Check that you have all of your tools
30.
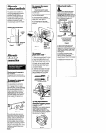
Turn on waler faucets and check
for leaks. Tighten couplmgs if there
is leaking.
31.
Plug electrical cord into grounded
outlet.
32.
If access panel was removed to
install ductwork, replace access
panel. Be sure to tighten both
screws.
33
1
Take a few minules and read the
Use and Care Guide to fully
understand your new wastierldryer.
Now start the washer and allow
it to complete the regular cycle.
Remove the tape across the dryer
lint screen. Check to be
sure lint screen is in its proper
position. Wipe out drum. Start dryer
and allow it to complete a cycle to
make sure the dryer is working
properly
35.
Finally, save all literature and keep
with the washer/dryer. Save all
shlpping materials for reshipping.
You have
successfully Installed your
KItchenAid washer/dryer.
To gel the most efliclent use from
your new washer/dryer read your
KItchenAId Use and Care Guide.
Congratulations!
Keep lnete~ation instructions nearb)
where you can refer to them.
\
They’ll make re-InstallIng
your KItchenAId washer/dryer
In another home es easy
es the first Instattatlon.
/