


PORTABLE INSTALLATION INSTRUCTIONS
(for model 110.4472)
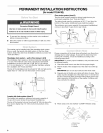
Connect Drain Hose
The washer must drain into a sink or laundry tub with a carry-
away capacity of 7 gal. (26.6 L) per minute (for portable
installations). The top of the tub must be at least 27" (68.6 cm)
above floor and no higher than 48" (121.9 cm) from the bottom of
the washer.
To prevent the fill-and-drain hose from leaking, it must be
installed according to the following instructions.
IMPORTANT: To ensure proper installation, this procedure must
be followed exactly.
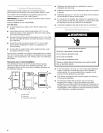
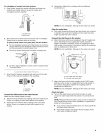
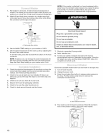
1. Wet inside end of the fill-and-drain hose with tap water.
IMPORTANT: Do not use any lubricant other than water.
Squeeze ears of double-wire clamp with pliers to open. Place
clamp over the straight end of the drain hose 1A"(6 mm) from
the end. Twist hose back and forth while pushing down onto
drain connector at the bottom of the washer. Continue until
hose contacts the cabinet.
ram)
Proper connection of the fill-and-drain hose will protect your
floors from damage due to water leakage.
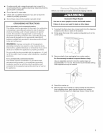
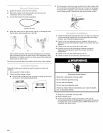
Insert new flat washer (supplied) into the end of the inlet hose.
Firmly seat the washer in the coupling.
Place clamp over area marked "CLAMR" Release clamp.
1/4"
(6ram)
A B
A. Coupling
B. Washer
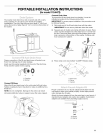
Connect Fill Hose
Attach the fill-and-drain hose to the cold water (left) inlet valve.
Tighten coupling by hand. Use pliers to make an additional two-
thirds turn.
NOTE: Do not overtighten. Damage to the valves can result.
Hot water (right) inlet valve is capped. Leave this valve capped.
A. Drain hose
B. Clamp
C. Cabinet
Proper connection of your faucet adapter kit will allow hot and
cold water to enter your washer properly. It also helps prevent
water damage due to leaks.
Attach the faucet adapter kit from the parts bag to your faucet. A
standard faucet adapter and washer are supplied. Customized
adapters are available from plumbing supply sources.
A. Washer
B. Adapter
11