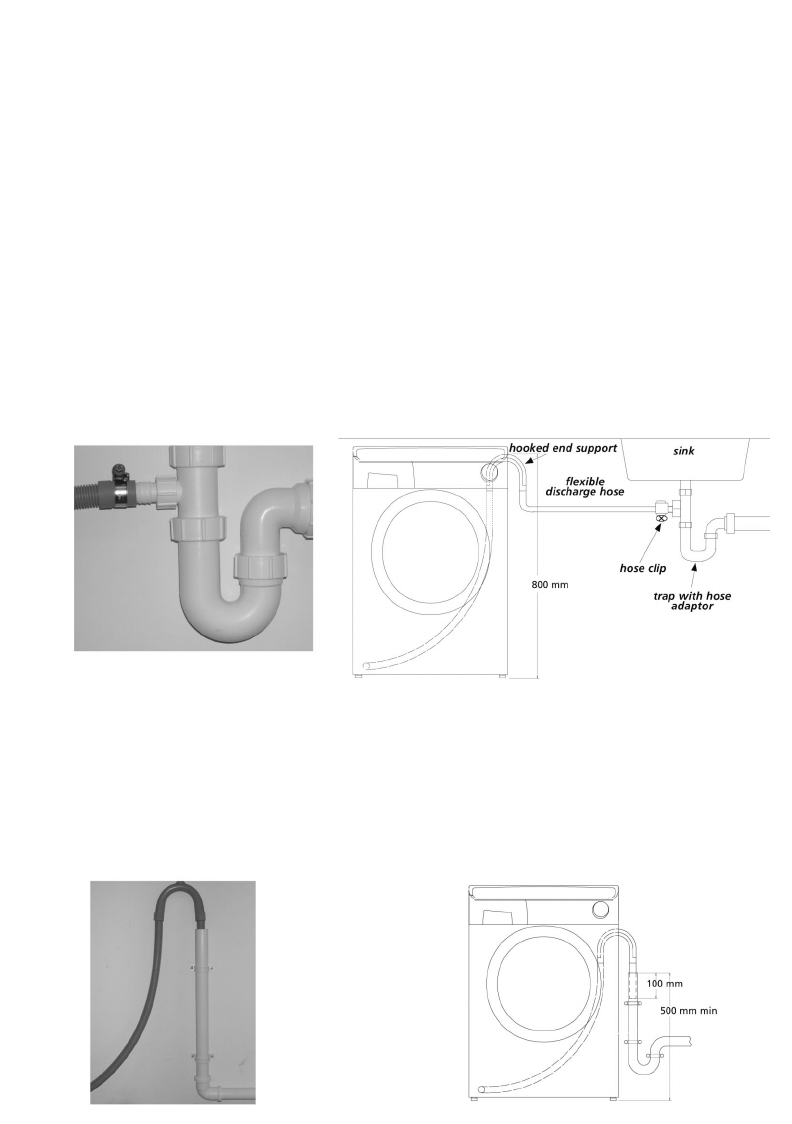
Connecting the drainage pipe
This machine must be connected in accordance with the water supply regulations.
Water bylaws prohibit connection to a surface water drain.
Decide which plumbing option suits you best then follow the instructions below:
Option 1 - Waste pipe connection (waste trap)
Fit the hooked end support to the outlet pipe and position it at least 800mm off the
floor.
After removing the blanking plug, or cutting the membrane from the waste system,
securely fix the outlet pipe to the drainage system, using a hose clip.
Secure the hooked end support up to at least 800mm to avoid water being drawn
back into the machine.
Option 2 - Into a standpipe
Ensure that the standpipe is not located near an electrical socket.
Fit the hooked end support to the outlet pipe. Install the hose into the standpipe
ensuring that the pipe is at least 500mm from the floor.
Insert the outlet pipe approximately 100mm into the standpipe.
Levelling The Machine
Your machine is heavy so care must be taken when moving it.
We recommend that two people move the machine to avoid strain and possible injury.
Take care not to damage flooring when moving the machine and do not drag or lift
the machine by its door.
When moving the machine to its final position, take care not to kink or damage the
hose at the back of the machine.
Once the machine is in place the feet should be adjusted to ensure that the machine is
level. If the machine is not level it may become very noisy or move during the spin
cycle.
Step 1. Turn the locking nut clockwise to release the screw adjuster on the feet.
Step 2. Adjust the feet on the corners of the machine by rotating each foot to raise or
lower its position until it is firm and level on the ground.
Step 3. When the machine is firm and level, tighten the locking nuts on the feet in an
anti-clockwise direction until they reach the base of the machine.
Testing the Installation
Refer to “Selecting the wash programme” for details of how to select programmes.
Step 1. Turn on the water supply and check for leaks from the fill hose.
Step 2. Switch on the electricity supply.
Step 3. Select the spin programme and then press the Start Pause button to start the
machine. Allow the programme to continue for one minute and then cancel the
programme by returning the selector to the OFF position. This will remove any water
remaining in the machine from factory testing.
Step 4. To check for cold water filling to the machine:
Select the rinse programme and press the Start Pause button to start the machine.
Once the rinse has finished, allow the tumble action to continue until the water has
pumped out. Check that the drain outlet is not leaking or overflowing.
12
13


