


16
FR
IT
CAPITOLO 5
MESSA IN OPERA
INSTALLAZIONE
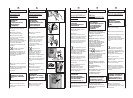
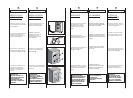
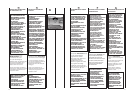
Porti la macchina vicino al
luogo di utilizzo senza il
basamento dell’imballo.
Tagliare le fascette
fermatubo,prestando
attenzione di non
danneggiare il tubo e il
cavo elettrico
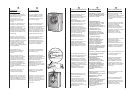
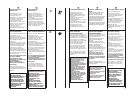
Svitare le 4 viti (A) sul lato
posteriore e rimuovere i 4
distanziali (B).
Richiudere i 4 fori utilizzando
i tappi contenuti nella busta
istruzione.
ATTENZIONE:
NON LASCI ALLA
PORTATA DI BAMBINI
GLI ELEMENTI
DELL’IMBALLAGGIO IN
QUANTO POTENZIALI
FONTI DI PERICOLO.
CHAPITRE 5
MISE EN PLACE
INSTALLATION
Placer la machine près du
lieu d’utilisation sans la base
d’emballage.
Couper avec précaution le
cordon qui maintient le
tuyeau d’évacuation et le
cable d’alimentation
Enlever les 4 vis de fixation
indiquées en (A) et enlever
les espaces indiqués en (B)
Couvrir les quatre trous en
utilisant les capuchons
prévus à cet effet dans le
sachet où se trouve la
notice
ATTENTION:
NE PAS LAISSER À LA
PORTÉE DES ENFANTS
DES ELEMENTS
D’EMBALLAGE QUI
PEUVENT CAUSER DES
RISQUES.
17
EN
CHAPTER 5
SETTING UP
INSTALLA
TION
Move the machine near its
permanent position without
the packaging base.
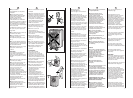
Carefully cut the securing
strap that holds the main
cord and the drain hose.
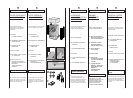
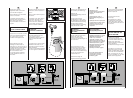
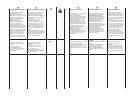
Remove the 4 fixing screws
marked (A) and remove the
4 spacers marked (B)
Cover the 4 holes using the
caps provided in the
instruction booklet pack.
WARNING:
DO NOT LEAVE THE
PACKAGING IN THE
REACH OF CHILDREN
AS IT IS A POTENTIAL
SOURCE OF DANGER.
RU
ÏÀPÀÃPÀÔ 5
ÓÑÒÀÍÎÂÊÀ
Ïîìåñòèòå ìàøèíó âáëèçè
ìåñòà åå èñïîëüçîâàíèÿ áåç
ïîäñòàâêè è óïàêîâêè.
èÂÂÂʸÚ Ô·ÒÚχÒÒÓ‚˚È ıÓÏÛÚ.
ÑÂÈÒÚ‚ÛÈÚÂ ÓÒÚÓÓÊÌÓ, ˜ÚÓ·˚ ÌÂ
Ôӂ‰ËÚ¸ ¯Î‡Ì„ Ë ˝ÎÂÍÚ˘ÂÒÍËÈ
ÔÓ‚Ó‰.
éÚÍÛÚËÚ 4 ‚ËÌÚ‡ (A) ̇ Á‡‰ÌÂÈ
ÒÚÂÌÍÂ Ë ËÁ‚ÎÂÍËÚÂ 4 ‡ÒÔÓÌ˚ı
‚ÚÛÎÍË (B).
á‡ÍÓÈÚ 4 ÓÚ‚ÂÒÚËfl
ÒÔˆˇθÌ˚ÏË Á‡„Îۯ͇ÏË. Ç˚
̇ȉÂÚ Ëı ‚ ÔÓÎË˝ÚËÎÂÌÓ‚ÓÏ
Ô‡ÍÂÚÂ Ò ËÌÒÚÛ͈ËÂÈ.
ÂÍÈÌÀÍÈÅ!
ÍÅ ÎÑÒÀÂËßÉÒÅ
∋ËÅÌÅÍÒÛ
ÓÏÀÊÎÂÊÈ ÄÅÒßÌ
ÄËß ÈÃP.
NL
HOOFDSTUK 5
INSTALLATIE
Breng de machine (zonder
de onderkant van de
verpakking) dicht bij de
plaats waar hij komt te
staan.
Knip voorzichtig de
beveiligingslus van het snoer
en de afvoerslang door.
Verwijder de 4 schroeven zie
(A) en verwijder de 4
pluggen zie (B)
Vul de 4 gaatjes op met de
dopjes die in de verpakking
bij de gebruiksaanwijzing
zitten.
WAARSCHUWING:
ZORG ERVOOR DAT HET
VERPAKKINGSMATERI-
AAL BUITEN HET BEREIK
VAN KINDEREN BLIJFT
OMDAT DAT GEVAAR
KAN OPLEVEREN.