


For technical questions, please call 1-800-444-3353. Page 6SKU 40211
Electrical Installation (continued)
Refer to FIGURE 2 on page 5.
Note: Wiring must be done by a professionally certified electrician.
Operation
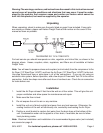
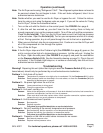
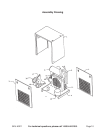
1. Remove the side panel.
2. The top three wires of the electrical box are pre-wired at the factory.
3. The wires from the electrical cord (not included) must be rated for a minimum of 10-1/2
load rated amps, and the plug on the electrical cord must be three pronged
(recommended 12 gauge, 3 conductor electrical cord). Wire the bottom three wires as
indicated in the wiring diagram in FIGURE 2 on page 5.
Note: Make sure you run the wires through the hole in the rear panel using a UL approved
cable clamp (not provided), so that you can close the unit when you are finished wiring.
See FIGURE 3.
FIGURE 3
Remove this Side Panel to
expose the electrical box
Run electrical cord
through opening in
rear panel.
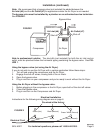
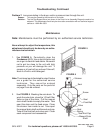
FIGURE 4
Note: If problem light is on, turn off Air Dryer and let the unit cool.
Try it again after it cools. If the light is still lit, take the unit to an
authorized service technician.
Note: The gauge should
always be in a range
between 32 - 39 PSI
(2-8
0
C).
If not, turn off Air Dryer
and let the unit cool.
Try it again after it cools.
If the light is still lit, take
the unit to an authorized
service technician.
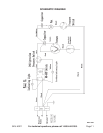
Rear Panel
REV 01/03; 08/03; 01/05; REV 11/05
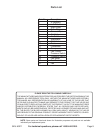
Model
Air Inlet
Capacity
Voltage
Air Inlet Temp
Horse Power
40211
21.6 CFM
110V
1/4 HP
175 F
Power
Light
Problem
Light
On/Off Switch
Temperature
Gauge
1/2” Stl.Pipe-14 NPT