


8
Washing sequence
8
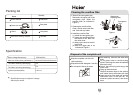
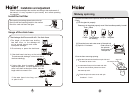
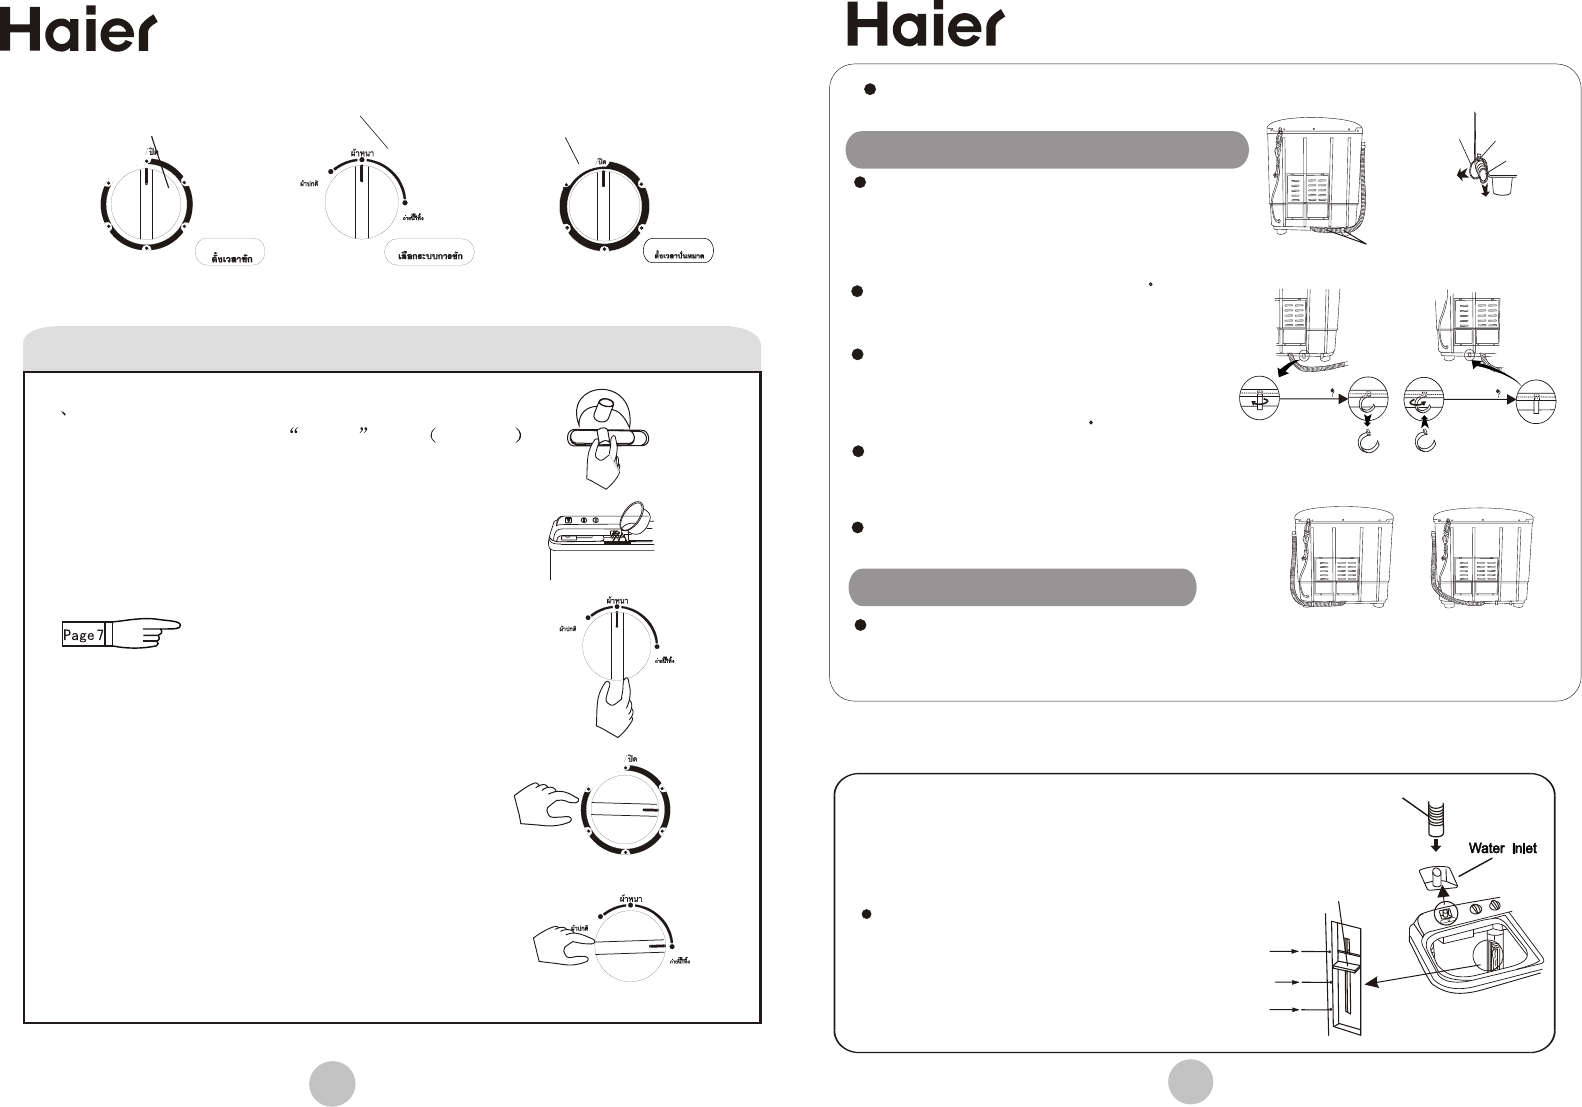
Install the water inlet hose; Select the water level
Select water level according to the
quantity of the laundries.
Set the water level adjusting lever
to needed line.
Insert the water inlet hose into the water-filling
entrance on the control panel directly.(pull it
out to dismantle it)
Maximum
Max.
Minimum
Min
Medium
Med
Water level
indicator
Water inlet hose
Use the new water inlet hose provided
with the machine to connect to the
water faucet.Old hose sets should
not be reused.
5
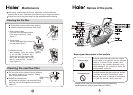
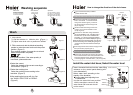
How to change the direction of the drain hoses
Take off the drain hose from the hanging
hole of the cabinet. Pull the drain hose
fixing hook outwards gently to take out
the drain hose from the two fixing hooks.
(As per Figure 2)
Rotate the drain hose fixing hook for 90
to take it out from the installation hole
(As per Figure 3).
Pull the fixing hook outwards slightly. Inlay the drain
hose into the fixing hooks reliably along the groove
at spin tub side, and make it extend towards spin
tub side..
Install the two drain hose fixing hooks taken
out into the installation hole at the other side of
the base frame (to aim at the installation hole
accurately you can lean the washing machine
forward slightly).Then rotatefor 90 (As per Figure 4).
Extend the drain hose from the back side
Figure 2
Figure 1
Drain hose
fixing hook
Drain hose
fixing hook
Pull outwards
slightly
Side sectional view
Fixing hook
installation hole
Drain hose
Take off
the drain hose
Figure 6
Figure 5
Figure 4
Figure 3
Take off the fixing
hook downwards
Rotate the fixing
hook for 90
Insert the fixing hook into the
installation hole upwards
Rotate the fixing
hook for 90
to fix it
Figure 1 indicates the ex factory installation
position of the drain hose.
Extend the drain hose from the side of spin tub.
Then hang the drain hose into the hanging hole at
the spin tub side. (As per Figure 5).
Take out the drain hose from the two fixing hooks.
make it extend towards back side.(Extend the drain
hose from the side of back, hang the drain hose in
to the hanging hole at the both sides) . (As per Figure 6).
STANDARDSTANDARD
STRONGSTRONG
DRAIN DRAIN
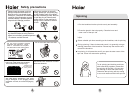
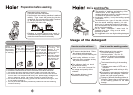
Wash
Figure 5
Figure 4
2. Fill the water and add the dissolved washing
powder to make the water level reach the preset
position. (Figure 2)
Run washing program for some time to stir and
dissolve the powder completely.
3.Put in the laundries. If the water quantity is
insufficient, please add water.
4.Select the current.
Select the strength of the current according to
the laundries. (Figure 3)
5.Select the washing time
Select the washing time according to the
laundries. (Figure 4)
6.After washing,the buzzer will ring .Set
the "WASH SELECTOR" at "DRAIN".
(Figure 5).
Figure 3
Figure 2
WASH TIMERWASH TIMER
Âé
Wash timer
(To set to below 2 minute,
first set to 5 minute then
turn it back. it can increase
the service life of the timer).
O
FF
O
FF
1212
99
66
33
1515
WASH SELECTORWASH SELECTOR
Wash selector
(Strong current,
standard current)
STANDARDSTANDARD
STRONGSTRONG
DRAIN DRAIN
SPIN TIMERSPIN TIMER
Spin timer
(to set to below 1 minute,
first set to 2 minute then
turn it back. it can increase
the service life of the timer).
11
44
33
22
55
O
F
F
O
F
F
O
F
F
O
F
F
1212
99
66
33
1515
STANDARDSTANDARD
STRONGSTRONG
DRAIN DRAIN
1 Inlet selector
(1) Set inlet selector to Wash side. Figure 1
(2 )Adjust water level rod to a position as needed.
WASH
SPIN
Figure 1