


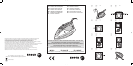

12
4. FILLING THE WATER RESERVOIR
5. SETTING THE TEMPERATURE
1. Place the iron on a stable surface
and plug it in. Press the “increase
temperature” regulator (6) to turn on
the unit.
2. The LCD screen (4) will light up for a
second and you will hear a beep when it
when it goes off.
3. Change the temperature with the
screen settings: press the “increase
temperature” regulator (6) to raise
the temperature from 1 to 3 and
to Maximum. Press the “lower
temperature” setting (7) to lower the
temperature setting (Fig C).
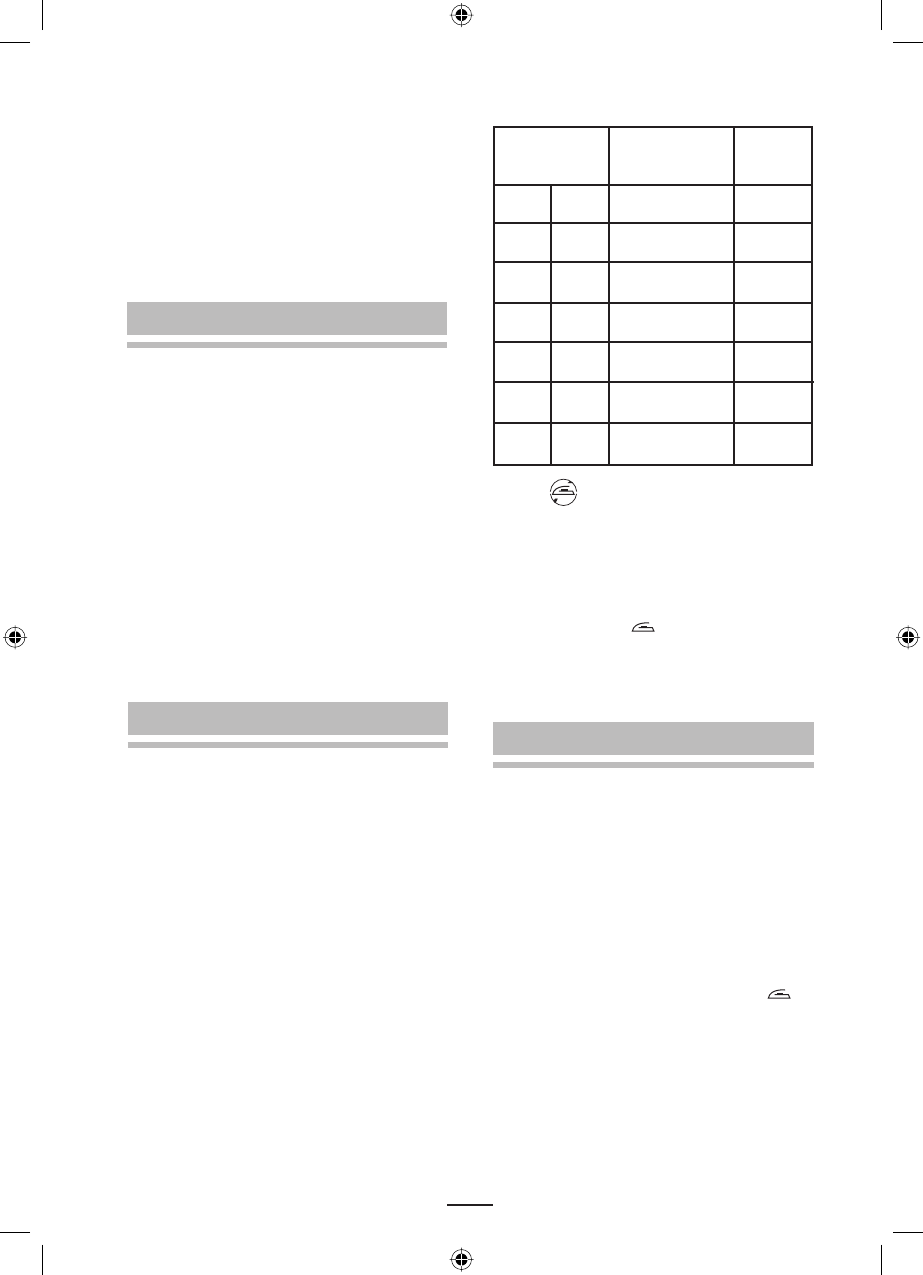
4. To select the right temperature for each
item to be ironed, select the correct
point and the correct item, which will
appear on the LCD screen while you
move from one point to the next. Use
this table as a guide:
• Place the unplugged iron on a stable
surface.
• Lift the water inlet cover. (8)
• Pour the water into the reservoir hole
using a glass (Fig. B).
• Do not put any cleaning products or
solvents into the water reservoir.
• Check that the water does not exceed
the maximum level and replace the
cover (8).
N.B.: If the water in the area where you live
is too hard (>27
o
F), we recommend that
you use distilled water. Do not use battery
water or water with added starch, perfume,
conditioner, etc.
the hot parts of the appliance.
• Do not direct the steam jet towards people.
• Do not use the iron on excessively wet
fabrics.
• Do not leave the iron supported on its base
while it is hot; leave it to cool down.
• Do not use stain-removing mixes or similar
products on fabrics to be ironed.
LCD SCREEN
APPROX. TEMP.
FABRIC
ACRYL
NYLON
POLYE
BLEND
WOOL
COTTO
LINEN
•
••
••
•••
•••
•••
MAX
70 - 90ºC
110 - 130ºC
115 - 135ºC
145 - 165ºC
160 - 180ºC
180 - 200ºC
185 - 205ºC
Acrylic
Nylon
Polyester
Cotton and
blends
Wool
Cotton
Linen
5. The symbol will appear and
the “▲” symbol will flash when the
temperature changes from lower to
higher and the “▼” symbol will flash
when you change from higher to lower.
6. When the sole reaches the right
temperature, you will hear a beeping
sound and the “ ” symbol will come
on. The “▲” and “▼” symbols will
disappear.
7. The iron is ready for use.
6. DRY IRONING
1. Place the iron on a stable, heat-resistant
surface and plug it in. Press the
“increase temperature” regulator (6)
to turn on the unit.
2. The LCD screen (4) will show all the
symbols at once and you will hear a
beep. The screen will then show Point 1
and the iron will begin to heat up.
3. Select the right temperature. See
Section 4. “Setting the temperature”
4. When you hear the beep and the “ ”
symbol appears, the iron is hot and
ready to use.
5. If you want to disconnect the iron, hold
the “increase temperature” setting (6)
down for 2 seconds (Fig. D). The screen
will go off with a beep.
6. Unplug the iron and let it cool down
before storing it away.