


Installation Instructions
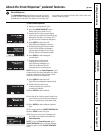
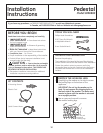
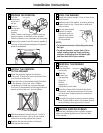
PREPARE THE PEDESTAL
Pull the
drawer out
as far as it
will go.
Remove
the screws
from the
drawer
slides. Detach the wiring connector and the
hose connector at the back of the drawer.
Slide the drawer out of the base and set aside.
Remove the screws from the service panels at
the rear of the pedestal and place the panels
within the pedestal.
2
A
B
13
C
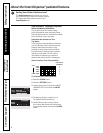
INSTALL THE PEDESTAL
TO THE WASHER
Place the pedestal against the bottom
of the unit. Check to be sure the drawer front
is at the front of the unit.
Align the holes in the pedestal with the holes
in the bottom of the unit. Use a Phillips
screwdriver to install the 4 screws through
the front of the pedestal and through the rear
panels and into the unit—do not tighten.
Slide the pedestal toward the unit, until it is
aligned front to back. Use an 8 mm socket
wrench to securely tighten the screws.
Replace the service panels on the back
and tighten the screws.
3
A
B
C
D
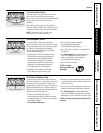
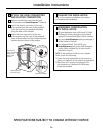
LEVEL THE WASHER
Stand the washer upright. Move it close to its
final location.
Make sure that the washer is level by placing
a spirit level on top. Check side to side and
front to back.
Use an open-ended
wrench to adjust
the legs in and out.
Tighten the locknut
against the bottom
of the pedestal.
NOTES:
• To minimize vibration, the locking nuts must
be tight.
• To reduce vibration, ensure that all four
rubber leveling legs are firmly touching
the floor. Push and pull on the back right
and then back left of your washer.
A
B
C
4
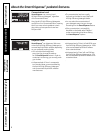
REINSTALL THE DRAWER
Check to be
sure the slides
are closed.
Slide the
drawer into
the opening.
Align the
drawer
supports to
the slides on each side.
Open the drawer fully. Reattach the hose
connector and wiring connector at the rear
of the drawer. Make sure both connections
are secure.
Reinstall the original screws into each drawer
slide. Tighten both screws. The drawer should
slide smoothly when you push it closed.
A
B
C
D
5
Connectors
REMOVE SHIPPING SCREWS
Remove the 4 shipping screws, plastic support
tubes and rubber grommets on the back side
of the washer.
6
Remove screws from
service panels
Connectors