


MLXE/MLXG42REMLXE/MLXG42RE
MLXE/MLXG42REMLXE/MLXG42RE
MLXE/MLXG42RE
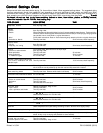
AUTO DRY-HIGH HEAT AUTO DRY-HIGH HEAT
AUTO DRY-HIGH HEAT AUTO DRY-HIGH HEAT
AUTO DRY-HIGH HEAT is recommended for regular
and permanent press items that can be tumble dried at
high heat. The Auto Dry-High Heat cycle determines
drying time automatically.
For items requiring more drying time, set the cycle
selector on MORE DRY. For items requiring less drying
time, set the cycle selector on LESS DRY.
This cycle works best with items of similar fabric, weight
and construction.
TIME DRY-LOW HEAT TIME DRY-LOW HEAT
TIME DRY-LOW HEAT TIME DRY-LOW HEAT
TIME DRY-LOW HEAT provides up to 90 minutes of
drying time at low heat for permanent press, knit and
delicate items.
AIR FLUFF-NO HEATAIR FLUFF-NO HEAT
AIR FLUFF-NO HEATAIR FLUFF-NO HEAT
AIR FLUFF-NO HEAT provides up to 30 minutes of
tumbling without heat. Use Air Fluff-No Heat to freshen
clothing, pillows or blankets or to dust draperies. Heat-
sensitive items such as plastics, foam rubber or similarly
textured rubber-like materials or items containing feathers
or down should be dried
only only
only only
only with the Air Fluff-No Heat
cycle.
To avoid fire hazard, do not use heat to
dry items containing feathers or down, foam rubber,
plastics, or similarly textured, rubber-like materials. Use
Air Fluff-No Heat cycle only.
Versión en españolVersión en español
Versión en españolVersión en español
Versión en español
Si desea obtener una copia en español de estas
Instrucciones de Funcionamiento, sírvase escribir a
la dirección que se incluye a continuación.
Solicite la P/N 131547100.
Spanish Owner's Guides
Frigidaire Company
P. O. Box 9061
Dublin, Ohio 43017-0961
BeforBefor
BeforBefor
Befor
e Operating Ye Operating Y
e Operating Ye Operating Y
e Operating Y
our Laundrour Laundr
our Laundrour Laundr
our Laundr
yy
yy
y
CenterCenter
CenterCenter
Center
Read your laundry center Owner's Guide.Read your laundry center Owner's Guide.
Read your laundry center Owner's Guide.Read your laundry center Owner's Guide.
Read your laundry center Owner's Guide. It has
important safety and warranty information. It also has
many suggestions for obtaining the best drying results.
To reduce the risk of fire, electric shock,
or injury to persons, read the IMPORTANT SAFETY
INSTRUCTIONS in your laundry center Owner's Guide
before operating this appliance.
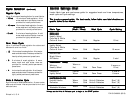
Cycle SettingsCycle Settings
Cycle SettingsCycle Settings
Cycle Settings
Turn the cycle selector clockwise to the desired cycle and
setting.
Each cycle ends with a cool down period. The heat
automatically turns off and the load continues to tumble
for 5-10 minutes. This reduces wrinkling and makes
items easier to handle during unloading.
Drying time varies depending on size and dampness of
load, weight and fabric type. Room temperature and
humidity, type of installation and electrical voltage or gas
pressure can also affect drying time.
P/N 131546900 (9512)
DRDR
DRDR
DR
YER OPERAYER OPERA
YER OPERAYER OPERA
YER OPERA
TING INSTRUCTIONSTING INSTRUCTIONS
TING INSTRUCTIONSTING INSTRUCTIONS
TING INSTRUCTIONS
Operating StepsOperating Steps
Operating StepsOperating Steps
Operating Steps
1.
Prepare items for drying.Prepare items for drying.
Prepare items for drying.Prepare items for drying.
Prepare items for drying.
2.
Check that lint screen is clean and properly inCheck that lint screen is clean and properly in
Check that lint screen is clean and properly inCheck that lint screen is clean and properly in
Check that lint screen is clean and properly in
place.place.
place.place.
place.
3.
Load the dryer.Load the dryer.
Load the dryer.Load the dryer.
Load the dryer. If desired, add a dryer fabric
softener sheet.
4.
Close the dryer door.Close the dryer door.
Close the dryer door.Close the dryer door.
Close the dryer door.
5.
Turn cycle selector clockwise to desired setting.Turn cycle selector clockwise to desired setting.
Turn cycle selector clockwise to desired setting.Turn cycle selector clockwise to desired setting.
Turn cycle selector clockwise to desired setting.
6.
Start dryer. Start dryer.
Start dryer. Start dryer.
Start dryer. Push the Push to Start button for 2
seconds.
7.
At end of cycle, remove items immediately andAt end of cycle, remove items immediately and
At end of cycle, remove items immediately andAt end of cycle, remove items immediately and
At end of cycle, remove items immediately and
hang or fold.hang or fold.
hang or fold.hang or fold.
hang or fold.
8.
Clean lint screen after every load.Clean lint screen after every load.
Clean lint screen after every load.Clean lint screen after every load.
Clean lint screen after every load.