


WW
WW
W
ASHER OPERAASHER OPERA
ASHER OPERAASHER OPERA
ASHER OPERA
TING INSTRUCTIONSTING INSTRUCTIONS
TING INSTRUCTIONSTING INSTRUCTIONS
TING INSTRUCTIONS
P/N 131546800 (9512)
MLXE/MLXG42REMLXE/MLXG42RE
MLXE/MLXG42REMLXE/MLXG42RE
MLXE/MLXG42RE
Versión en españolVersión en español
Versión en españolVersión en español
Versión en español
Si desea obtener una copia en español de estas
Instrucciones de Funcionamiento, sírvase escribir la
dirección que se incluye a continuación.
Solicite la P/N 131547200.
Spanish Owner's Guides
Frigidaire Company
P. O. Box 9061
Dublin, Ohio 43017-0961
BeforBefor
BeforBefor
Befor
e Operating Ye Operating Y
e Operating Ye Operating Y
e Operating Y
our Laundrour Laundr
our Laundrour Laundr
our Laundr
yy
yy
y
CenterCenter
CenterCenter
Center
Read your laundry center Owner's Guide.Read your laundry center Owner's Guide.
Read your laundry center Owner's Guide.Read your laundry center Owner's Guide.
Read your laundry center Owner's Guide. It has
important safety and warranty information. It also has
many suggestions for obtaining the best washing results.
To reduce the risk of fire, electric shock,
or injury to persons, read the IMPORTANT SAFETY
INSTRUCTIONS in your laundry center Owner's Guide
before operating this appliance.
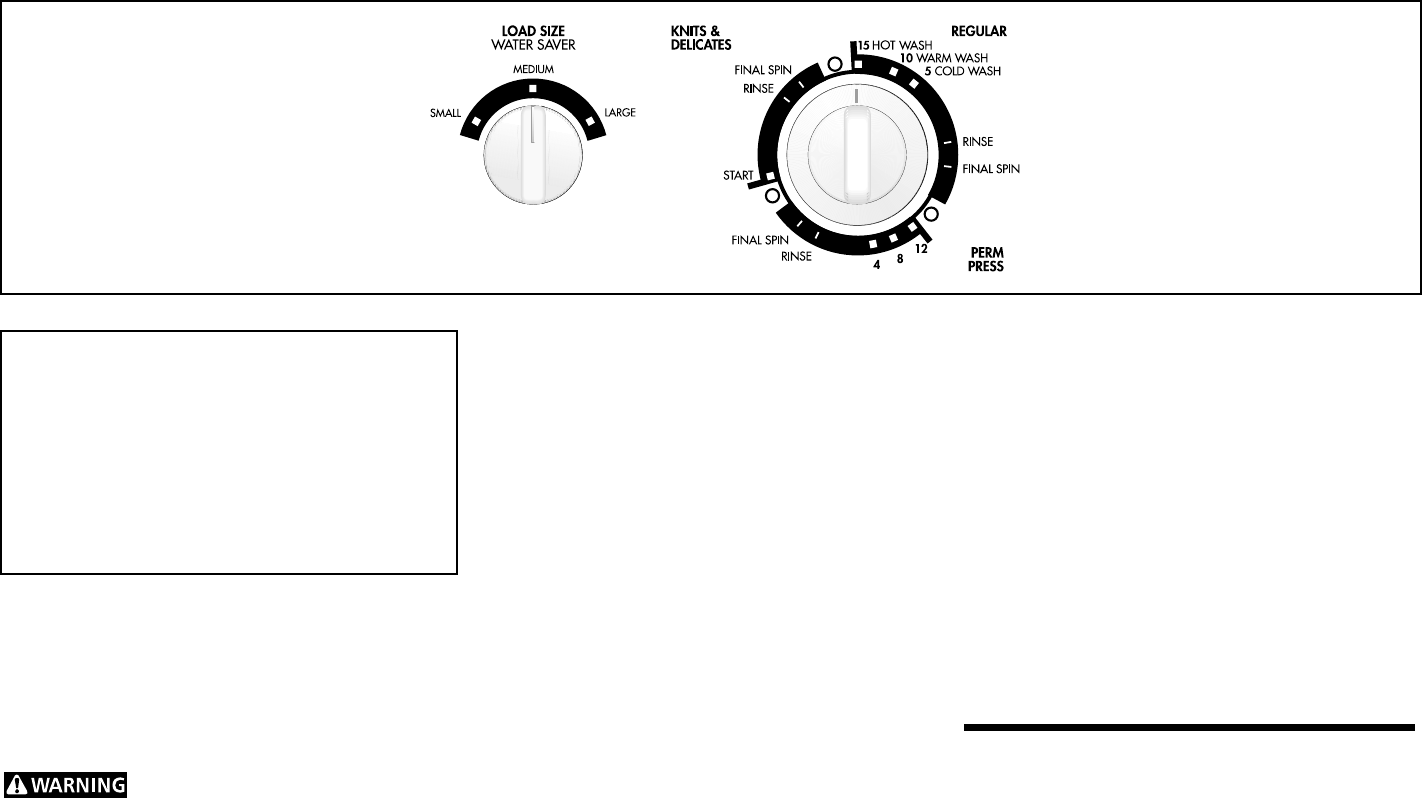
To stop the washer, push in the cycle selector
knob. To change a cycle, push in the cycle
selector knob and turn it clockwise to the desired
setting. Pull out the knob to restart the washer.
10.
If desired, add diluted liquid fabric softenerIf desired, add diluted liquid fabric softener
If desired, add diluted liquid fabric softenerIf desired, add diluted liquid fabric softener
If desired, add diluted liquid fabric softener
during the final rinse.during the final rinse.
during the final rinse.during the final rinse.
during the final rinse.
11.
Remove items when the cycle is completed.Remove items when the cycle is completed.
Remove items when the cycle is completed.Remove items when the cycle is completed.
Remove items when the cycle is completed.
As a safety measure, the lid will AUTOMA-
TICALLY LOCK during the spin portion of each
cycle. The lid will automatically unlock
approximately 1 minute after the end of the spin
cycle.
Cycle SelectionCycle Selection
Cycle SelectionCycle Selection
Cycle Selection
For best results, follow the fabric care label directions
on items to be washed. Check the
Control SettingsControl Settings
Control SettingsControl Settings
Control Settings
Chart Chart
Chart Chart
Chart (reverse side) if the care label is not available.
The Regular, Perm Press and Knits & Delicates cycles
provide a spray rinse during the first spin, followed by
a deep rinse and a final spin.
(continued, reverse side)
Operating StepsOperating Steps
Operating StepsOperating Steps
Operating Steps
1.
Sort laundry into loads that can be washedSort laundry into loads that can be washed
Sort laundry into loads that can be washedSort laundry into loads that can be washed
Sort laundry into loads that can be washed
together.together.
together.together.
together.
2.
Prepare items for washingPrepare items for washing
Prepare items for washingPrepare items for washing
Prepare items for washing.
3.
Pretreat stains and heavy soil.Pretreat stains and heavy soil.
Pretreat stains and heavy soil.Pretreat stains and heavy soil.
Pretreat stains and heavy soil.
4.
Add the measured amount of detergent toAdd the measured amount of detergent to
Add the measured amount of detergent toAdd the measured amount of detergent to
Add the measured amount of detergent to
the washer before adding the laundry load.the washer before adding the laundry load.
the washer before adding the laundry load.the washer before adding the laundry load.
the washer before adding the laundry load.
5.
If desired, add liquid bleach to the BleachIf desired, add liquid bleach to the Bleach
If desired, add liquid bleach to the BleachIf desired, add liquid bleach to the Bleach
If desired, add liquid bleach to the Bleach
Dispenser.Dispenser.
Dispenser.Dispenser.
Dispenser.
6.
Add the laundry load to the wash tubAdd the laundry load to the wash tub
Add the laundry load to the wash tubAdd the laundry load to the wash tub
Add the laundry load to the wash tub.
7.
Set the Load Size control according to type,Set the Load Size control according to type,
Set the Load Size control according to type,Set the Load Size control according to type,
Set the Load Size control according to type,
size, and soil level of the load.size, and soil level of the load.
size, and soil level of the load.size, and soil level of the load.
size, and soil level of the load.
8.
Push in the cycle selector knob and turn itPush in the cycle selector knob and turn it
Push in the cycle selector knob and turn itPush in the cycle selector knob and turn it
Push in the cycle selector knob and turn it
clockwise to the desired wash cycle. clockwise to the desired wash cycle.
clockwise to the desired wash cycle. clockwise to the desired wash cycle.
clockwise to the desired wash cycle. See
Cycle Selection Cycle Selection
Cycle Selection Cycle Selection
Cycle Selection for cycle descriptions and
Control Settings ChartControl Settings Chart
Control Settings ChartControl Settings Chart
Control Settings Chart for suggested cycle
settings.
9.
Start the washer by closing the lid and pullingStart the washer by closing the lid and pulling
Start the washer by closing the lid and pullingStart the washer by closing the lid and pulling
Start the washer by closing the lid and pulling
out the cycle selector knob.out the cycle selector knob.
out the cycle selector knob.out the cycle selector knob.
out the cycle selector knob. The washer will
operate with the lid open; however, the tub will
not spin unless the lid is closed.