


OPERATING INSTRUCTIONS
Components
Power “On” Light (green): This light
will illuminate when the “ON” switch is
depressed and the unit is turned on. It
will remain on until the unit is turned
“OFF” or until the water tank is emptied.
Caution: Always unplug before re-
filling.
Important: Do NOT add cleaning
solutions, scented perfumes, oils or any
other chemicals to the water used in this
appliance. Use tap water or
distilled/purified water if the tap water
in your area is very hard.
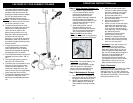
2. To assemble the garment rod, insert
one of the extensions into the other by
depressing the button on the extension
(marked C) so that you can insert into
the other extension (marked D). Turn
the extension until the button comes
out of the opening and you hear a
click. Repeat procedure for the other
extension. (See fig. 2)
Assembling Your Garment
Steamer
Step 1: Assembling Garment Rod
1. First attach the garment hook to
the garment rod by screwing the
garment hook (marked A) into the
garment rod extension (marked B).
(See fig. 1)
Fig. 1
Fig. 2
Fig. 3
3. Once you have assembled the
garment rod, insert the bottom section
of the rod (marked E) into the adapter
hole in the upper housing of the unit
(marked F) and turn 90° until it is
locked in place. (See fig. 3)
5
OPERATING INSTRUCTIONS cont.
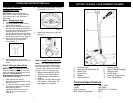
Step 2: Assembling Steamer Hose
1. Insert end of steamer hose with the
long tube bushing (marked A) into
the adapter hole (marked B) on the
unit. Rotate hose 90° to lock in place.
(See fig. 4)
Fig. 4
2. To attach the steam diffuser, grasp
steam diffuser in one hand and the hose
in the other. Depress the locking button
on the hose end until the locking button
engages the hole in the steam diffuser.
A slight rotation of the steam diffuser
may help engage the locking button.
(See fig. 5)
Fig. 5
3. To attach the garment brush
(marked E) onto the diffuser
(marked F), place the two hinges
at the back of the garment brush
(see fig. 6) into the two open tabs
that are at the back of the steam
diffuser. Swing the garment brush
up against the bottom of the steam
diffuser until the locking tab engages.
Fig. 6
6