


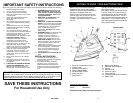

FEATURES OF SHARK ELECTRONIC IRON
1
2
3
3
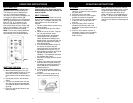
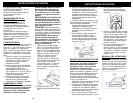
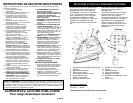
1. BURST OF STEAM BUTTON
Burst of steam provides extra, sudden
bursts of steam which aid in removing
stubborn wrinkles from fabrics such as
denim, cotton or linen.
2. ATOMIZER SPRAY BUTTON
Pressing this button provides a defined
jet of spray which gently moistens fabric.
3. VARIABLE STEAM CONTROL
Minimum to maximum steaming for
different materials. Self cleaning
feature flushes internal sole plate with
water.
4. ANTI-DRIP FUNCTION
Cuts off water when the iron
temperature is too low.
5. BUILT-IN ANTI-CALCIUM
FILTER
Prevents calcium build-up and prolongs
the life of the iron.
6. STAINLESS STEEL SOLEPLATE
Provides maximum glide-ability and
heat retention.
LED Display Panel
8. WATER FILLING INLET
The cover prevents dust and
foreign matter from entering the
water tank. It also stops any water
from spilling during ironing.
9. PIVOT CORD
For left or right handed use. Pivots
up and down; prevents dragging
along the fabric. The flexible cord
protector protects the cord from
fraying.
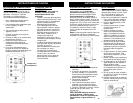
7. LED DISPLAY PANEL
Displays the fabric setting (left) and
the temperature indicators (right).
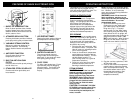
OPERATING INSTRUCTIONS
4
This appliance is for HOUSEHOLD USE
ONLY and may be plugged into any
120V AC polarized electrical outlet. Do
not use any other type of outlet.
DRY IRONING
For dry ironing, turn the variable steam
control dial all the way to the right to “0”.
This will cut off the steam flow if water is
in the water tank. All marked fabric
settings on the LED Display Panel can
be used for dry ironing.
1. Plug the cord into a polarized, 120V
AC electrical outlet. The power “ON”
light will come on, indicating that the
iron is receiving power.
2. Press on the electronic temperature
control button to select the desired
fabric/temperature setting. Turn the
variable steam control to “0”.
(See “Ironing Guide” for a guide to
temperature selection.)
3. Place iron on its heel (on a stable,
protected surface) while iron is
warming to desired temperature.
STEAM IRONING
CAUTION: DO NOT aim iron at face,
towards yourself, or anyone else
while using or adjusting steam.
Burns or serious injury may occur.
WARNING: Before filling the iron
with water, be sure the iron is not
plugged into the electrical outlet.
The iron may be filled with water
while it is hot.
CAUTION: TO PREVENT THE RISK
OF BURNS, use caution when filling
iron with water. Burns can occur
from touching hot metal parts, hot
water, or steam.
2. Plug the cord into a polarized, 120V
AC electrical outlet.
3. Press on the electronic temperature
control button to select the desired
fabric and temperature setting. Turn
the variable steam control dial to
the desired steam setting. (See
“Ironing Guide” for a guide to
temperature selection.)
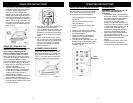
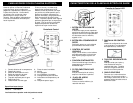
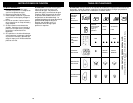
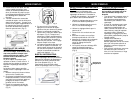
Fig. 1
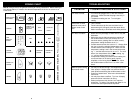
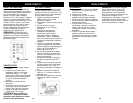
FABRIC & TEMPERATURE
INDICATORS
Press on the Electronic Temperature
Control to select the desired fabric
setting. The red lights at the left of the
LED Display Panel will light up.
At the same time, the temperature
indicator lights on the right side of the
LED Display Panel will start to flash.
They will stop flashing when the iron
reaches the selected temperature.
NOTE: Because of the soleplate design,
ordinary tap water may be used with this
iron. However, in very hard water
areas, we recommend using distilled or
demineralized water.
WARNING: Never fill the iron with
fabric conditioner, starches or any
other liquid, as these will damage the
steam mechanism. Do not use
contaminated water.
1. Open the water filling inlet cover.
Holding the iron at a slight angle,
pour water slowly into the water
filling inlet. (Fig. 1) Fill tank to
desired level or to the “MAX” water
level marking using the water filling
flask. (When the iron is upright, the
see-through water tank allows you to
gauge the amount of water.) DO
NOT overfill the tank. When finished
filling the iron with water, close the
water inlet cover before continuing.