


9
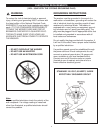
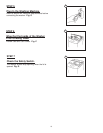
• Connect the opposite end of the fill hoses to their
respective HOT & COLD water supply lines. Fig. I
IMPORTANT: Make sure the HOT water line is
connected to the HOT (upper) water valve and the
COLD water line is connected to the COLD
(lower) water valve. Fig. I
• Slowly open both water supply lines and check for
any sign of leaks at all connection points.
• If leaks occur, immediately close the water supply
lines and effect the necessary repairs and/or
replacement of any/all defective connections.
• If you are unable to effect suitable repairs
yourself, call our toll free CUSTOMER HELP LINE
at "1 800 26 DANBY and ask for assistance.
STEP 3
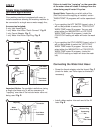
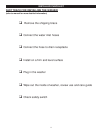
Connect Drain Hose to Drain
Receptacle
Portable Installation: Hang the drain pipe over the
edge of the wash tub and/or kitchen sink. Make
sure the hose cannot be accidentally displaced
when the drain water is being discharged.
Permanent Installation: Insert the end of the drain
hose directly into the drain stem pipe and /or hang
over the edge of the wash tub.
NOTE: The highest
point of the drain
hose must be
positioned between
26" ~ 46" above
floor level, otherwise
the pumping out
(efficiency) of the
water may be
affected. Fig. J
STEP 4
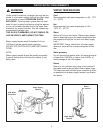
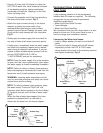
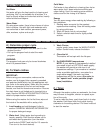
Levelling the Washing Machine.
To prevent vibration and unnecessary movement
during wash and spin operation, the washer must
be installed on a firm and level surface, This is
accomplished by using the level adjustment knob
located on the lower right side of the cabinet. To
change the height of the adjustment leg, unscrew
the level adjustment knob, set the machine level
and re-tighten when the machine is stable. Fig. M
The inclination angle of the washer shall not be
more than two (2º) degrees.Place the washer at
least 5cm (2") away from the wall.
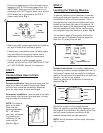
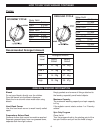
Portable Installations: For portable applications,
the washing machine comes equipped with four (4)
"north/south" casters that can easily be installed to
assist in the movement of the machine too and from
the sink. Lay the unit on its back.
Install the casters into the bottom of the base as
depicted. Fig. N
Return the machine to the upright position.
When the machine is positioned for operation, set
the height of the adjustment leg slightly higher than
the front caster to prevent movement of the
machine during wash and spin operation.
NOTE: Not all movement will be totally eliminated,
this is normal.
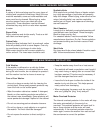
Tap
Connector
Connecting
Nut
I
Water
Inlet Hose
J
Correct
Level
Adjustment Knob
M
Loosen
Tighten
Incorrect
N
Adjustable Foot
Castor
Castor
Fixed FootFixed Foot
Castor
Castor
Fixed foot