


8
6. Press PUSH TO START to
begin cycle
Push and hold the PUSH TO START knob to begin the cycle.
Promptly remove garments after cycle has completed to reduce
wrinkling. Use the Wrinkle Prevent feature to avoid wrinkling
when you are unable to remove a load from the dryer as soon
as it stops.
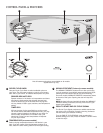
4. Set temperature and options
(on some models)
Select temperature and options by turning the knob to the
desired position or select the Automatic Dry Cycle that has the
temperature included in the cycle selections.
NOTE: Not all options and settings are available with all cycles.
TEMPERATURE
Turn the TEMPERATURE knob to change the drying
temperature setting. See “Setting the Drying Temperature.”
Wrinkle Prevent feature (on some models)
n
Get up to 90 minutes of heat-free, periodic tumbling at the
end of a cycle. Turn the WRINKLE PREVENT knob to select
ON or OFF at any time before the cycle has ended.
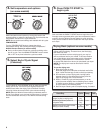
5. Select End of Cycle Signal
(if desired)
Turn the END OF CYCLE SIGNAL knob to select the desired
setting (On or Off). The End of Cycle Signal produces an
audible sound when the drying cycle is nished. Promptly
removing clothes at the end of the cycle reduces wrinkling.
NOTE: When the Wrinkle Prevent setting is selected and the
End of Cycle Signal is on, the tone will sound every 5 minutes
until the clothes are removed, or the Wrinkle Prevent setting
ends.
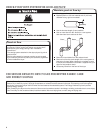
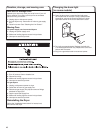
Drying Rack
(optional on some models)
Use the Drying Rack to dry items such as sweaters and
pillows without tumbling. The drum turns, but the drying
rack does not move.
If your model does not have a drying rack, you may be
able to purchase one for your model. To nd out whether
your model allows drying rack usage and for information
on ordering, please refer to the “Accessories” section
or contact the dealer from whom you purchased your dryer.
NOTE: The drying rack must be removed for normal
tumbling.
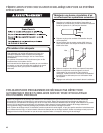
To use the drying rack
1. Place drying rack in dryer.
Slide rear pegs into the dimples on the back wall of the
dryer. Lower the front legs to rest on the dryer opening.
2. Put wet items on top of drying rack, leaving space
between items. Do not allow items to hang over the
edge of the drying rack. Close the door.
3. Select a Timed Dry cycle and temperature, or an air
cycle (on some models). Items containing foam, rubber,
or plastic must be dried on a clothesline or by using an
air cycle. Refer to the following table.
4. Start the dryer. Reset cycle to complete drying, if needed.
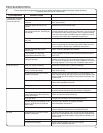
Rack Dry: Temp.Cycle:
Time
Washable wool items (block to
shape, lay at on drying rack)
Stuffed toys/pillows (foam rubber
lled) (on some models)
Timed
Dry
Air
(no heat)
N/A
60 min.
90 min.
Low
Stuffed toys/pillows (cotton or
polyester lled)
Timed
Dry
Low 60 min.