


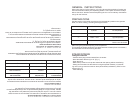


GENERAL INSTRUCTIONS
When using the iron for the first time, you may notice a slight emission of smoke and
hear some sounds made by the expanding plastics. This is quite normal and it stops
after a short time. We also recommend passing the iron over an ordinary cloth before
using it for the first time.
PREPARATIONS
Soft the laundry to be ironed according to the international symbols on the garment
label, or if this is missing, according to the type of fabric.
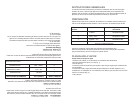
GARMENT LABEL FABRIC TYPE THERMOSTAT REGULATION
• synthetic low temperature
•• silk - wool medium temperature
••• Cotton - linen high temperature
Fabric not to be ironed
Start ironing the garments requiring a low temperature.
This reduces the waiting times (the iron takes less time to heat up than to cool down)
and eliminates the risk of scorching the fabric.
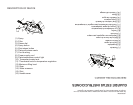
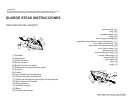
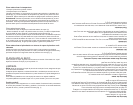
STEAM IRONING
Filling the reservoir
- Check that the plug is disconnected from the socket.
- Move the steam selector (3) to “0” [Fig. 1].
- Open the lid (2).
- Raise the tip of the iron to help the water enter the opening without overflowing.
- Slowly pour the water into the reservoir using the special measure (14) and tak-
ing care not to go over the maximum level (about 300ml) indicated by “MAX” on the
reservoir [Fig. 2].
- Close the lid (2).
INSTRUCCIONES GENERALES
Al momento de usar la plancha por primera vez, puede ser que se note una ligera
emisión de humo y que se oiga algunos sonidos producidos por la expansión del
plástico. Esto es normal y se detendrá después de un rato. Recomendamos pasar la
plancha por encima de una tela simple antes de usarla por primera vez.
PREPARACIÓN
Separe la ropa que se va a planchar de acuerdo a los símbolos internacionales que
vienen en las etiquetas de las prendas, o de lo contrario, de acuerdo al tipo de tela.
Etiqueta de la Tipo de Tela Regulación del
Prenda Termostato
• sintética temperatura baja
•• seda – lana temperatura media
••• algodón – lino temperatura alta
tela que no debe plancharse
Comience a planchar las prendas que requieran de temperatura baja.
Esto reduce el tiempo de espera (la plancha tomas menos tiempo para calentarse
que para enfriarse) y elimina el riesgo de quemar la tela.
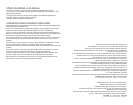
PLANCHADO A VAPOR
Cómo llenar el tanque de agua
-Verifique que el tapón no se encuentre en la abertura del alimentador.
-Mueva el selector de vapor (3) a 0º [Fig. 1].
-Abra la tapa (2)
-Levante la punta de la plancha para ayudar a que el agua ingrese por la abertura sin
que se reblase.
-Lentamente vierta el agua dentro del tanque utilizando el medidor especial (14) y
cuidando de no sobrepasar el nivel máximo (unos 300mm) que se indica con la marca
“MAX” en el tanque [Fig. 2]
-Cierre la tapa.