


Model GS29
®
Instructions
for Use
For your safety
and continued
enjoyment of this
product, always read
the instruction book
carefully before using.
Remove excess water from the reservoir
by lifting the unit, inverting, and pouring the
water over sink, and allowing water to drain
from internal reservoir. Repeat the above
procedure as many times as necessary until
a normal steam rate returns, usually 2-3
times. With each repeated cycle, use a fresh
solution of vinegar and water. Run one cycle
of fresh, cold water through the unit at the
completion of decalcification, before using
the unit again to steam garments.
HOW TO STEAM
Grasp the "T" handle steam nozzle with the
steam jets facing away from you. Begin at
the bottom of the fabric to allow the steam
to rise inside and outside, removing
wrinkles. Slowly move the nozzle from the
bottom to the top of the fabric. Remove the
nozzle from the garment and smooth the
fabric with your free hand. Some fabrics are
best steamed on the underside of the mate-
rial. This will allow the fibers of the fabric to
relax, eliminating wrinkles.
NOTE: Test fabric for color fastness in an
inconspicuous spot. Drape linens, towels,
handkerchiefs and napkins over a rod or
place on a towel rack.
Heavier fabrics may require repeated
steaming. Repeat as necessary.
With practice, you will gain speed and
efficiency. You will soon learn which
fabrics require multiple steam applications.
Do not directly touch velvet or silk with the
steam head.
TROUBLESHOOTING THE STEAMER
• PROBLEM - Steamer fails to heat
CAUSE - Steamer not plugged in
SOLUTION - Plug into electrical outlet
• PROBLEM - Auto shutoff engaged
CAUSE - Water container is empty
SOLUTION - Fill container
• PROBLEM - No steam
CAUSE - Water level is low
SOLUTION - Turn On/Off switch off and
refill water container
• PROBLEM - Water drips from nozzle
CAUSE - Condensation in hose
SOLUTION - Hold the hose vertically
and allow water to drain back into unit
• PROBLEM - Nozzle gurgles
CAUSE - Condensation in hose
SOLUTION - Hold the hose vertically and
allow water to drain back into unit
• PROBLEM - Poor steam performance
CAUSE - Sediment in container
SOLUTION - Decalcify reservoir and water
container
Note: Amounts of chemicals in water will
vary in different areas. To insure continued
operation of the steamer, never store with-
out cleaning and removing excess water
from the reservoir and water container.
LIMITED ONE YEAR WARRANTY
Conair will repair or replace (at our option)
your unit free of charge for 12 months from
the date of purchase if the appliance is
defective in workmanship or materials.
To obtain service under this warranty, return
the defective product to the service center
listed below that is nearest you, together
with your purchase receipt and $3.00 for
postage and handling. California residents
need only provide proof of purchase and
should call 1-800-366-0937 for shipping
instructions. In the absence of a purchase
receipt, the warranty period shall be 12
months from the date of manufacture.
ANY IMPLIED WARRANTIES, INCLUDING
BUT NOT LIMITED TO THE IMPLIED
WARRANTY OF MERCHANTABILITY AND
FITNESS FOR A PARTICULAR PURPOSE,
SHALL BE LIMITED IN DURATION TO THE
12 MONTH DURATION OF THIS WRITTEN
WARRANTY. Some states do not allow
limitations on how long an implied warranty
lasts, so the above limitations may not
apply to you.
IN NO EVENT SHALL CONAIR BE LIABLE
FOR ANY SPECIAL, INCIDENTAL, OR
CONSEQUENTIAL DAMAGES FOR BREACH
OF THIS OR ANY OTHER WARRANTY,
EXPRESS OR IMPLIED, WHATSOEVER.
Some states do not allow the exclusion or
limitation of special, incidental, or conse-
quential damages, so the above limitation
may not apply to you. This warranty gives
you specific legal rights, and you may also
have other rights, which vary from state to
state.
CORD REEL
This steamer has been equipped with an
automatic cord reel that allows the cord to be
stored out of the way. To operate the appli-
ance, the cord must be pulled out from the
cord reel.
1. Pull the two-prong plug away from the
steamer until you see the red tape; do not pull
past the red tape.
2. When steaming is finished, unplug the two-
prong cord from the outlet.
3. Press the cord reel pedal with your foot,
until the cord retracts into the housing.
CAUTION: The cord may snap back while
retracting; be sure to stand away from the
end of the cord as it retracts.
CLEANING AND STORING
I. Turn the On/Off switch to the off position
and unplug from the power source.
2. Wait for the steamer to cool completely
for at least 30 minutes.
3. Unplug power cord and retract it into the
housing.
4. Remove the steamer hose.
5. Remove the water container from unit,
unscrew valve and empty unused contents.
Allow to air dry.
6. Remove excess water from the reservoir
by lifting the unit and pouring.
7. Collapse telescopic hanger rod.
8. Replace water container.
9. Store the unit.
OTHER IMPORTANT NOTES
During operation, the steamer hose may
gurgle. This is a normal result of
condensation collecting inside the hose.
Simply lift the "T" handle upward until
the hose is extended to its full height. The
gurgling will disappear when the excess
moisture inside the hose has had a chance
to drain back into the base.
DECALCIFICATION
If the appliance begins to produce steam
more slowly than usual or stops producing
steam and then starts again, you may need
to decalcify your steamer. Decalcification
refers to removing the calcium deposits
which form over time on the metal parts
of the steamer. For best performance from
the Conair
®
Ionic Fabric Steamer, decalcify
the unit from time to time. The frequency
depends upon the hardness of your tap
water and how often you use the steamer.
To decalcify, use a solution of 1/3 white vin-
egar and 2/3 water in the water container.
Replace the water container in the unit. Plug
the unit into electrical outlet. Turn to the on
position and run until half the amount has
steamed (1 Liter). Turn the unit to the off
position, unplug from electrical outlet, and
allow to sit for 30 minutes. Remove water
container.
Service Centers
Conair Corporation Conair Corporation
Service Department Service Department
150 Milford Road 7475 N. Glen Harbor Blvd.
East Windsor, NJ 08520 Glendale, AZ 85307
For information on any Conair products call:
1-800-3-CONAIR or visit us on the web at
http://www.conair.com
©2007 Conair Corporation
East Windsor, NJ 08520, Glendale, AZ 85307
06PC2296
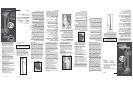
Always steam with hose in upright
position, so any condensation is free
to flow back into the steamer.
If you steam in a low position, condensa-
tion will collect inside the hose. This will
cause gurgling and some water droplets to
form near the steam jets on the "T" han-
dle. To avoid this, frequently lift the steam
handle upward until the hose is extended
to its full height.
TO STEAM DRAPES
Wash and dry drapes as directed, according
to fabric type. Rehang drapes and steam
when they are in place.
CAUTION: Hose will be hot when
in use. Avoid prolonged contact.
CÓMO DESARRUGAR TELAS
Mantenga la boquilla en forma de T con los
orificios frente a la ropa. Mueva la boquilla
lentamente desde abajo hacia arriba, por
dentro y por fuera (algunos tejidos respon-
den mejor cuando se aplica vapor por den-
tro). Termine alejando la boquilla mientras
alisa la ropa con su mano libre. Esto relajará
las fibras y eliminará las arrugas.
NOTA: Haga una prueba de color en un
área discreta de la tela antes de desarru-
gar. Se le hará más fácil desarrugar toallas,
servilletas y manteles colgándolos en una
barra.
Telas más densas pueden necesitar más
trabajo. Aplique vapor cuantas veces sea
necesario.
Con práctica, desarrugar telas se volverá
más fácil y más rápido y usted sabrá cual
telas necesitan más de una aplicación.
No deje que la boquilla toque seda o ter-
ciopelo directamente.
RESOLUCIÓN DE PROBLEMAS
• PROBLEMA - El aparato no calienta
CAUSA - El aparato no esta enchufado
SOLUCIÓN - Enchufe el cable en una toma
de corriente
• PROBLEMA - El aparato se apaga
automáticamente
CAUSA - El tanque de agua está vacío
SOLUCIÓN - Llene el tanque
• PROBLEMA - El aparato no produce vapor
CAUSA - El nivel de agua está bajo
SOLUCIÓN - Apague el aparato (OFF) y
llene el tanque
• PROBLEMA - Gotas de agua caen de la
boquilla
CAUSA - Condensación en el tubo
SOLUCIÓN - Mantenga la boquilla alta
y recta para que el agua baje hacia el
tanque
• PROBLEMA - La boquilla burbujea
CAUSA - Condensación en el tubo
SOLUCIÓN - Mantenga la boquilla alta
y recta para que el agua baje hacia el
tanque
• PROBLEMA - El aparato produce poco
vapor
CAUSA - Depósitos de calcio
SOLUCIÓN - Limpie la cal presente en el
tanque y en el depósito
Nota: Según donde vive, el agua local con-
tendrá más o menos elementos químicos.
Para lograr un desempeño óptimo, siempre
limpie el aparato y saque el agua reman-
ente en el tanque y en el depósito antes de
almacenarlo.
GARANTÍA LIMITADA POR UN AÑO
Conair reparará o remplazará (a su opción) su
aparato sin cargo por un período de 12 meses
a partir de la fecha de compra si presenta
defectos de mano de obra o en los materiales.
Para obtener servicio técnico bajo esta
garantía, lleve o mande su aparato al Centro
de Servicio más cercano, junto con su recibo
de compra y un cheque de $3,00US por gas-
tos de envío y de manejo. Los residentes de
California sólo necesitan dar una prueba de
compra y deben llamar al 1-800-366-0937
para recibir instrucciones de envío. En aus-
encia del recibo de compra, el período de
garantía será de 12 meses a partir de la fecha
de fabricación.
CUALQUIER GARANTÍA, OBLIGACIÓN O
RESPONSABILIDAD IMPLÍCITAS, INCLUYENDO
PERO NO LIMITADAS A LA GARANTÍA
IMPLÍCITA DE COMERCIABILIDAD Y APTITUD
PARA UN PROPÓSITO ESPECÍFICO, ESTARÁN
LIMITADAS POR LOS 12 MESES DE LA
PRESENTE GARANTÍA ESCRITA. Algunos
Estados no permiten limitaciones sobre la
duración de una garantía implícita, de modo
que las limitaciones mencionadas pueden no
regir para usted.
CONAIR NO SERÁ RESPONSABLE EN
NINGÚN CASO POR ALGÚN DAÑO ESPECIAL,
INCIDENTAL O CONSECUENTE DEBIDO AL
INCUMPLIMIENTO DE ESTA O DE CUALQUIER
OTRA GARANTÍA, EXPRESA O IMPLÍCITA.
Algunos Estados no permiten la exclusión o
limitación de daños especiales, incidentales o
consecuentes, de modo que las limitaciones
mencionadas pueden no regir para usted.
Esta garantía le otorga derechos legales espe-
cíficos y usted puede tener otros derechos
que varían de un Estado a otro.
tanto, no deje el aparato desatendido durante
un tiempo prolongado mientras esté en
pausa. Si necesita dejar el aparato durante un
tiempo prolongado, apáguelo y desenchúfelo.
SISTEMA DE ENROLLADO DEL CABLE
Su aparato está dotado de un sistema
automático de enrollado del cable que per-
mite guardar el cable adentro del aparato.
Para que el aparato funcione, usted deberá
sacar el cable primero.
1. Para sacar el cable, coja éste por la clavija
y jálelo hasta que aparezca la marca roja.
No siga jalando después de que aparezca la
marca roja.
2. Cuando haya terminado, desenchufe el
cable.
3. Oprima el pedal de enrollado del cable con
el pie para guardar el cable.
PRECAUCIÓN: El cable puede enrollarse brus-
camente y lastimarlo. Manténgase lejos del
cable al enrollarlo.
LIMPIEZA Y MANTENIMIENTO
1. Apague (OFF) y desconecte el aparato.
2. Deje el aparato enfriar durante por lo
menos 30 minutos.
3. Desconecte el cable y guárdelo.
4. Desconecte el tubo.
5. Saque el tanque, abra la válvula y vacíe el
agua remanente. Deje el tanque secar al aire
libre.
6. Vacíe el agua que quedó en el depósito.
7. Baje el soporte telescópico.
8. Regrese el tanque en el depósito.
9. Guarde el aparato.
OTRAS NOTAS IMPORTANTES
El tubo puede gorgotear durante el uso. Esto
es un resultado normal de la condensación
acumulada en el tubo. Para corregir, levante
la boquilla hasta extender el tubo completa-
mente. El gorgoteo desaparecerá cuando el
agua haya bajado hasta el tanque.
LIMPIEZA DE LA CAL
Si el aparato produce menos vapor o deja
de producir vapor y luego empieza otra vez,
o si el indicador de agua baja se enciende
mientras queda agua en el tanque, debería
limpiar la cal acumulada en el aparato. Se
trata de eliminar los depósitos de calcio
que se encuentran en las partes metálicas
del aparato.
Para resultados óptimos, le recomenda-
mos que limpie la cal regularmente. La
frecuencia de la limpieza dependerá de la
dureza del agua local y de cuanto se usa el
aparato.
Mezcle 1/3 de vinagre blanco con 2/3
de agua. Vierta la mezcla en el tanque.
Coloque el tanque en el depósito y enci-
enda el aparato. Espere hasta que la mitad
del líquido (1 litro) haya desaparecido.
Apague y desconecte el aparato. Déjelo
enfriar durante 30 minutos, luego vacíe
el líquido remanente en el tanque y en el
depósito. Repita estos pasos 2 o 3 veces
hasta que el vapor regrese a lo normal.
Cada vez, use una mezcla nueva de vinagre
con agua. Antes de volver a usar el aparato
para desarrugar telas, repita estos pasos
con un tanque de agua fresca.
Centros de servicio:
Conair Corporation Conair Corporation
Service Department Service Department
150 Milford Road 7475 N. Glen Harbor Blvd.
East Windsor, NJ 08520 Glendale, AZ 85307
Para información sobre cualquier producto
de Conair, llame al 1-800-3-CONAIR o visite
http://www.conair.com
©2007 Conair Corporation
East Windsor, NJ 08520, Glendale, AZ 85307
06PC2296
Siempre mantenga la boquilla recta y
alta. Esto permitirá que la condensación
baje hacia el tanque.
Si mantiene la boquilla baja, la conden-
sación se acumulará en el tubo. Esto
causará gorgoteo y formará gotas en la
boquilla, las cuales pueden mojar la ropa.
Para evitar que esto ocurra mantenga la
boquilla alta y el tubo extendido.
CÓMO DESARRUGAR CORTINAS
Lave y seque las cortinas según las instruc-
ciones del fabricante. Cuelgue las cortinas y
aplique vapor una vez que están en su lugar.
PRECAUCIÓN: El tubo se volverá
muy caliente. Evite tocarlo.
Modelo GS29
®
Manual de
instrucciones
Para su seguridad y
para seguir disfrutando
de este producto
durante años, siempre
lea las instrucciones
cuidadosamente
antes de usarlo.
Vaporizadora
para tela
iónica
IB-7130A
IB-7130A
appliance off. Do not leave the appliance
unattended during an extended period of
time when using the steam pause. Turn
the appliance off if you need to leave it
unattended during a prolonged period.
06pc2296 gs29 IB.indd 206pc2296 gs29 IB.indd 2 10/14/08 10:35:29 AM10/14/08 10:35:29 AM