SKU 94702 For technical questions please call 1-800-444-3353. Page 8
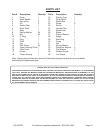
When unpacking your 20 Gallon Parts Washer, check to make sure that all parts listed in the parts
list on page 10 are included. If any parts are missing or broken, please call HARBOR FREIGHT
TOOLS at 1-800-444-3353. It is important that you read the entire manual to become familiar with
the product BEFORE you operate and use the Parts Washer.
Unpacking
Assembly
Your Parts Washer will require complete assembly before use. It is important that you read the
entire manual to become familiar with the product BEFORE you set up and use the Parts Washer.
1. Set the Body (7) upside down onto your work surface. Be careful to avoid breaking or
scratching the Cover (1).
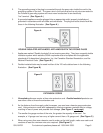
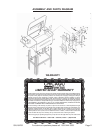
2. Attach each of the four Legs (13) to the Shelf (12). Secure Legs (13) to the Shelf (12) with
two Pan Screws (14), two Washers (8), and two Nuts (9) through each Leg (13) and into the
Shelf (12)-see Figure 1.
Leg (13)
Shelf (12)
Figure 1- Legs to Shelf
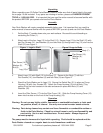
3. Attach Legs (13) with Shelf (12) to the Body (7). Secure to the Body (7) with four
Pan Screws (14), four Washers (8) and four Nuts (9)-see Figure 2.
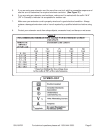
4. Stand the Parts Washer on its Legs (13). Secure the Switch Box (21) in place on Pump
Housing (18) with four Screws (22). Attach the Pump Housing (18) to the Body (7) by
setting it into the hole located on the side and secure in place with Nuts (31) and
Washers (32).
5. Insert the Filter Screen (17) into the Filter Cover (16 ). Slide the Pump Housing Cover (15)
down into the slots on the front of the Pump Housing (18).
Operation
Warning: Do not use any highly volatile, flammable or combustible solvents, or fuels such
as gasoline, diesel, or toluene. Use only non-corrosive water based solvents.
Warning: Parts being cleaned may contain and leave flammable or combustible residue or
fluids in the Parts Washer. Check for solvent fumes to verify nonflammability and
non-toxicity. Use in a well ventilated area. Do not smoke. Always dispose of
solvents properly.
The pump must be immersed in liquid while operating. Fluid should be replaced and the
Parts Washer cleaned on a regular basis to avoid hazardous conditions.
Pan Screw (14),
Washer (8),
Nut (9)
Pan Screw (14),
Washer (8),
Nut (9)
Body (7)
Figure 2-Legs to Body


