


Size: 19.685" x 17.5"
Este producto puede variar ligeramente del que aparece ilustrado.
Product may vary slightly from what is illustrated.
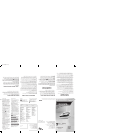
1. Water-fill hole
2. Fabric-select dial
- Temperature
- Smart Steam
™
system
3. Pivoting cord
4. Heel rest
5. Fabric guide
6. Water tank
7. Soleplate nonstick-sole plate
1. Orificio de llenado de agua
2. Selector de tejidos
- Temperatura
- Sistema de vapor Smart Steam
™
3. Cable giratorio
4. Talón de descanso
5. Guía de tejidos
6. Tanque de agua
7. Suela anti-herente
ቢ
ባ
ቤ
ብ
ቦ
ቧ
ቨ
ቢ
ባ
ቤ
ብ
ቦ
ቧ
ቨ
Como usar
Este aparato es solamente para uso doméstico.
Antes de usar
Importante: Retire toda etiqueta o calcomanía adherida al cuerpo o a la suela de
la plancha.
Para óptimo rendimiento, deje la plancha reposar por 90 segundos
antes de comenzar a planchar.
Nota: Utilice agua de la llave para llenar el tanque de la plancha. No se debe de
utilizar agua procesada por sistemas de ablandamiento.
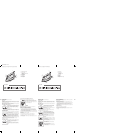
PARA LLENAR EL TANQUE DEL AGUA
1. Incline la plancha y con la ayuda de una taza limpia
de medir, vierta agua adentro del orificio (A) hasta
alcanzar la marca del nivel de llenado MAX que
aparece en el tanque. Llene de nuevo cuando sea
necesario.
2. Enchufe la plancha.
Consejo: Si no está seguro de la fibra del tejido, se recomienda planchar una
superficie pequeña por adentro de la prenda (una costura o un ruedo) antes
de comenzar a planchar.
PLANCHADO AL VAPOR
El sistema Smart Steam™ produce vapor automáticamente cuando el selector
de temperatura está entre la posición 4 y 6 (B).
1. Gire el selector de tejidos al ajuste apropiado (entre
el 4 y el 6), según el tejido de la prenda (B). Consulte
la guía de tejidos y lea la etiqueta de la prenda que
desea planchar para determinar el tipo de tejido.
Asegúrese de que haya agua en el tanque. El vapor se
apaga automáticamente entre la posición 0 y 3.
2. Al terminar de planchar, ajuste el selector de tejido al nivel más bajo, pase
el selector a la posición 0 y desconecte la plancha.
Importante: Siempre coloque la plancha sobre su talón cuando esté
encendida pero no en uso.
PLANCHADO EN SECO
1. Gire el selector de temperaturas a cualquiera de las
posiciones 1, 2 o 3 (SECO) para planchar sin vapor
(C). El sistema Smart Steam™ se apagará
automaticamente.
2. Para planchar en seco a temperaturas más elevadas,
vacíe el tanque de agua para evitar que produzca
vapor.
B
C
A
How to Use
This appliance is intended for household use only.
GETTING STARTED
Important:
Remove any labels, stickers or tags attached to the body or soleplate
of the iron. For optimum performance, let the iron stand for 90 seconds before
beginning to iron.
Note: Use ordinary tap water for ironing. Do not use water processed through a
home softening system.
FILLING WATER TANK
1.
Tilt the iron and using a clean cup, pour water into
water-fill hole (A) until the water reaches the MAX
mark on the water tank. Refill as needed.
2.
Plug in the iron.
Tip: If unsure of a garment’s fiber, test a small area (on an
inside seam or hem) before ironing.
STEAM IRONING
The Smart Steam™ system automatically produces steam when you turn the
fabric-select dial between settings 4 and 6 (B).
1.
Turn the fabric-select dial to appropriate setting
(between 4 and 6) for your fabric (B).
See fabric guide on the water tank and read garment’s
label to help you determine fabric type. Be sure there is
water in the reservoir. Steam is automatically turned off
between settings 0 and 3.
2.
When finished ironing, turn the fabric-select dial to 0 and unplug the iron.
Important: Always stand the iron on its heel rest when powered on but not
in use.
DRY IRONING
1.
Turn the fabric-select dial to setting 1, 2, or 3 (DRY) to
iron without steam (C). The Smart Steam™ system will
automatically turn off.
2.
To dry iron at higher settings, empty the water from the
reservoir to prevent steaming.
EMPTYING WATER TANK
Note: It is not necessary to empty the water after each
use.
1.
Unplug the iron and let it cool.
2.
If you want to empty the water, hold the iron over a
sink with the tip pointing down. Water will empty out
the water-fill hole (D).
COMO VACIAR EL TANQUE DESPUÉS DE PLANCHAR
Nota: No es necesario vaciar el tanque después de cada uso.
1. Desconecte la plancha y permita que se enfríe.
2. Para vaciar el agua, sujete la plancha con la punta
hacia abajo sobre un lavadero. El agua sale a través
del orificio de llenado (D).
Cuidado y limpieza
Este producto no contiene piezas reparables por el consumidor. Para
servicio, acuda a personal de asistencia calificado.
LIMPIEZA DE LAS SUPERFICIES EXTERIORES
1. Asegúrese que la plancha se encuentre desconectada y que se haya
enfriado completamente. Limpie la suela y demás superficies exteriores
con un paño suave humedecido con agua y con un detergente suave.
Nunca utilice abrasivos, limpiadores fuertes, vinagre ni esponjas abrasivas
que pudiesen rallar o descolorar la plancha.
2. Después de limpiar la plancha, planche a vapor sobre un paño viejo para
eliminar cualquier residuo acumulado.
ALMACENAJE
1. Desconecte la plancha y permita que se enfríe completamente.
2. Asegúrese que el selector se encuentre ajustado a la posición 0.
3. Coloque la plancha verticalmente sobre el talón de descanso para evitar
que la suela gotee.
Care and Cleaning
This product contains no user serviceable parts. Refer service to qualified
service personnel.
CLEANING OUTSIDE SURFACES
1. Make sure iron is unplugged and has cooled completely. Wipe the
soleplate and outer surfaces with a soft cloth dampened with water and
mild household detergent. Never use abrasives, heavy-duty cleansers,
vinegar or scouring pads that may scratch or discolor the iron.
2. After cleaning, steam iron over an old cloth to remove any residue from
the steam vents.
STORING YOUR IRON
1. Unplug the iron and let it cool completely.
2. Check that the fabric-select dial is set to 0.
3. Store iron on its heel rest. Storing iron on its soleplate can cause leaks
or damage.
D
B
C
A
D
Guía de tejidos Fabric guide