


10
GB
Transit packing
After removing the packing, check the appliance for damage.
If you have any doubts do not use the washer and call a
qualified technician. Keep the packaging components (plastic
bags, polyester foam, nails etc.) out of the reach of children
since they could be dangerous. The interior of the washer-
dryer, has an oscillating unit which is fixed on the back by 3
screws during transport (figure 3). Before starting up the
washer-dryer, release the unit, by unscrewing the 3 screws.
Seal the screw holes with the plastic plugs supplied with the
appliance.
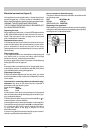
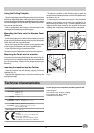
Levelling
The machine must be level in order to operate properly, To
level the machine, simply regulate the adjustable feet (fig. 4);
the angle of inclination (measured on the top of the machine)
must not exceed 2 degrees. If the washer-dryer is installed on
a carpeted floor, check that there is sufficient ventilation space
between the floor and the bottom of the machine.
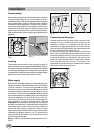
Water supply
Both hot and cold water supplies are preferable and they
should be between 34.5kN/m²(5lb/in²) and 1034.2kN/m²
(150lb/in²) pressure. The hose having the red end fitting
should be encountered between the hot supply and the
threaded connection adjacent to the letter H on the rear of
the machine. The hose having the white end fittings should
be connected between the cold supply and the threaded
connection adjacent to the letter C on the rear of the ma-
chine (see fig. 5). Remember to insert a sealing washer at
each connection to ensure watertight joints. Do not
overtighten the connections by using tools -hand tight is
sufficient to prevent leaks. It is generally more convenient to
have these supplies away from the sink taps. Where no
suitable hot water supply is available or it does not meet
these requirements, both inlet hoses may be connected to a
cold supply by using two taps etc., or a «T» junction on the
plumbing (see fig. 6) however, use of cold water only will
increase programme times.
Note: the maximum temperature should not exceed 70°C
(158°F).
Installation
Fig. 5 Fig. 6
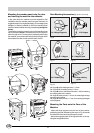
Connecting the drain pipe
Connect the drain hose to a drain (with a minimum inner
diameter of 4 cm), avoiding excessive crimping or the
formation of elbows. It is important that the hose be
positioned at a height greater than 60 cm. If this is not the
case, the hose must be fastened to the hook located on the
top part of the back of the machine (fig. 7).
If a drain pipe coming from the wall is used to connect the
hose, have a qualified plumber/technician check to make
sure that it functions properly. If your home is on the top of
an apartment building or condominium, the drain may be
subject to a siphoning effect which results in the machine
filling and draining continuously. To eliminate this
inconvenience, special valves are available on the market
which can be fitted to the drain hose.
Fig. 3
Fig. 4
Fig. 7